This post may contain affiliate links. Read our disclosure policy.
I’m very excited to share this recipe for Red Velvet Cake with Cream Cheese Frosting with you today, but first, I have something to say that may shock you…
I’m not a huge fan of red velvet.
I know it’s tremendously popular. But most red velvet type desserts that I’ve tasted have always been bland, dry, or sickeningly sweet. Plus, there can never be enough chocolate in my book so the tease of cocoa in red velvet cake kind of angers me if I’m being honest!
I’m happy to say I created a fabulous recipe that even I enjoy eating. This doesn’t mean I plan on giving up my chocolate cake anytime soon, but now I have a go-to red velvet cake recipe.
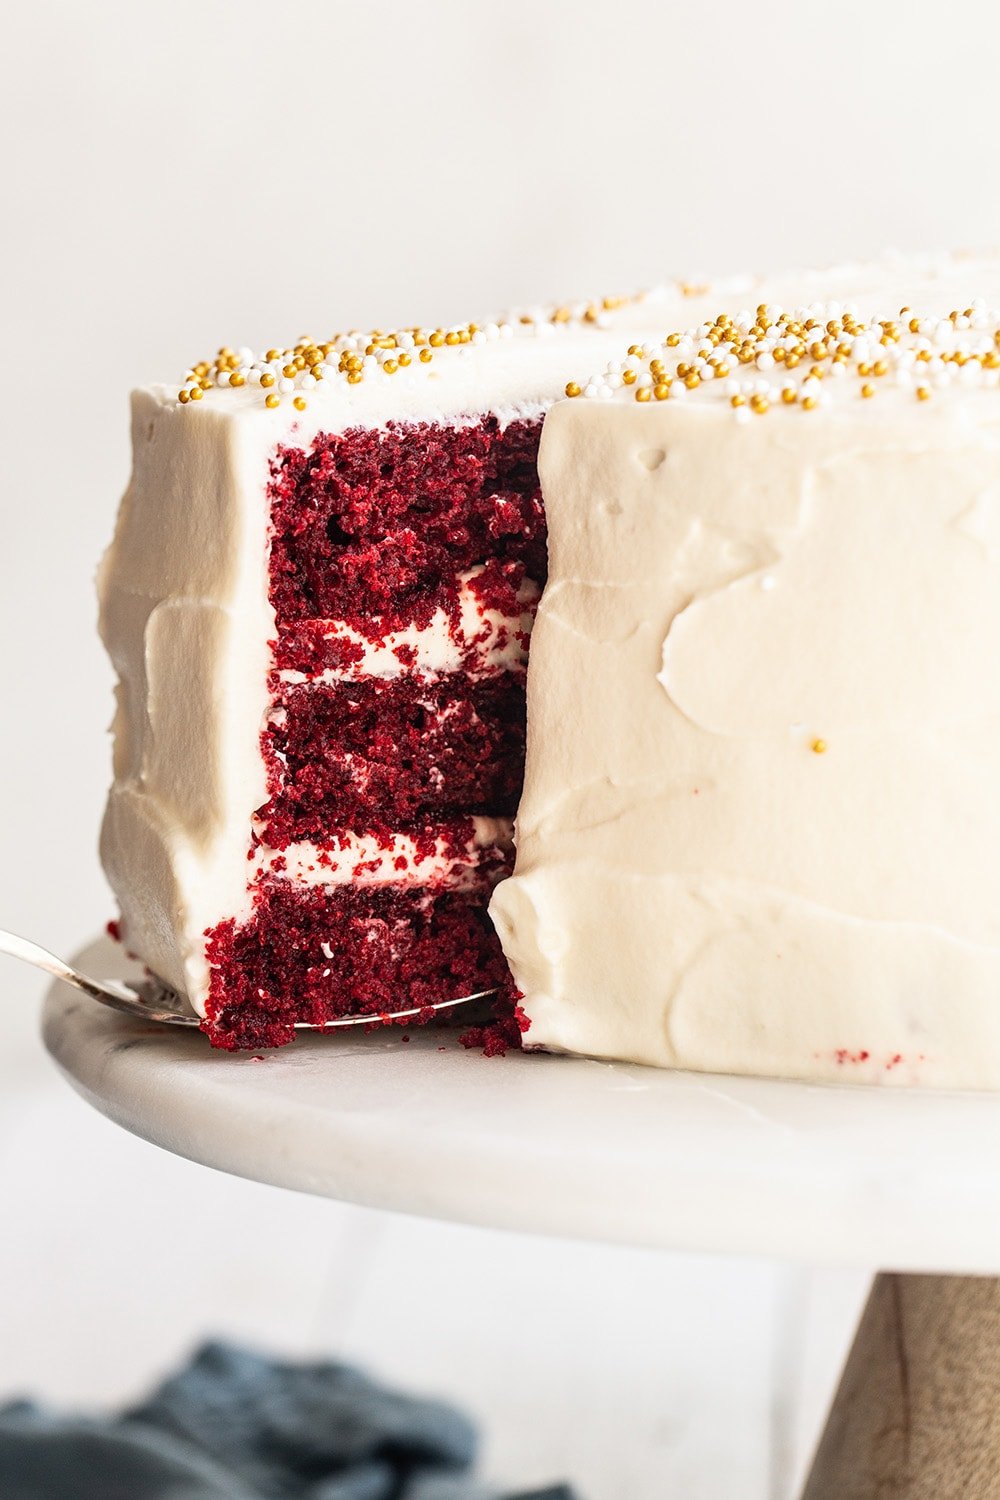
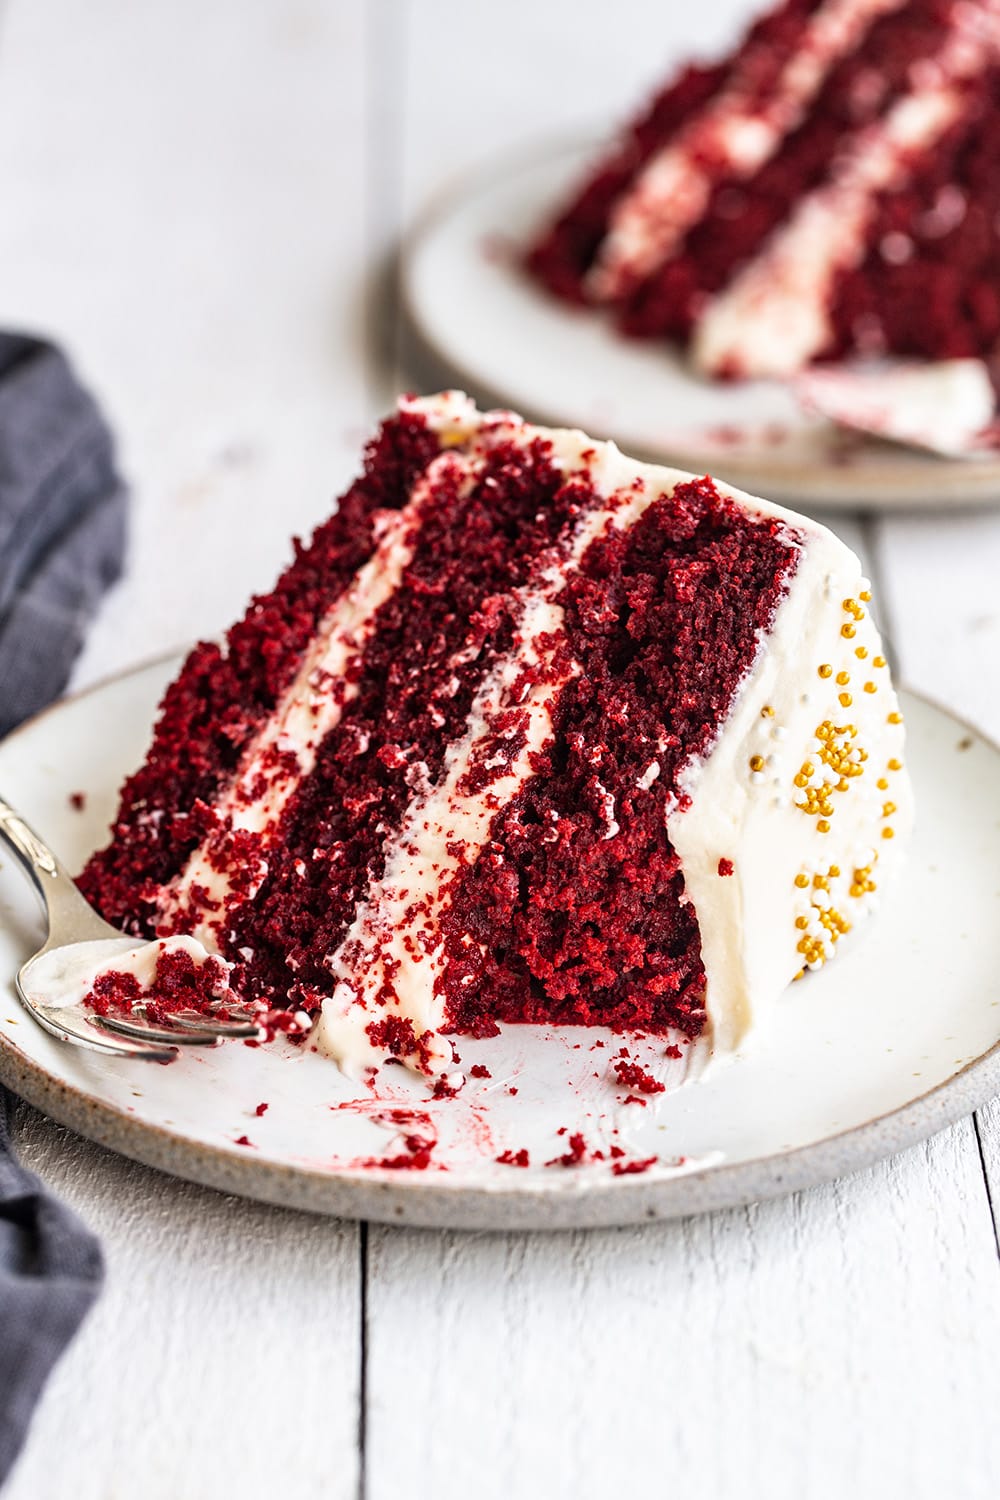
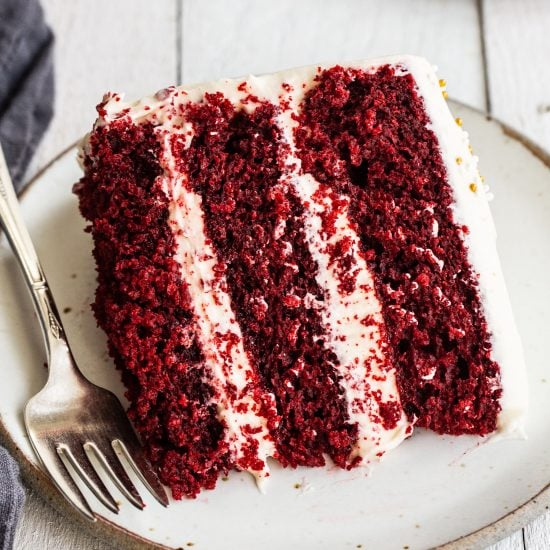
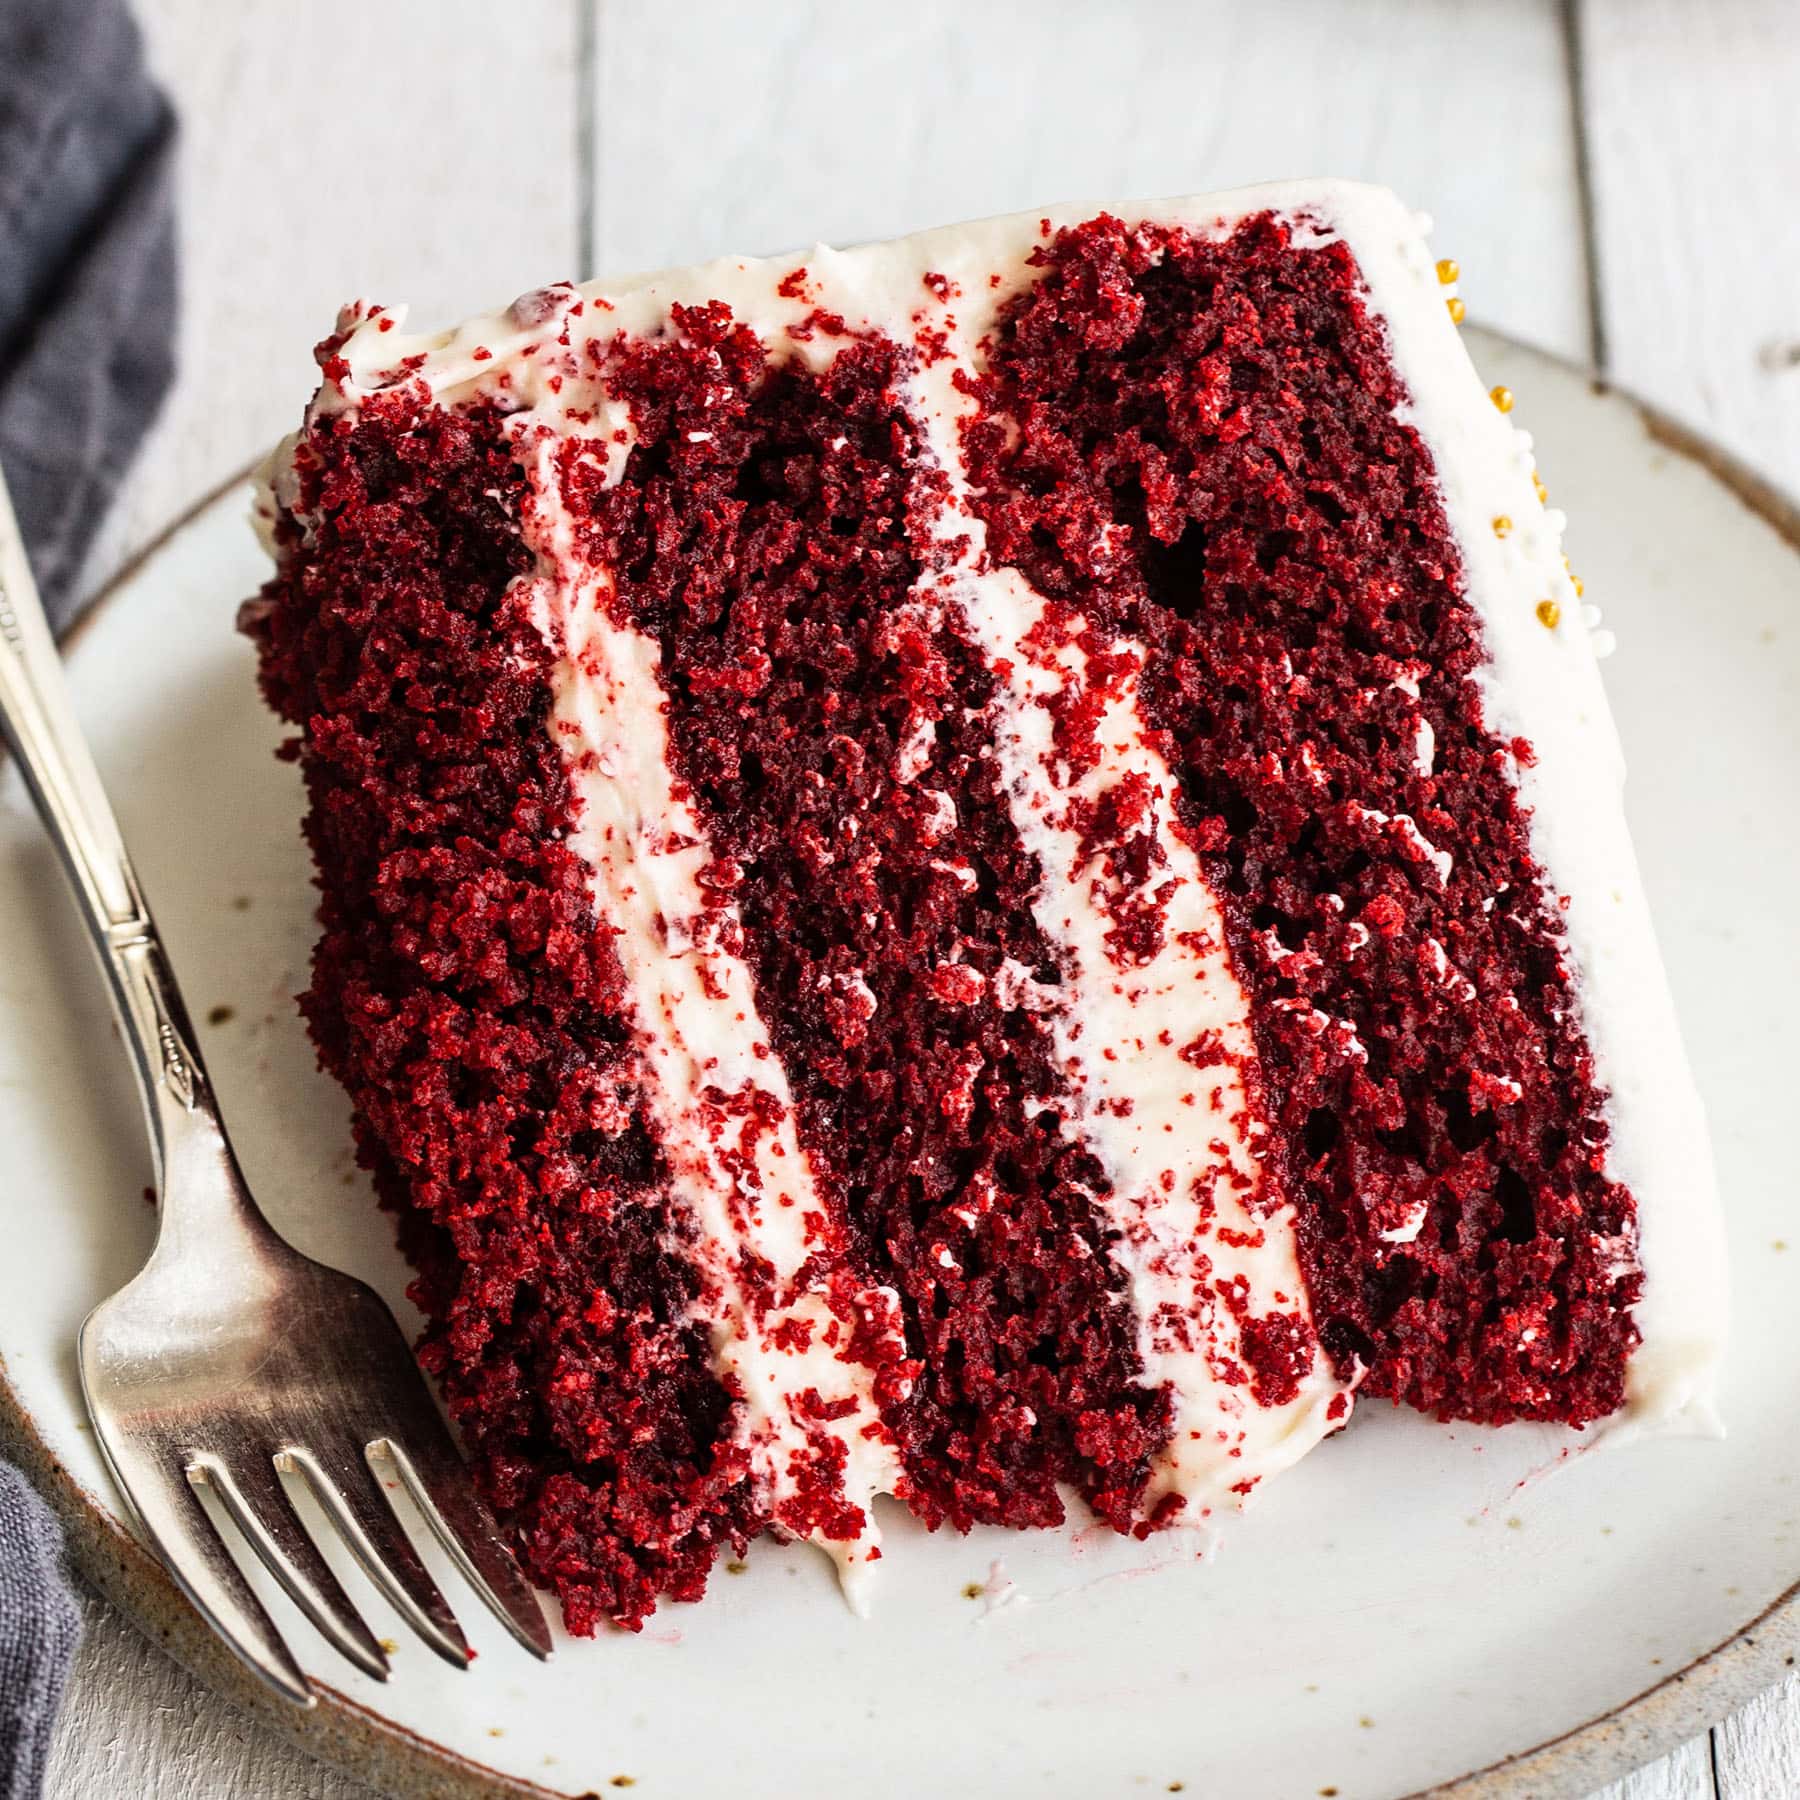
This cake is absolutely perfect for birthdays, Valentine’s Day, 4th of July, Christmas, or any time the red velvet flavor craving strikes. I wanted to make this recipe super easy, so you don’t need any cake flour!
How to Make Red Velvet Cake
What is Red Velvet Cake? Is Red Velvet Cake Just a Chocolate Cake with Red Food Coloring?
Red Velvet Cake is a popular dish in the Southern United States. Although traditional recipes vary from modern ones, it’s now typically made with a small amount of cocoa powder, buttermilk, vinegar, and red food coloring as staple ingredients. Its name references both its color as well as its soft, velvety smooth texture. It’s not really a chocolate cake, but simply has a hint of chocolate flavor.
Best Red Velvet Cake Baking Tip: Use ROOM TEMPERATURE Ingredients!
With the exception of the hot coffee / hot water, you really want to make sure your eggs and buttermilk are brought completely to room temperature. This will help to form a uniform and cohesive batter and cake.
Why Use Hot Coffee or Hot Water in a Cake Recipe?
Just like in my Best Chocolate Cake recipe, this Red Velvet Cake uses hot coffee as a staple ingredient. If you don’t have coffee, you can just use hot water. The coffee does help to enhance that hint of chocolate flavor, and the heat of the liquid helps to ‘bloom’ the cocoa, bringing out its full flavor.
What if I Don’t Have Buttermilk?
Buttermilk works best in this recipe to provide a rich and tender cake. It is traditional (along with the vinegar too!). You can learn more about the science of buttermilk in my Buttermilk 101 article here. I would not recommend using a buttermilk substitute. If you must, use whole milk instead but note the cake’s final taste and texture will be different.
What Kind of Food Coloring is Best for Red Velvet Cake?
I would highly recommend using gel food coloring for red velvet cake and not liquid or ‘natural’ food coloring. You’ll need at least 3 teaspoons, possibly more depending on the brand, so don’t buy just one small bottle (0.75 oz). Opt for a larger bottle or buy two smaller ones. I like Americolor or Chefmaster gel food coloring.
Overview Instructions of How to Make Red Velvet Cake:
Make the Red Velvet Cake Batter:
- Prepare three 8-inch round cake pans with parchment rounds, spraying parchment and sides of pans generously with nonstick cooking spray.
- Whisk together the hot coffee and cocoa powder, setting aside for 5 minutes. Whisk in a separate medium bowl the dry ingredients of the flour, baking powder, baking soda, salt, and cinnamon.
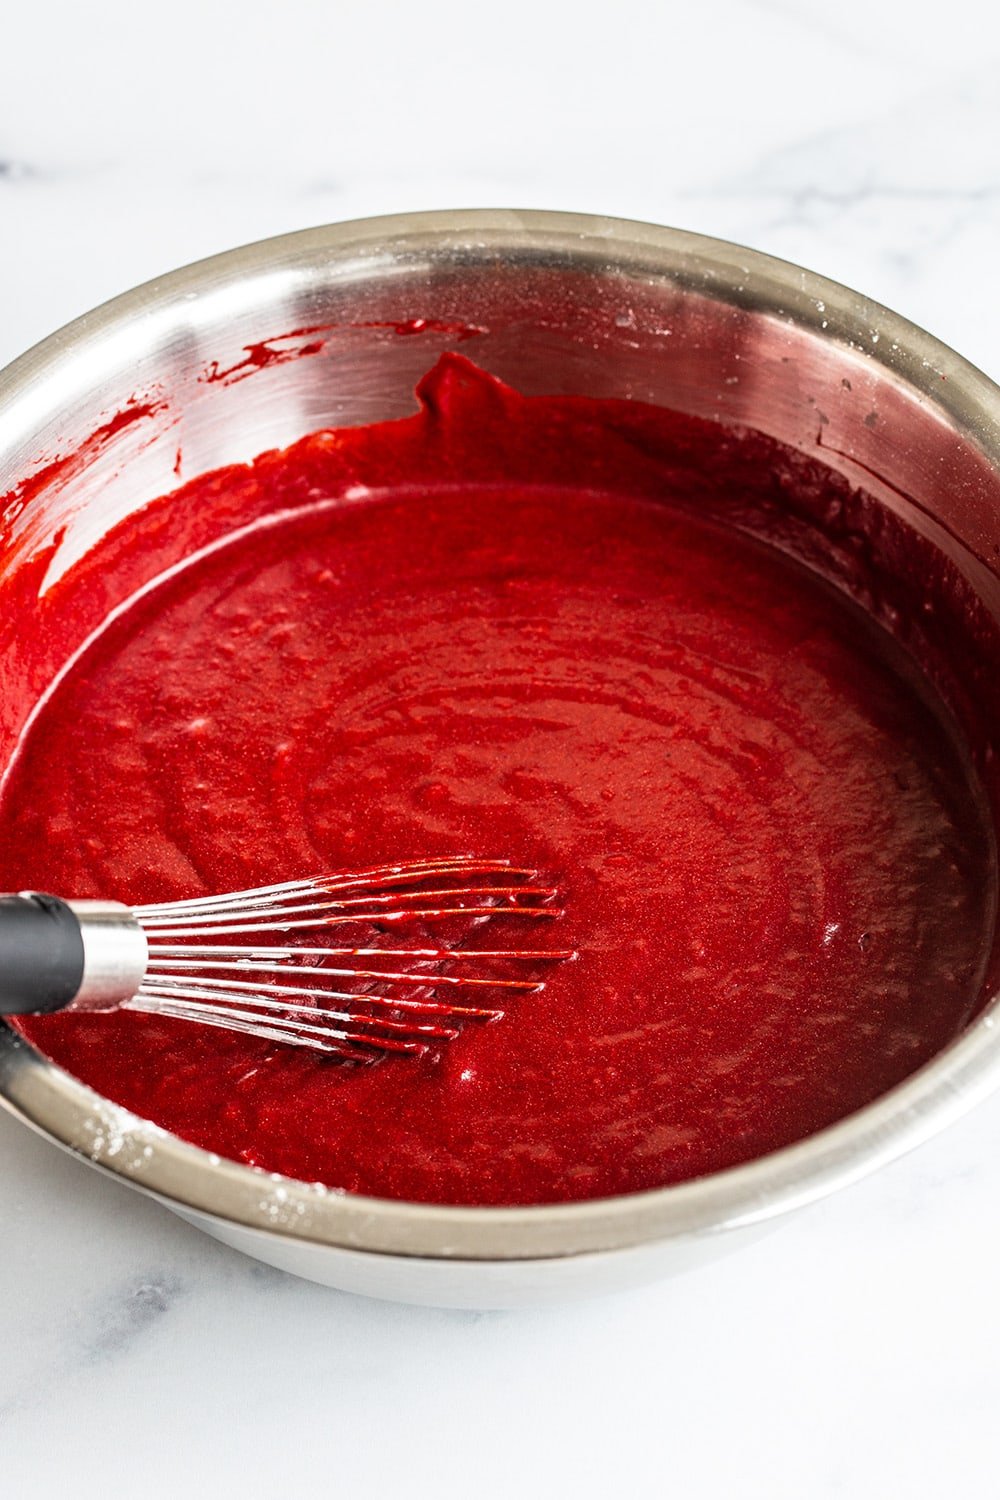
- In a large bowl, whisk together the sugar, vegetable oil, and melted butter. Add in eggs and egg yolk, whisking until well combined. Add buttermilk, vanilla, and food coloring, and whisk to combine.
- Whisk in the vinegar and coffee mixture. Sift the flour mixture in thirds into the wet ingredients, folding until incorporated.
- Pour the batter evenly between your prepared pans. Tap the bottoms against the counter several times.
- Bake at 325°F for 25-30 minutes, or until a cake tester comes out clean.
- Place the cake pans on a cooling rack. Once cool to the touch, run a thin knife around the edges to loosen the cake, and invert onto the cooling racks. Cool completely.
Make the Cream Cheese Icing:
- Using an electric mixer fitted with the paddle attachment (or a hand mixer), beat the cream cheese and butter on medium-high speed until light, creamy, and smooth.
- Scrape down the sides and bottom of the bowl to ensure no clumps remain.
- Add vanilla and beat until combined.
- Gradually add in the confectioners’ sugar on low speed and beat until the buttercream frosting is fluffy.
Assemble:
- Lay one of the cake layers flat-side up on a cake plate or pedestal.
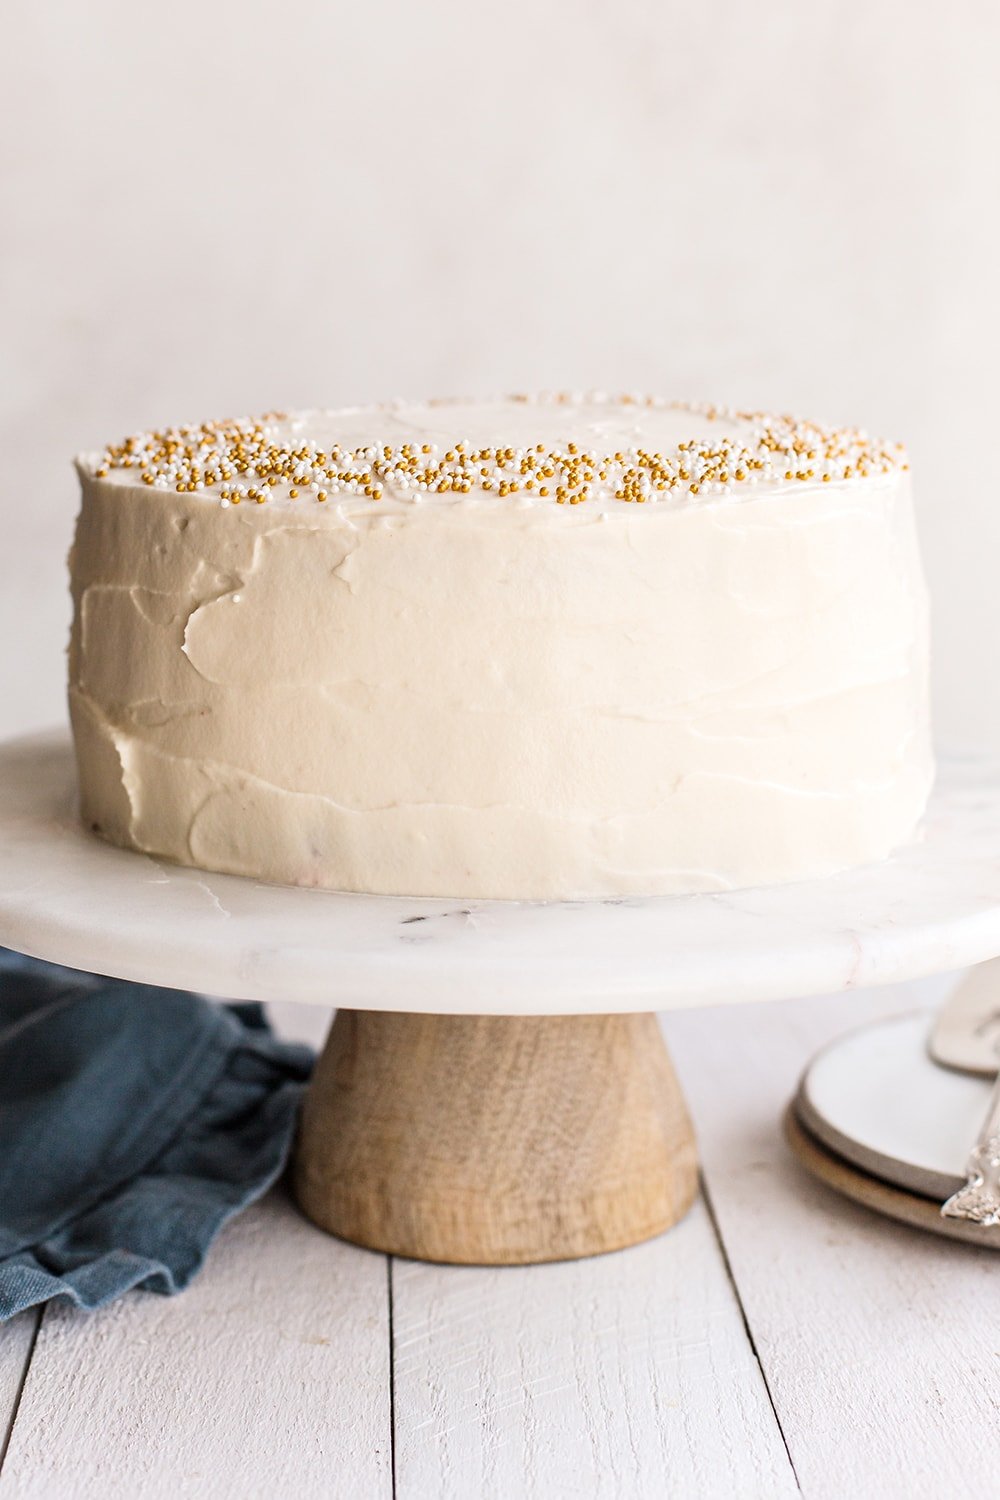
- Use about a third of the frosting to fill the bottom cake layer, then top with the second cake layer and repeat. Place the final cake layer flat-side up. Use the rest of the frosting to ice the sides and top of the cake, using an offset spatula to smooth the icing.
- Refrigerate until ready to serve!
What Kind of Baking Pans to Use for Red Velvet Cake?
Use three 8-inch cake pans for this recipe. My favorite brand of cake pan is Fat Daddio’s, they bake evenly and wash up easily. Don’t use darkly coated nonstick cake pans or you may end up with dry or overbaked cake edges.
Can I Use 9-inch Cake Pans Instead?
Although this recipe was specifically designed for 8-inch cake pans, you may be able to bake in two 9-inch cake pans. Fill each 3/4 full and increase the baking time by about 5 to 10 minutes because there will be more batter in each pan.
How to Prevent Red Velvet Cake from Sticking:
Be sure to line each cake pan with parchment rounds. I like these ones which have tabs to easily pull out the baked cake layers. Spray the sides of the pans and the parchment generously with nonstick cooking spray.
What Kind of Frosting is Best with Red Velvet Cake?
Cream cheese frosting is the classic choice for red velvet cake! Its tangy flavor complements the sweetness of the cake layers. If you’d prefer something more sturdy or want to make special cake decorations, opt for my Best Buttercream instead.
Favorite Tools for Layer Cakes:
Can I Make Red Velvet Cupcakes Instead?
Although this recipe was developed for cake layers, you can turn it into cupcakes in a pinch. Divide the batter among about 24 cupcake cavities, filling each 3/4 full, and bake for 17 to 20 minutes.
How to Make Cake Ahead of Time & How to Freeze Red Velvet Cake:
You can wrap unfrosted un-cut cooled cake layers completely in several layers of plastic wrap. Place inside a freezer bag or airtight container. Store at room temperature for up to 4 days or freeze for up to 2 months. Defrost overnight in the fridge (do not thaw at room temperature or you will end up with mushy cake).
How to Store Homemade Red Velvet Cake Recipe:
Cover with a cake keeper and store at room temperature for up to 6 hours, then refrigerate for up to 3 days.
More Red Velvet Recipes:
For the cake:
-
1/2
cup
of plain hot coffee or boiling water
-
1/4
cup
(21 grams) unsweetened natural cocoa powder
-
2 1/4
cups
(279 grams) all-purpose flour
-
1/2
teaspoon
baking powder
-
1
teaspoon
baking soda
-
1
teaspoon
fine sea salt
-
1/4
teaspoon
ground cinnamon,
optional
-
2
cups
(400 grams) granulated sugar
-
1/2
cup
(109 grams) fresh vegetable oil
-
1
stick (113 grams) unsalted butter,
melted
-
2
large eggs,
at room temperature
-
1
large egg yolk,
at room temperature
-
1
cup
buttermilk,
at room temperature
-
2
teaspoons
vanilla extract
-
3
teaspoons
red gel food coloring,
plus more if needed*
-
1
teaspoon
distilled white vinegar
For the cream cheese frosting:
-
16
ounces
(454 grams) cream cheese,
at room temperature
-
2
sticks (227 grams) unsalted butter,
at room temperature
-
2
teaspoons
vanilla extract
-
4
cups
(500 grams) powdered sugar,
sifted
For the cake:
-
Preheat the oven to 325°F. Line three 8-inch cake pans with parchment rounds and spray parchment and sides of pans generously with nonstick cooking spray.
-
In a glass measuring cup, whisk the hot coffee and cocoa powder. Cover and let stand for 5 minutes.
-
In a medium mixing bowl, whisk together the flour, baking powder, baking soda, salt, and cinnamon.
-
In a large mixing bowl, whisk together the sugar, vegetable oil, and melted butter. Add in the eggs and yolk and whisk for twenty seconds, or until very well combined. Add in the buttermilk, vanilla and food coloring and whisk to combine. Whisk in the vinegar and coffee mixture. Using a fine mesh sieve, sift the flour mixture into the batter in three additions, whisking until each addition is incorporated.
-
Divide the batter equally between the prepared pans. Tap the bottoms of the pans against the counter several times to release any air bubbles.
-
Bake for 25 to 30 minutes, or until a cake tester or toothpick comes out clean. It’s normal for the cake to look slightly spongy on top. Place the cake pans on cooling racks. When the pans are cool enough to touch, run a thin knife around the edges of the pans to loosen the cakes. Invert onto the wire racks. Let cool completely.
For the frosting:
-
In the bowl of a stand mixer fitted with the paddle attachment, beat the cream cheese and butter on medium-high speed until very light, creamy, and smooth. Scrape down the bottom and sides of the bowl to ensure no clumps remain. Add in the vanilla and beat until combined. On low speed, gradually add in the sugar and beat until fluffy, about 3 minutes. If the frosting is too thick, add a splash of milk or cream. If it’s too thin, add more sifted powdered sugar.
To assemble:
-
Lay one cake layer flat-side up on a cake plate or pedestal. Tuck in strips of baking paper under the cake edges to keep the plate clean.
-
Use about a third of the frosting to fill the bottom cake layer, then top with the second cake layer and repeat. Place the final cake layer flat-side up. Use the rest of the frosting to ice the whole cake. Serve.
-
The cake can be covered and stored in the refrigerator for up to 3 days.
*Don’t skimp on the food coloring. You will likely need more than one bottle if using a small container. I prefer Americolor or Chefmaster.
This post was originally published in 2013 and updated in 2022 with recipe improvements and new photos. Photos by Ashley McLaughlin.
February Baking Challenge
This recipe was the February 2022 selection for our monthly baking challenge! Every month you can join the challenge by baking the recipe and snapping a photo for a chance to win prizes! Learn more about my monthly baking challenges here. Check out some of the cakes (and cupcakes!) baked by you guys:


made this for my sister visiting from Italy (I am in the uk) and it was an absolute success. it was delicious. soft but had some density… just perfect. the only thing that I will do differently next time is the cream cheese frosting. I followed the recipe exactly but the frosting came out very liquid, after researching the Internet I discovered that the cream cheese you get in the UK is much softer. I used Philadelphia. i tried making a small batch (which we ate on the side of the cake 😉 and whisked the butter with the sugar well and only after is all whipped I added the cold cream cheese. the result is an amazing cream cheese that hold its shape 🙂 100% my go to red velvet cake
Deliciously moist, rich cake! Made the recipe (almost) as written, with the exception of using more butter in place of the vegetable oil (was out of it). It still came out great with a moist, tender crumb. I will definitely make again, but the coffee and cinnamon took a way from the traditional red velvet flavor, in my opinion, so I’ll leave those out next time. Thanks for such a great recipe!
I made this cake for my coworkers and had so much high praise! one doctor even went as far as to say that this cake recipe is the only cake that has held a candle to his old friends cake (pastry chef) sooooo many compliments!!!
I have tried so many red velvet recipes including the one that is considered number one by kitchn bake-off. This is by far my favorite. Very moist and perfect amount of sweetness and chocolate. Made 1/2 the recipe into cupcakes (made about 15 cupcakes). Baked for 15-17 min.
Awesome flavor ! I made mini cupcakes and bake for only 10mins got about 90
I also made the full recipe for frosting should of made only half .froze the rest of it…Yummo
OMG this is the best cake I’ve ever made! everyone loved it and ate it in 2 days in my family! So delicious, thank you!
What would be the cooking time for a 9×13 cake
Hi Shawna! Other readers have successfully made this recipe in a 9×13-inch pan, but as we have not tested this ourselves, we cannot say exactly how long this will take to bake. Let us know how it goes if you give this a try 🙂
Have you tried this using a sheet pan? I would like to flip out, create a double layer 1/2 sheet pan cake to decorate for a birthday.
Hi Trista! We have not tested this cake in any type of sheet pan, but other readers have successfully made this recipe in a 9×13-inch pan. Let us know how it goes if you give this a try!
Hi, how can this be made using a Bundt pan/ pound cake version? Is it possible?
Thanks
Hi Lisa! We haven’t tried that, and I’m not sure how well it would work. Bundt cakes are typically more on the heavy/dense side, whereas this cake was designed to be super light and fluffy. If you don’t feel like experimenting, give this recipe a try in three 8-inch round cake pans, or try one of Tessa’s bundt cake recipes 🙂 Happy baking!
Can I make mini cupcakes with this recipe? If so how long approximately to I bake?
Hi Barb! We haven’t tried that, so I can’t say for sure! Let us know how it goes if you give that a try.
Can I bake the cake the day before adding the cream cheese frosting?
Hi Markéta! Yes, you can make the cake ahead – check out Tessa’s tips for this in the pink tip box, above the recipe!
Have you (or has anyone reading this) made this recipe with chocolate chips or chocolate chunks added to the batter? Would love to hear the right amount to add and how that worked out. Thanks!
Hi Ashlea! Sorry, we haven’t tried that! Let us know if you give it a try 🙂
I just want to say this cake is worth dirtying dishes❤️ so delicious and so spongey and so perfect! Made this tonight for my brother’s bday tomorrow
Hi!! I love that Cake! but, Can I moisten the cake as with other cakes? That is, prepare a syrup with a liquor, kirsch or amaretto..?
Hi Paola! We haven’t tried that, so I can’t say for sure! Let us know how it goes if you give that a try 🙂
Am I able to use regular brewed coffee ?
Hi Clara! Yes, hot freshly-brewed coffee is perfect. Let us know what you think of this cake once you’ve given it a try 🙂
Can I use 2 pcs 6”pans instead to have that junior size look with a bit thicker 2 layer cake? Will the texture different?
Hi Joan! This recipe was designed for three 8-inch cake pans; however, you’re welcome to experiment with 6-inch pans. Just know that you’ll have leftover batter, but the texture shouldn’t be different. Let us know how it goes if you give it a try!
Wow, this is a great recipe. The cake has a great texture, soft and light but has some density, just how I like it. I made it exactly as written but next time I wouldn’t put as much red food color in, it was pretty bright red and didn’t think it needed as much. Only my preference. Other than that don’t change a thing.
Hi there, am I able to use espresso powder in this recipe vs coffee? Or, do you think it will be too strong?
Hi Kristin! You could use espresso powder (dissolved in water) to make the coffee portion, sure! The cake might have a slightly stronger coffee flavor overall, but unless you have some non-coffee drinkers, I don’t think anyone would mind! Let us know what you think of this cake once you’ve given it a try 🙂
Hi there, wondering if you have the measurements of all the ingredients in grams? I want to convert the recipe for 10” cakes. Not sure if anyone has asked this or done it already?
Hi Erika! Everything in this recipe is already listed in both volume and weight measurement, in grams. We cannot list the weights of the teaspoon measurements, as those measurements are too small for most kitchen scales to accurately measure. Grab a set of measuring spoons online and you’ll be all set 🙂 We have not made this cake as 10-inch cakes, but in the pink tip box, you’ll find adjustments for 9-inch pans. Happy baking 🙂
I just used this recipe for cupcakes and followed the ingredients exactly. I ended up baking the cupcakes for ~28 minutes at 325. The flavor is perfect.. I really enjoy the hint of chocolate.
Unfortunately the cupcakes didn’t bake up nicely.. the center never rose, slightly greasy, and after cooling all stuck to the liners.
Any advice on what went wrong?
Hi Jenn! So glad to hear that you enjoyed this recipe, but I’m sorry to hear that your cupcakes didn’t rise, and stick to the muffin liners. There are several reasons why this may have happened, and Tessa actually just published an article about How to Prevent Cupcakes & Cakes From Sinking here. She also has an article about How to Prevent Cupcake Liners From Sticking. I hope something in these articles helps, and I hope you give this recipe another try sometime – it really is so delicious! Happy baking!
Hi can you use white vinegar if you cannot find distilled? Also is the coffee you use instant Nescafé or espresso machine coffee?
Thanks
Hi Christina! Distilled white vinegar is needed here for its acidity and will help leaven this cake, giving it lightness and rise. It should be available with the vinegars in your local grocery store. Even if it’s just called White Vinegar, check the ingredients – it may say “distilled white vinegar” there, even if it’s not labelled as such on the front. Other types of white vinegar are often meant for cleaning, so you want to avoid those! As for the coffee, either way will work just fine. Espresso machine coffee will be a stronger, richer flavor, so keep that in mind. I hope that helps! Let us know what you think once you’ve given this cake a try 🙂
Thank you so much for the reply I will let you know how it turns out on Sunday . I have found one that says double strength vinegar 8% acidity I hope it will do ☺️
It was my first time baking a red velvet and it came out like magic! I loved it and my family did too. Thank you very much..
Can you use 8 inch foil cake pans? It’s hard to find 8 inch pans. Just wondering if you’ve ever used to foil pan?
Hi Connie! We haven’t tested this recipe using foil cake pans, but I’d imagine they’d work fine, just make sure you still use parchment paper and grease the pans well so the cakes don’t stick. While we recommend using these 8×3-inch cake pans, this specific cake recipe doesn’t rise too much, so a slightly shorter pan should work ok – I’d suggest placing the pans on a rimmed baking sheet though just to be safe! You can also make this recipe into cupcakes if you’d rather not experiment. Check out the pink tip box above the recipe for more details. Let us know what you think of this recipe when you give it a try 🙂 Good luck!
Tessa ,Could either a strawberry ,or cherry ginache be used for both the filling & the icing ?
( Dairy is aAsthma Trigger for me )
Hi Juliet! We haven’t tried anything like that, so we can’t say for sure! Let us know how it goes if you try that 🙂
Know it’s not ideal but can I use a 9 x13 cake pan ?
Hi Ashley! We haven’t tried that ourselves, but other readers have done this with much success! Let us know how it goes 🙂
Hi there. My son’s favorite cake is red velvet, which I plan to make for his birthday. However, we have an elderly family member who cannot consume red dyes at all. Can I bake this without the red dye?
Hi Patricia! We haven’t tried that, so I can’t say for sure, but it shouldn’t really change anything but the appearance of the cake, so leaving out the food coloring entirely should be just fine. Let us know how it goes! Happy baking 🙂
Thanks very much for the best Red velvet recipe this is what I was really looking for
Hello! I have made this cake 2 times and wondered if I could use regular red food coloring and how much for the recipe if so? It’s hard to find just a red gel food coloring since we have to buy a 4 back of other colors just to get that 1! Thanks!
Hi Leigh! No, we don’t recommend using regular food coloring in this recipe. You would need so much of it to bring the same level of color, and that adds a substantial amount of liquid to the cake that will alter the flavor and texture of the cake. Tessa linked a couple gel colors in the pink tip box above the recipe – those are available on Amazon (and aren’t part of a pack!), so you can always get them shipped to your house whenever you plan to make this cake 🙂 I hope that helps! Happy baking!
Hello! This looks amazing. Can cake flour be used instead of AP?
Hi Rachel! Tessa wrote this recipe specifically using all-purpose flour, so we haven’t tried it with cake flour instead. We recommend sticking with all-purpose flour for best results, but let us know how how it goes if you give cake flour a try! 🙂
This was the cake that saved Valentine’s day!! Back in February, my mom had ordered a RV cake from someone to take to a work gathering, when she got it the day before she was stunned to see it was just a little bit bigger than a cupcake!!!! I’m not exaggerating… she had invited so many coworkers and what she got barely fed 2 people. She was so sad so I decided to make this for her, thankfully I was only missing like 2-3 ingredients. She bought them while I got off work, I clocked out at 10pm and I started making this!! It paid off because everyone LOVED IT! They asked me to make it again and so this week I finally did and again, it was a hit! Tessa wrote in an IG post once that this is the recipe for people that don’t like red velvet and it’s so true. Even my dad who does NOT like red velvet at all is OBSESSED with this one. Had to tell him to take it easy because he could eat one all by himself.
Hi! What brand of buttermilk do you use? (I’m in the USA) and I only see low fat buttermilk options at my store. Could you help expand on whether that’s okay/ suggest a brand?
Hi Shriya! Most commercially available buttermilks are made with low-fat milk and are therefore low-fat buttermilks. That’s okay – that’s what we used to create and test this recipe. I’ve personally found full-fat buttermilk products here and there at Walmart/Target, but when we test our recipes, we use the low-fat stuff because it’s much more widely available and will bring great flavor and texture to this cake. Brands vary across the country, so it’s hard to recommend one brand, but any buttermilk should work great. Let us know how it goes 🙂
I’ve made this a few times and it is so delicious! Although I just made it again and something weird happened. the top of the cakes got very crispy and took forever to cook. Any idea what went wrong?
Hi Jackie! I’m sorry your cakes suddenly started baking so strangely! Here are a few ideas as to what may have gone wrong:
– How do you measure your ingredients? By volume (using cups), or by weight (using a digital kitchen scale)? When measuring by volume, it’s so easy to mis-measure ingredients (particularly flour) and throw off the entire chemistry of a recipe. Check out Tessa’s article here, where she talks about how to best measure ingredients to ensure accuracy every time.
– How old are your leavening agents? If your baking soda/powder are not fresh, they won’t do their jobs and your baked goods can not rise properly, fall after baking, and much more. Tessa talks about the science behind leavening agents, and how to test for leavener freshness, in this article here!
– Your oven might be running a little cold. Do you have an oven thermometer to check that? Check out Tessa’s article here about ovens, full of tips!! If you don’t have an oven thermometer to ensure your oven is at the temperature it says it is, invest in one now! They are inexpensive and really help your baking so much. This oven thermometer is one of Tessa’s favorites.
I hope something here helped, Jackie! Let us know if you have any follow-up questions – we’re always happy to help! 🙂
Has anyone used this recipe with powder based food coloring? I just tried it as I’m baking it now. I peeked at the cakes and my only fear at the moment is them not rising enough. I did two 8” layers.
I made this for a friend’s birthday which happened to be Canada Day. Perfect for both occasions. It was so moist and the perfect red colour. I thought 4 cups of icing sugar would be too much, but it was just the right amount of sweetness. Will definitely make it again.
Let me begin by stating that i have never left a review before. But with this recipe I felt I must.
I own a bakery, and have for 5 years, however, for several years I’ve been searching and experimenting for a red velvet cake recipe that I loved. It is very important to me that my cakes are moist with a good flavor. Today I decided to try this recipe, I decided it would be my last attempt and if it was still dry and flat. I would give up.
I have just finished this recipe, I decorated the cake with my own cream cheese recipe and tasted it. It is PERFECT and will be my only go to red velvet recipe from here on. It is moist, perfectly fluffy, with an excellent flavor; I absolutely love how the coffee enhances it.
If you haven’t made this yet, please do so ASAP, but be warned, it’s very addicting!
Yay! So thrilled to hear that you loved this red velvet cake recipe, Kaylee! Thank you so much for your lovely comment 🙂
This turned out perfect. I did cut the cinnamon in half but otherwise followed exactly as directed. It is a little bit of labor but at the end is so worth it. Thank you so much for the tips, they help tremendously for someone like me who doesn’t do much baking.
Hi! Can i use alkalized cocoa powder for this recipe? thanks!
Hi Chris! We recommend using natural cocoa powder for this recipe as Dutch-process cocoa powder doesn’t react to baking soda. Learn more about the difference between the two cocoa powders here. I hope that helps! Can’t wait for you to give this recipe a try, it’s a favorite of mine! 🙂
I rarely leave comments on recipes and when I do, they are usually the best stuff I have tried. And this… oh my lordd. The cake is so..so..SOOOO MOIST! Oh my god. I have tried many red velvet recipes and this one takes the cake (no pun intented) seriously i have given up looking for the best red velvet recipe until i found yours. Thank you so much!! Xx
I didn’t have unsalted butter on hand so i used salted butter compound and still added the salt (i used iodized salt) followed the recipe to a T and didn’t have any issues.
Thrilled to hear this, Chris!!
For the food coloring, can you use Lorann brand? Thank you.
Hi Kristina! We haven’t tried this cake using that brand of food coloring, but just check your bottles to ensure they’re gel food coloring, and not liquid. The liquid style isn’t as concentrated and you’ll need a lot more to color your cake, which will alter the consistency of the cake. Check out more info on this (as well as links to Tessa’s recommended brands) in the pink tip box, above the recipe 🙂
when making the coffee, is it just a tsp of coffee granules and hot water added or more coffee?
Hi Crystal! The answer to your question will depend on the type of instant coffee or espresso you’re using – the package should direct you on this. You can just make the coffee as you normally would to drink and just use 1/2 cup total for the recipe. The hot coffee and cocoa powder will be mixed and allowed to sit to bloom for 5 minutes, before continuing with the recipe. Be sure to read the directions for the recipe before starting, and check out the pink tip box above the recipe for more info! Happy baking 🙂
I made this cake and converted another batch into 35 cupcakes for my son’s birthday party. This recipe is perfect! The cream cheese frosting is delicious with the right sweetness, and the cake sponge is soft and light. Wonderful! This will always be my go-to recipe for red velvet cake and cream cheese frosting! Highly recommend!
Could I make this in a regular cake pan?
Hi Ann! I’m not sure what you mean exactly by ‘regular cake pan’ – do you mean a sheet pan? Other readers have successfully made this recipe in a 9×13-inch pan, but we have not tested this ourselves. Let us know how it goes if you give this a try!
I should have been more specific. Yes a 9 x 13 pan. I made this cake for our daughter-in-law’s birthday and it was spectacular. Tender and delicious. Everyone loved it. Yours is the only recipe I will use for red velvet cake from now on!
So glad to hear that, Ann! 🙂
Has anyone tried making this as a Bundt cake?
Hi Will! Perhaps one of our other readers has tried this, but we have not tested this recipe in a bundt pan, so we cannot say for sure how that would work. Let us know if you give this a try 🙂
Delicious, moist cake perfectly complimented by the cream cheese frosting. Most recently we made this as cupcakes following the guidance in the blog post, worked out beautifully. Will definitely make this recipe again (many times I suspect)!
I have someone that has requested a red velvet sheet cake, I was wondering if I can cook this in a 9×13 pan?
Thanks
Shea
Hi Shea! Other readers have successfully made this recipe in a 9×13-inch pan, but as we have not tested this ourselves, we cannot say exactly how long this will take to bake. Let us know how it goes if you give this a try 🙂
Absolutely delicious! The cake was ultra moist and baked beautifully! Usually when I make cakes/cupcakes I’m left with a ton of leftover frosting. This recipe called for the perfect amount! Definitely keeping this recipe for future bakes!
delisioso!!! 5 Star for sure. Followed to a T, and turned out perfect. Thanks for your recipe!
Hi, can the recipe be converted to cupcakes as well? If so, at waht temperature and time shod they be baked? Thanks!
Hi Lou! Yes, these can be made into cupcakes! Check out the the pink tip box, above the recipe, for all the info 🙂