How to Make Soft Pretzels
Ingredients for Homemade Pretzels Recipe:
- Active dry yeast – You can use instant yeast instead, but note that your pretzels may just be slightly more fluffy than chewy. Read our blog post on active dry vs. instant yeast.
- Barley malt syrup – This helps give the pretzels that distinct deep yet slightly bittersweet flavor. I ordered online, but have also seen it at some health food stores. If you can’t find this, simply use brown sugar (light or dark – the difference won’t be noticeable as it’s a small amount).
- All-purpose flour – I’ve tested this recipe with bread flour and didn’t find that it made enough of a positive impact to recommend using it instead. AP works great here! To be specific, I tested with bleached Gold Medal AP flour. I’ve also very successfully tested this recipe swapping in 2 cups of Rye flour for AP flour which adds a lovely depth of flavor and even darker color!
- Fine sea salt – This is for the dough.
- Pretzel salt – This is for sprinkling on the pretzels before baking. I’d highly recommend ordering the pretzel salt for the most impressive pretzels possible and best flavor. If that’s not an option, use coarse sea salt instead. Just note it’ll dissolve into the dough more.
- Food grade lye – More on this below.
How to Knead Soft Pretzel Dough:
I like to use my 6-quart Professional KitchenAid stand mixer with the dough hook attachment. This dough is quite stiff and dense, so if your stand mixer is on the small side or quite old, the motor may not want to knead it. You could always knead the dough by hand, it’ll just take some upper body strength and a few more minutes.
The Key to Perfect Pretzels? Lye!
Take a look at the pretzel comparison below. One was made by dipping the unbaked pretzels in a lye bath, the other by dipping in a boiled baking soda bath:
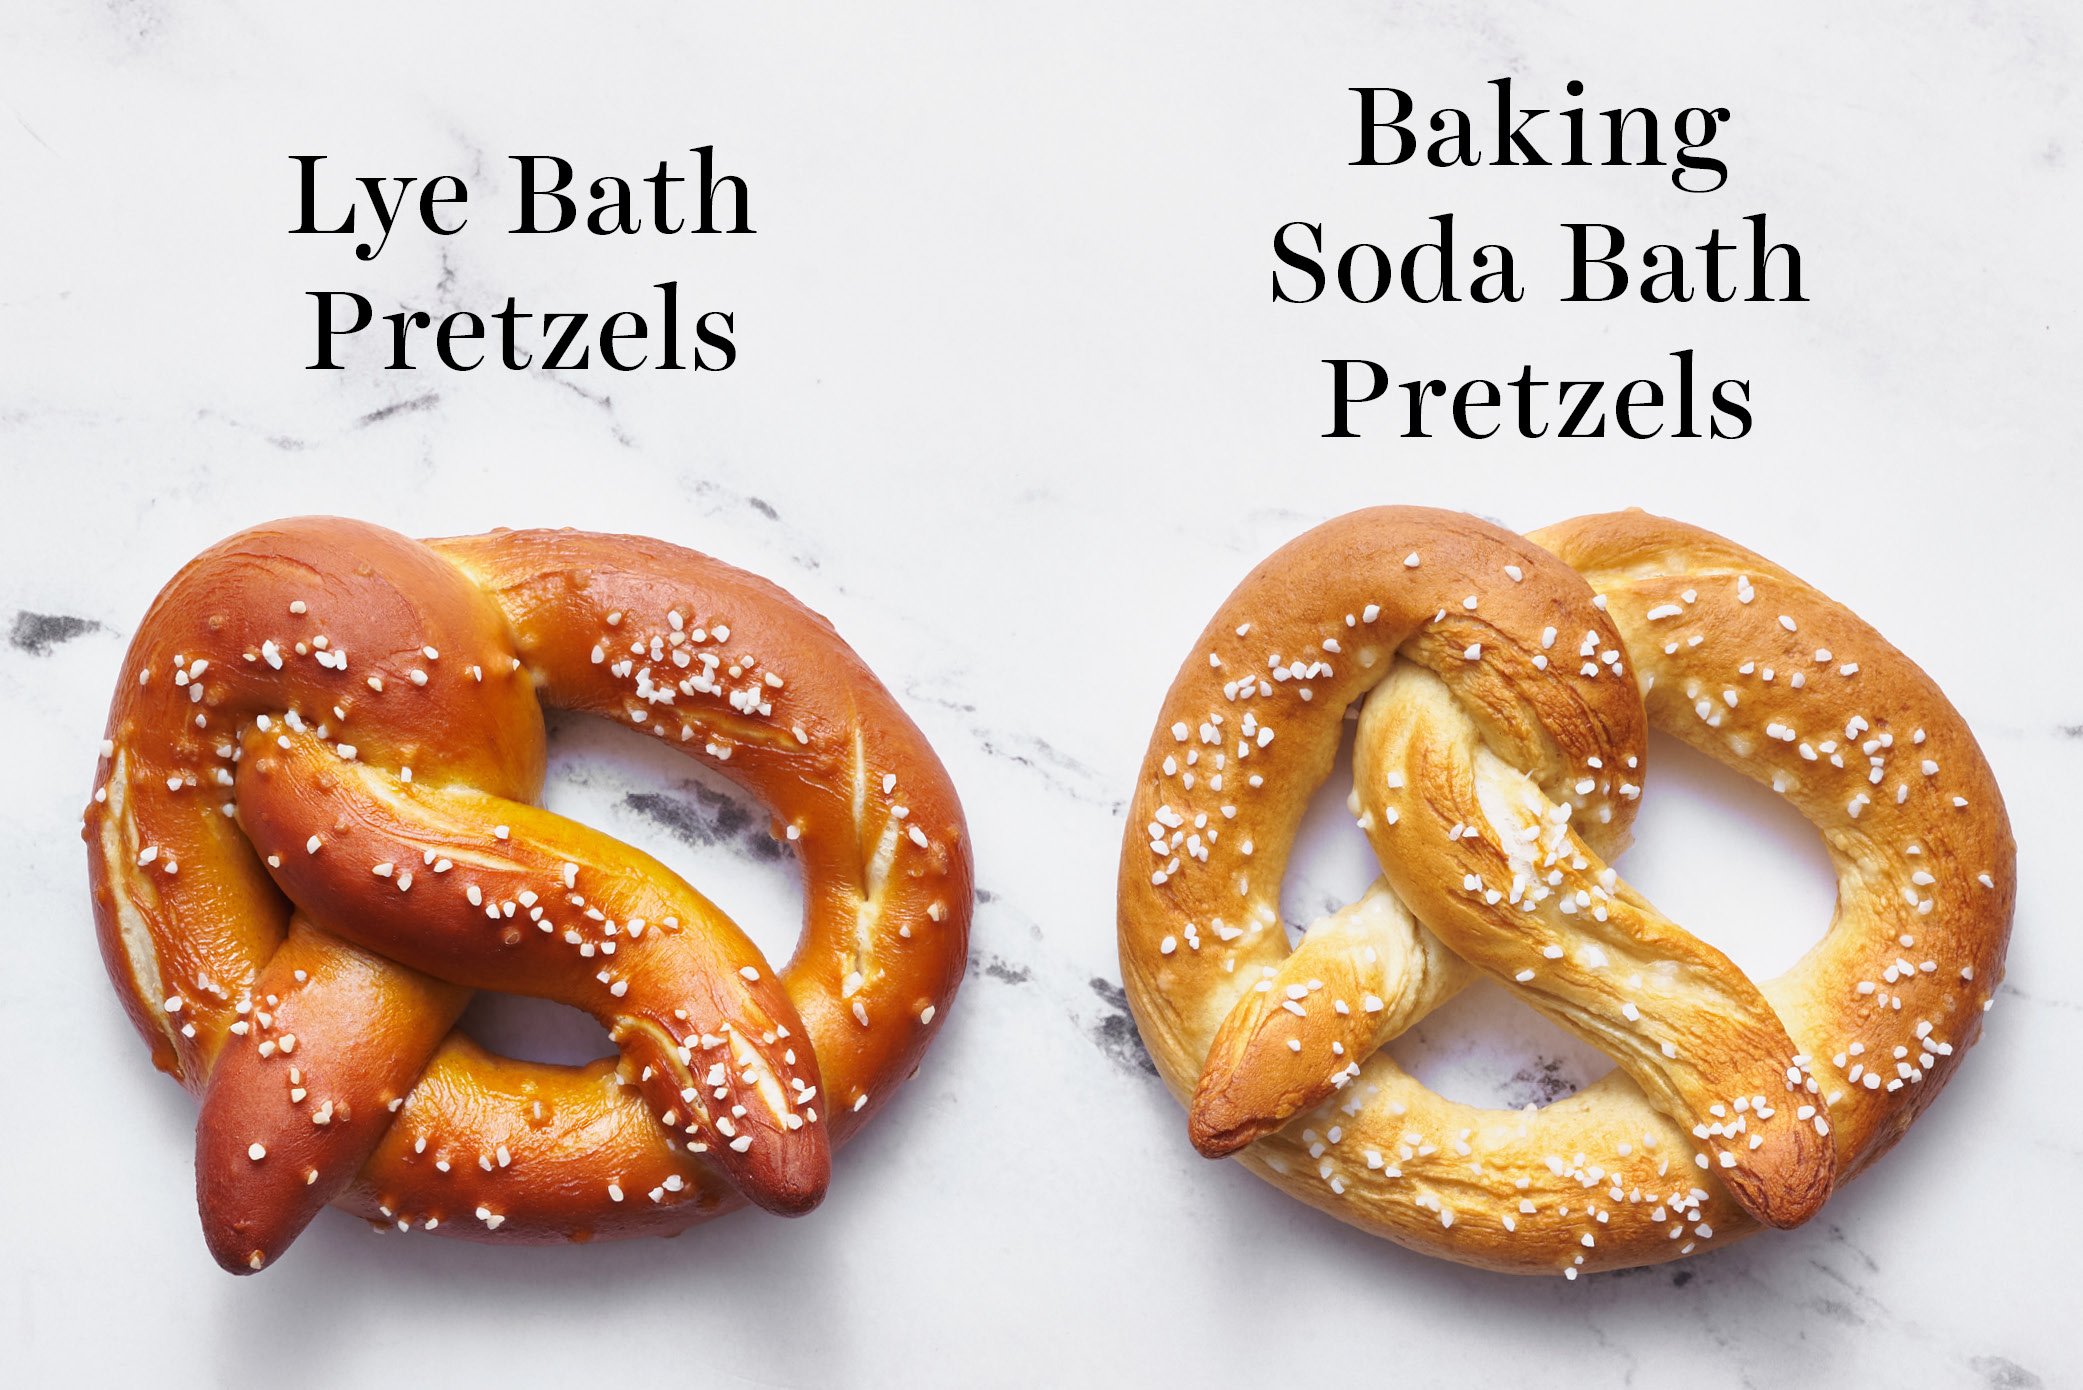
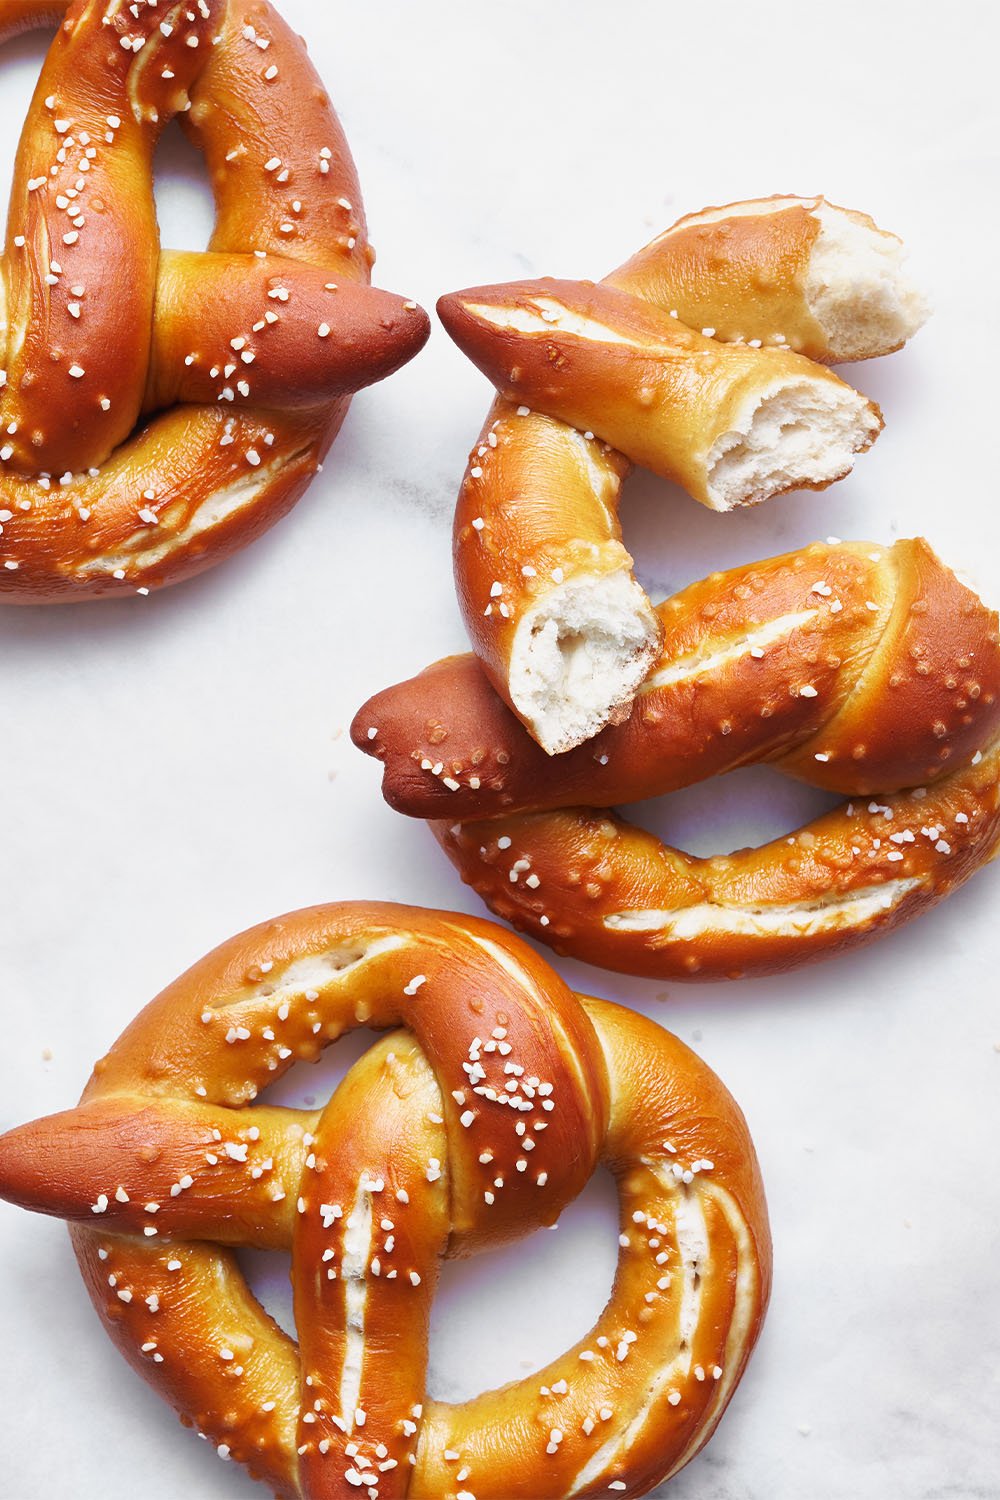
You can see just how much darker the lye pretzels turn out! What you can’t see is they also have that distinct, slightly alkaline pretzel flavor and a chewier texture.
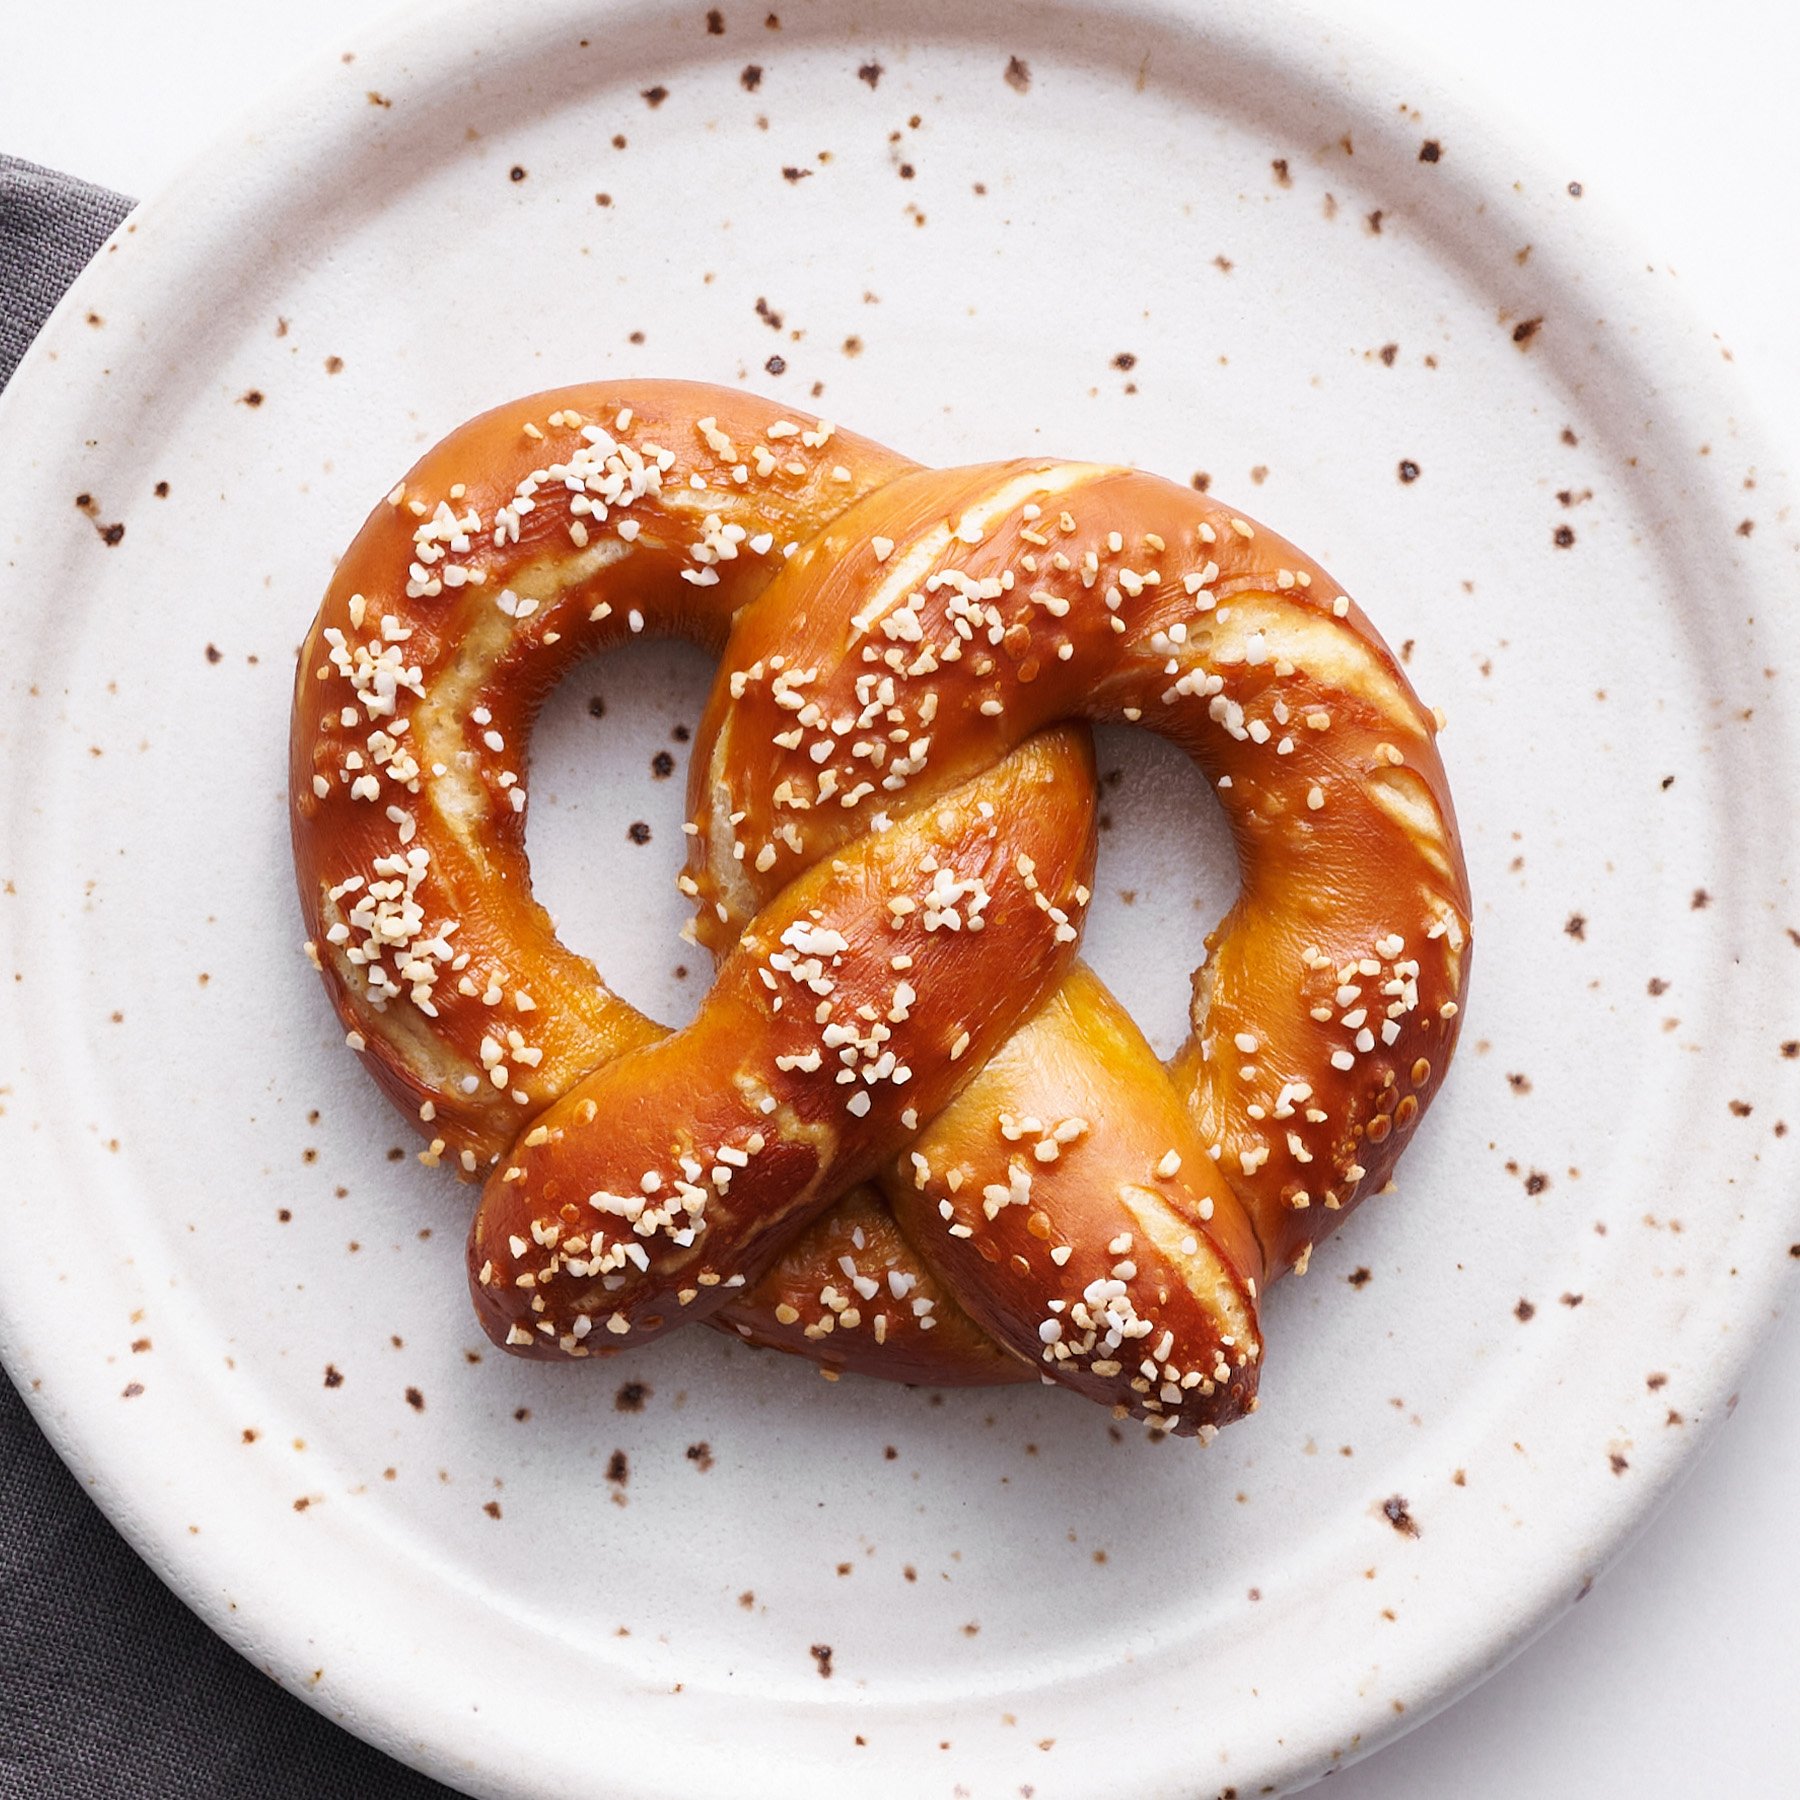
Lye has a pH of around 13 whereas baking soda has a pH of around 8. This extra alkalinity accelerates the Maillard reaction, allowing that caramelization to develop on the exterior of the pretzels. That ultra-deep color and slightly crispy, crunchy exterior crust is only made possible with lye. Lye is what professional bakers use, and it’s what’s authentic in a traditional Bavarian pretzel!
Do I Have to Use Lye?
No. You can prepare a baking soda bath instead. See more directions below. But if you want the most perfect pretzels possible, give lye a try! It’s not as scary as you may think.
Where to Buy Food-Grade Lye?
I know I just said not to be afraid of lye, but it is sodium hydroxide (also called caustic soda) which is the main ingredient in soap making and in products like Draino.
You can purchase food-grade lye most easily online or at some craft and hobby stores in the soap-making section.
How to Use Lye Safely
Lye is a caustic material, meaning if used improperly, it can cause chemical burns. Before you freak out, check out the safety tips below, and also remember that lye in this recipe’s application is diluted and therefore is similar to household bleach. Once lye is baked, it’s totally safe to eat.
- Only use in a well-vented controlled area. You don’t want to do this in a small space without a window open or the fan on (blowing any fumes away).
- Always add lye to water, never water to lye. The idea is to avoid any potential for splashing.
- Use only heat-resistant plastic or glass containers to prepare your lye bath. Never use metal.
- If lye does touch your clothes, remove that clothing item. If it touches your skin, simply run the skin under running water for a few minutes.
- If you’re concerned about safety, use plastic gloves when handling the pretzels in the lye bath. For extra security, feel free to wear goggles and even a face mask (now that we all own one!).
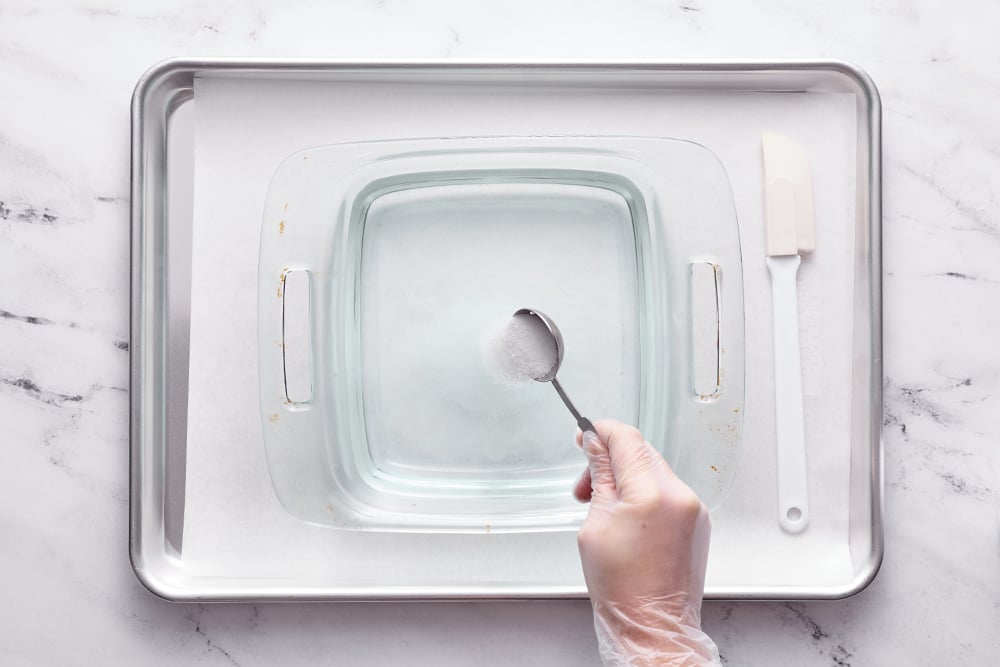
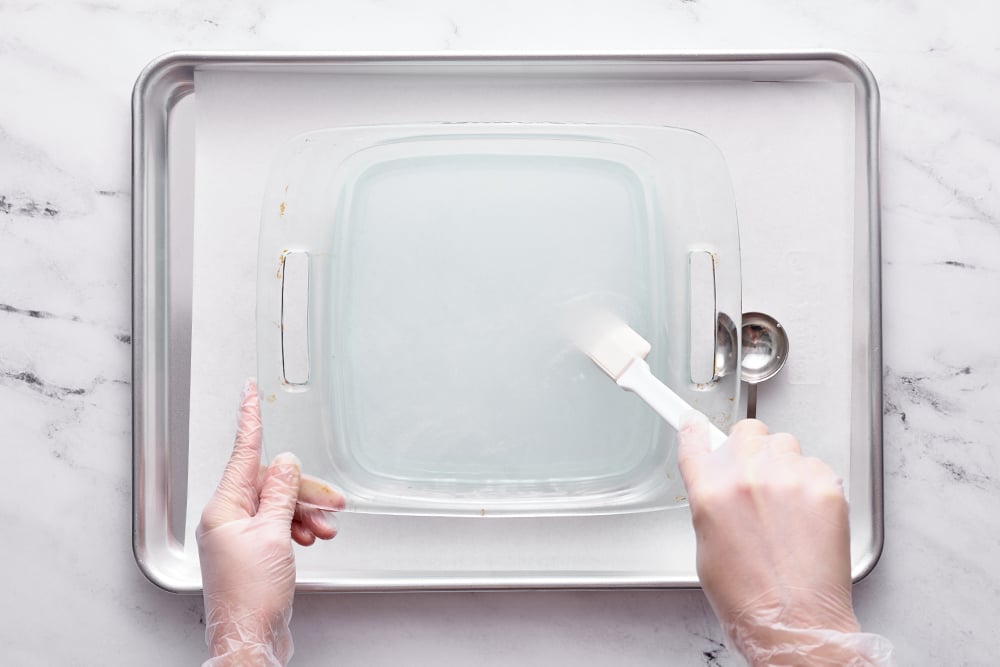
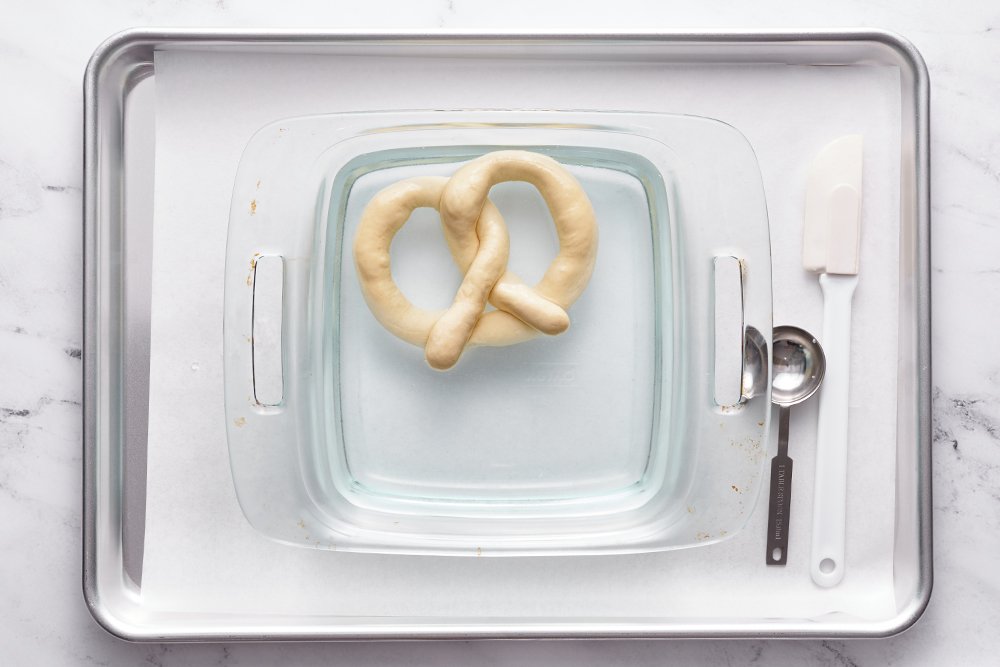
How to Prepare a Lye Bath for Pretzels:
- In a well-vented area, place a plastic or glass container (do not use metal) on top of a few pieces of parchment paper to protect your counter from splashes.
- Carefully sprinkle the lye into the water. Use a heat-safe silicone spatula to carefully stir the lye to dissolve. The lye is dissolved when the water looks clear (the container will feel warm to the touch – this is normal).
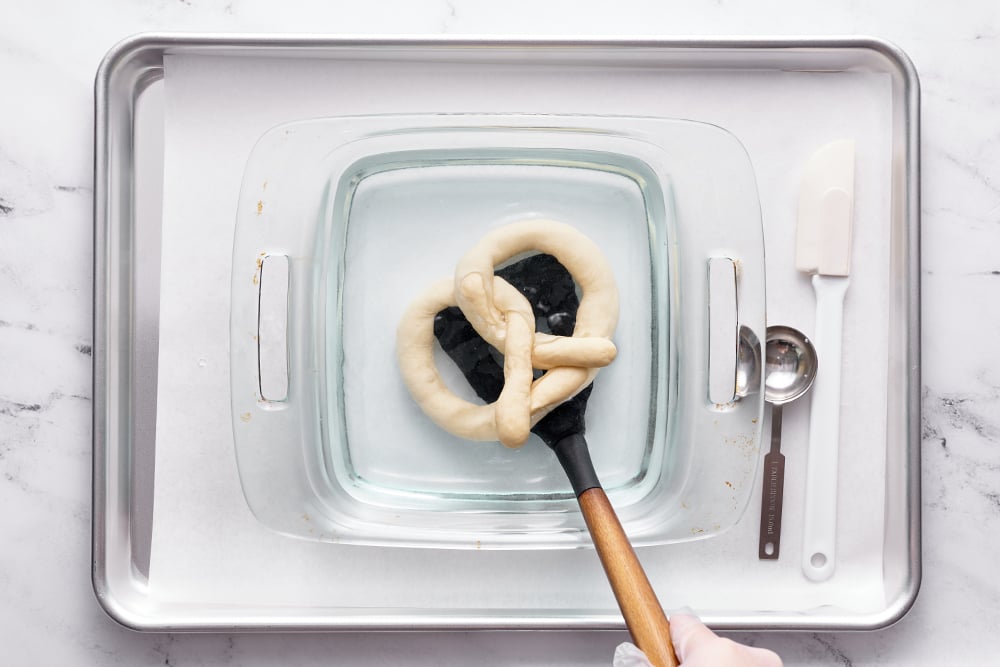
- Dip a shaped pretzel into the lye bath for about 30 seconds. Remove and let drip off then place on the prepared greased parchment-lined baking sheets.
If you wind up making pretzels often, you may want to avoid using the same glass container each time. Lye is corrosive and will eventually weaken the glass. Your best bet is a dedicated high-quality plastic container.
How to Prepare a Baking Soda Bath (lye alternative):
If working with lye isn’t an option for you, here are the directions for using baking soda instead. You simply dip the pretzels in boiling water that’s been alkalized with baking soda. Note that the pretzels will be much lighter in color and won’t have the same chewy texture.
For Baking Soda Bath:
- 2/3 cup of baking soda
- 10 cups of water
Directions: In a large pot, bring the baking soda and water to a boil. Boil the pretzels in small batches in the soda solution for about 45 seconds to 1 minute, pressing them down to submerge. Proceed with the recipe as written after the lye bath step.
Making Baking Soda More Alkaline
There are some ‘hacks’ online for baking the baking soda to increase its pH level from 8 to about 11. This is done by spreading the baking soda on a baking sheet and baking at 250°F for 2 hours. I don’t prefer this method because it’s time-consuming and the resulting baking soda is now caustic and corrosive. You may as well use lye, which is easy to order online.
Choose Your Own Pretzel Adventure:
As I see it, there are TWO pretzel journeys, aka options for customizing your soft pretzels.
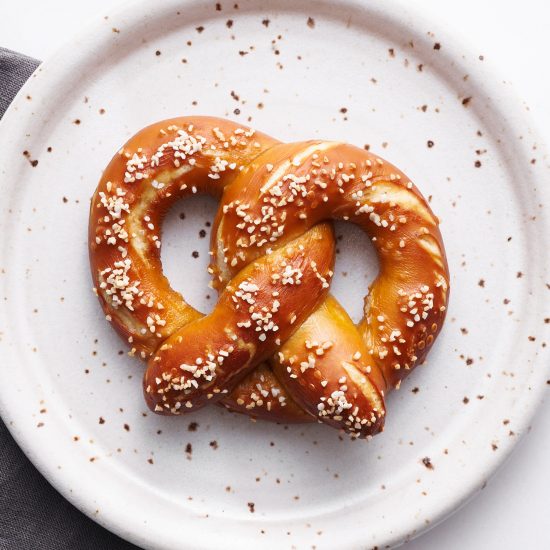
- One is what’s pictured in these photos: A more traditional Bavarian-style pretzel with a deeply browned exterior and chewy texture. The recipe as written will yield this result.
-
The other is a more American-ized pretzel that’s lighter in color and fluffier in texture. A pretzel reminiscent of those frozen pretzels many of us grew up eating or even the shopping mall pretzels.
-
If you prefer the latter, use a baking soda bath instead of lye. You can also allow the shaped pretzels to rise for about 30 minutes before dipping in baking soda and baking. This will create a fluffier texture (but also less distinct pretzel shapes).
- For a last option on this journey, brush the freshly baked pretzels with melted butter.
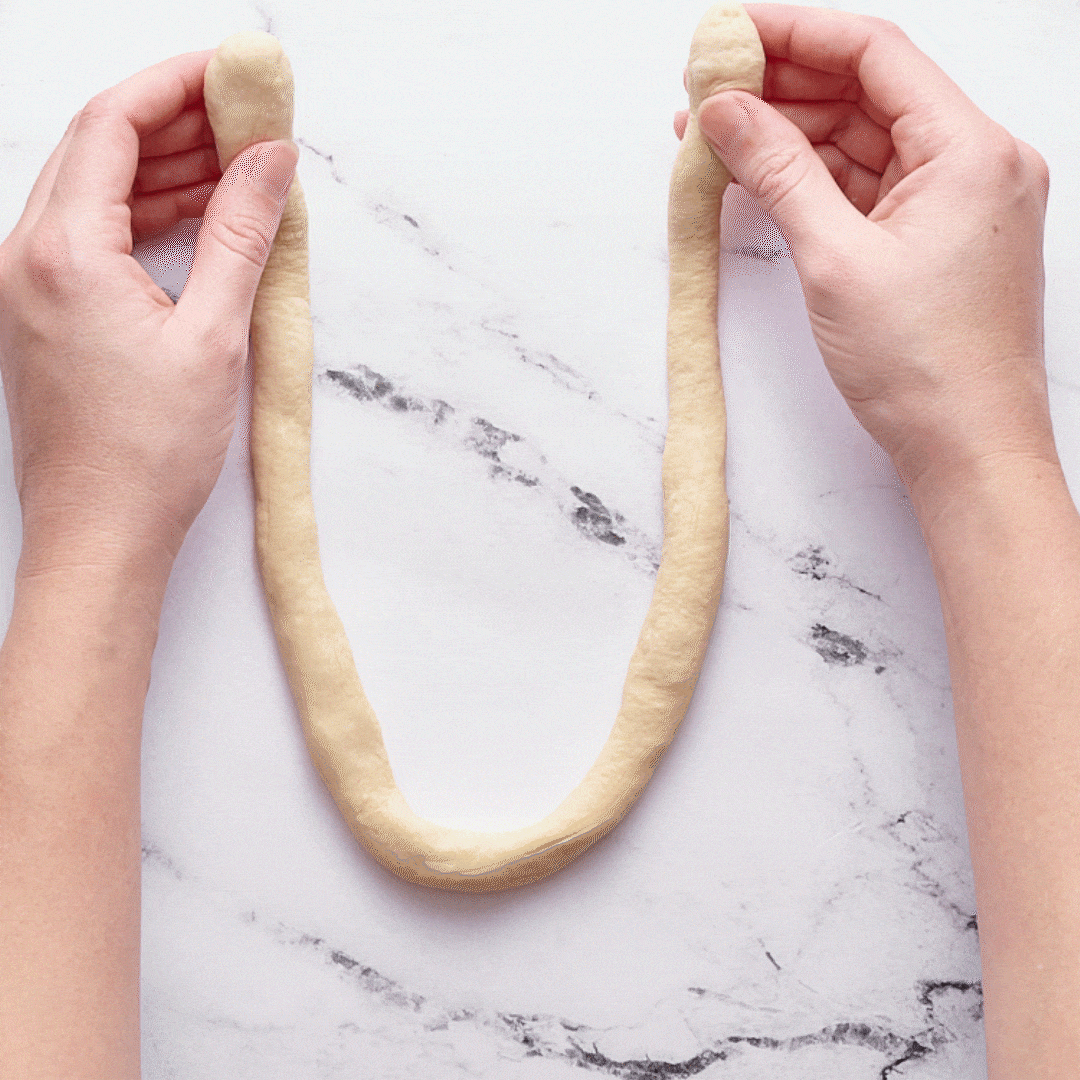
How to Shape Pretzels:
Shape the log into a letter U. Cross the arms placing one over the other, then twist them around each other once. Bring the ends down to the bottom of the U and gently press to stick. Place on two greased parchment-lined baking sheets.
How to Make Pretzel Buns:
After you portion the dough into ten equal pieces, take one piece and begin to grab bits of the dough from the top to bring around to the bottom to create a smooth ball shape. Roll around on a clean counter to smooth out further. Bake as the recipe states.
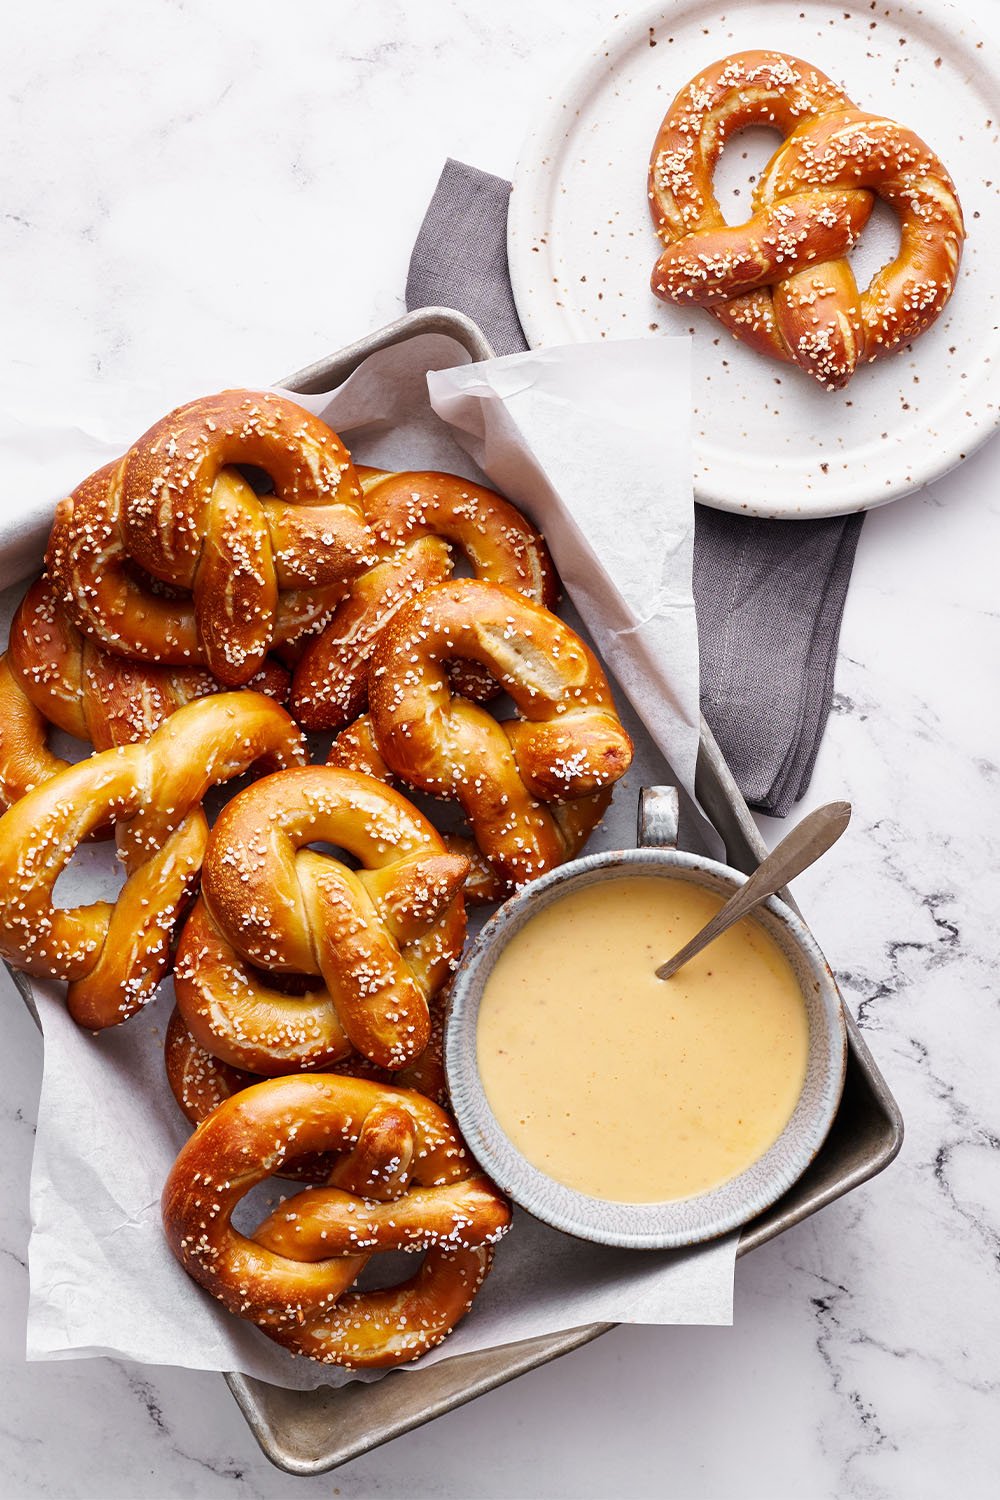
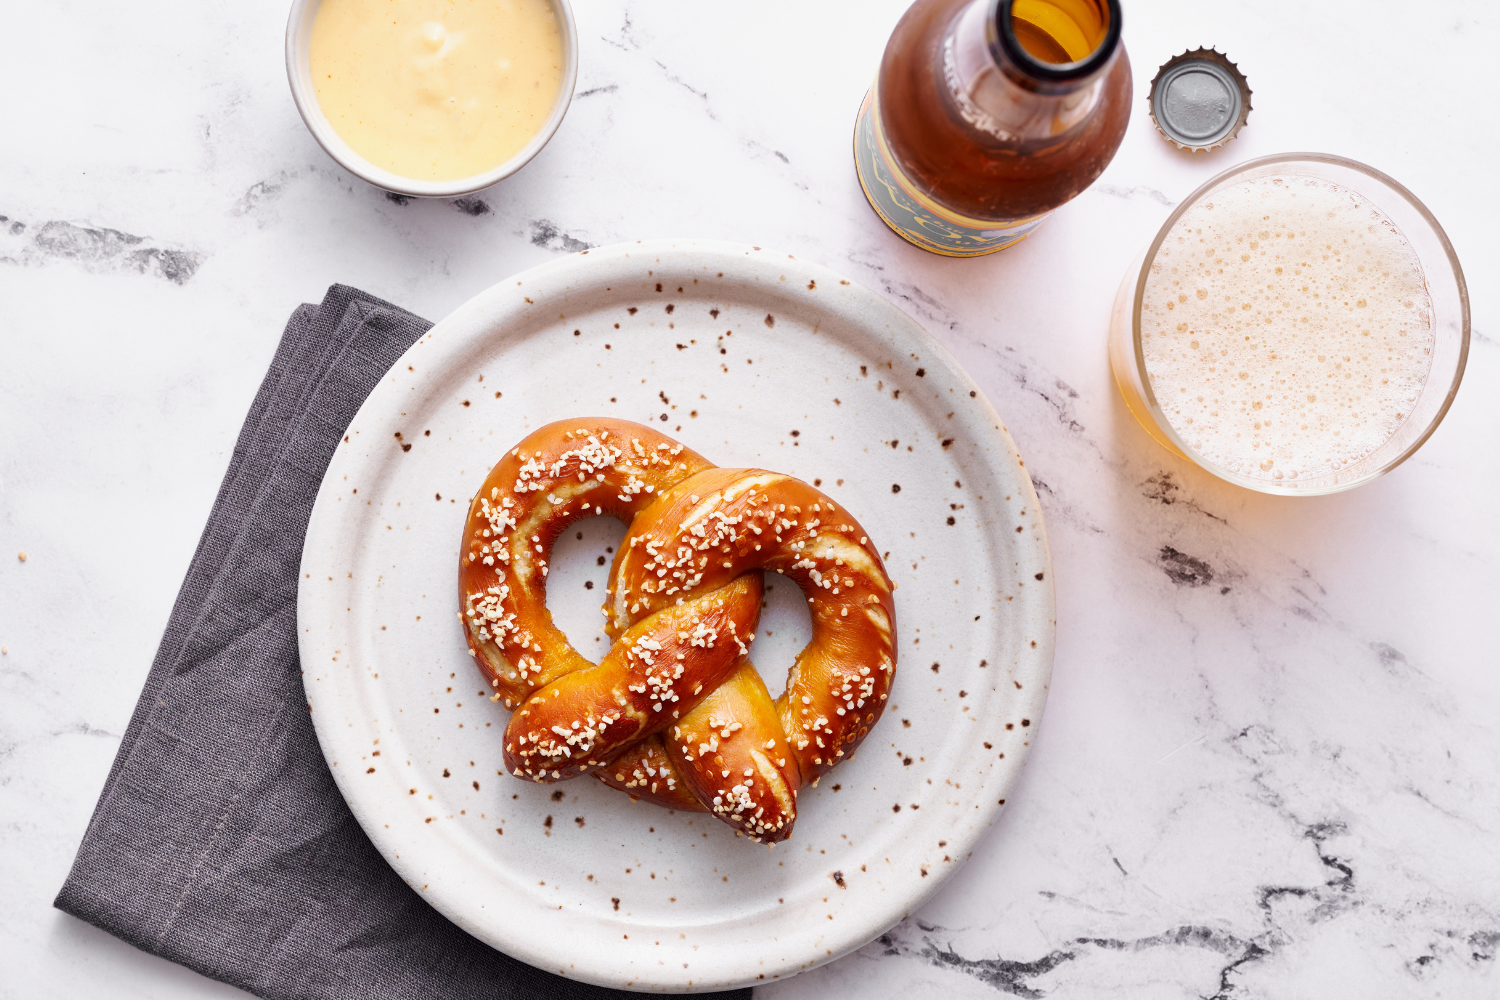
How to Serve Pretzels:
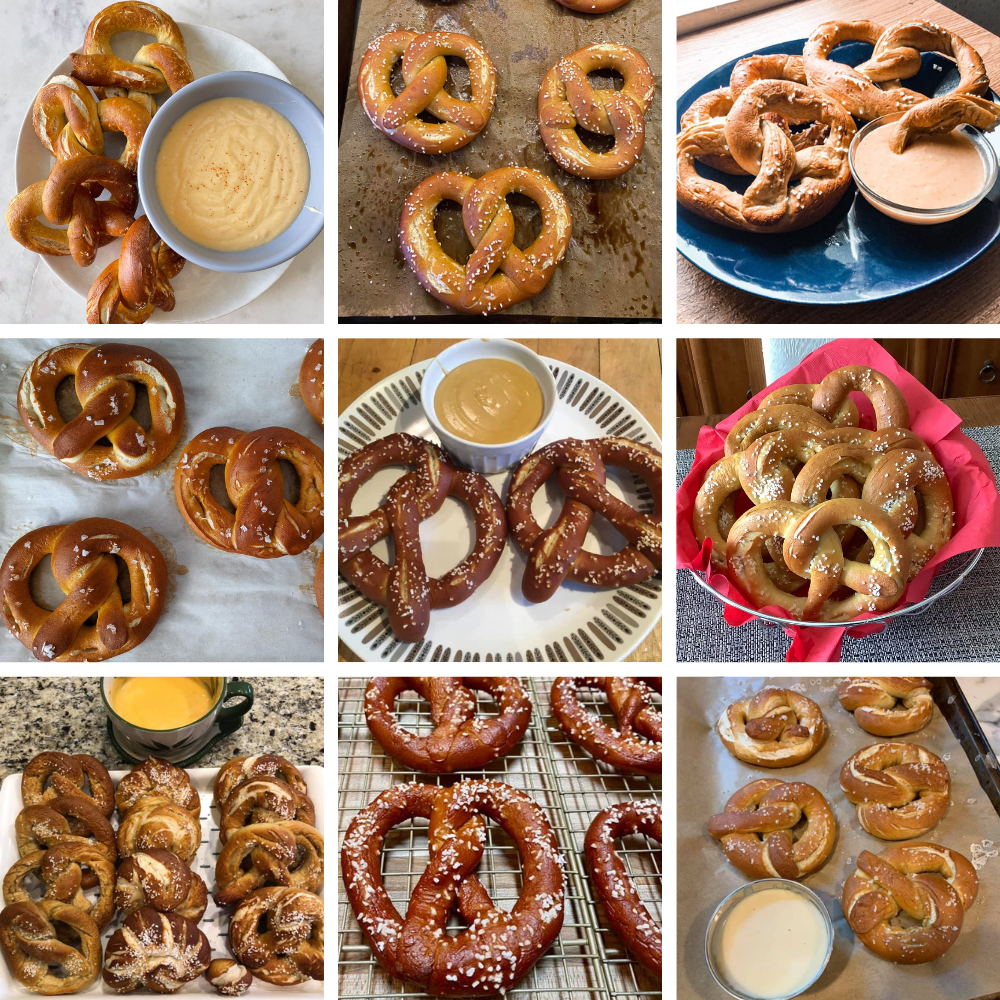
Serve them with my Beer Cheese Dip or simply alongside some whole grain mustard or spicy honey mustard.
You can also slice pretzels open, toast them, and smear them with cream cheese for a pretzel-bagel situation.
How to Store Pretzels:
Store in an airtight container at room temperature for up to 2 days. Reheat in the toaster oven at 350°F for a few minutes to refresh.
How to Freeze Pretzels (best option!):
Store the baked pretzels in an airtight container in the freezer for up to 2 months. The longer they’re frozen, the more the pretzel salt will dissolve into the pretzels, but they’ll still taste great.
Defrost by letting them sit on the counter for about an hour. Or, simply microwave for about 30 seconds. If desired for a crispier texture, once defrosted, refresh in the toaster oven for about 5 minutes.


Hello! I’ve noticed other recipes use an egg wash. Does the lye bath replace that need, or could/should you additionally do an egg wash before adding the salt and baking? Thanks!
Hi Lucy! Egg wash is typically added to help color develop, and to add a little shine. The lye bath (as you can see in the pictures in the pink tip box, above the recipe) help these pretzels brown beautifully, so there’s no need for additional browning! Feel free to experiment with adding this if you wish, but I think you’ll love this recipe as written 🙂 Enjoy!
This is a great recipe, tastes like German pretzels I remember. This is almost the same as mine. I use maltose syrup because I never see the barley syrup in store. The one thing that I do at end is mix the pretzel salt with some Indian black salt , Kala Namak, just a little as it goes a long way. It gives the pretzel an even more pretzeled out taste. Try it.
So easy! So yummy! So fun! Thank you for sharing this recipe. Used the baking soda since I couldn’t find the lye very easily.
These were sooo awesome!!! I didn’t use the lye but the baking soda bath but they were perfect. Just like I remember when I used to buy them on the streets of NY. My grandson and I made pretzel spiders for Halloween and they were so good.
Thank you & Joe for sharing this wonderful and easy to follow recipe. We’ve made these a half a dozen times and the pretzels are SO good!
This is an awesome pretzel recipe!! I set my expectations lower that they probably wouldn’t hold a candle to vendor pretzels, as I opted to use the soda bath vs. lye and brown sugar vs. malt syrup. Nope! You guys, these pretzels were SOOO good!! Possibly even better than what you would buy at a Bavarian festival!! I have kicked my old pretzel recipe to the curb and this is taking its place. I think what impresses me most is its no fuss and easy to work with dough. And to boot, it produced both better flavor and textured pretzels compared to other recipes I have tried. If this is the 2nd best version of the recipe, I can’t even imagine how good the lye bath and malt syrup pretzels are! Note, I did allow the pretzels to rise for 30 minutes after shaping them into the knot.
I buy lye water pre made in a glass bottle at the Asian market to use for moon cake dough. Can this be used for the lye in the water here? What would the procedure be for how much to add?
Hi Brook! Unfortunately, premade lye water’s concentration isn’t typically labeled, so we do not recommend using it for this recipe.
these were so delicious and one of the easiest baked goods to make! great effort to result ratio :). bonus, you feel like you’re doing a science project, which is always fun. my guests couldn’t believe they were handmade. we did half with pretzel salt and half with cinnamon sugar.
I have too much bread flour compared to AP. Will I need to do any changes if i use Bread flour, and will the results be still good or not? Thanks guys!
Hi Danny! Tessa originally tested this recipe using bread flour, and while she didn’t find that it made enough of an impact to recommend using in the published recipe (since many bakers don’t have it on hand at all times), it worked just fine – so a combination of the two should work just fine, no modifications needed. Your AP/bread flour pretzels will likely just be a little chewier than if you were to use all AP flour. Let us know how it goes!
Is there a way to make the dough ahead and then actually bake the pretzels the next day?
Hi Megg! Because we don’t want this dough to rise much at all (they’d become much softer and spongier if left to rise), preparing the dough the day before would allow the dough to proof a little more than we want here. Instead, I recommend following the freezing instruction in the pink tip box, just above the recipe. Let us know what you think of these pretzels once you’ve given them a try 🙂
You can actually bake baking soda in the oven which will raise the pH by 1 to 2 points, which will help with the lower alkalinity of the baking soda. *Previously worked as a biochemist 🙂
I made these and I love them . 2 of my grandkids are glutton free,can i use Glutton free flour and still follow the recipe
Hi Barbara! We don’t bake or test our recipes using gluten-free flour, so we can’t say for sure! Let us know how it goes if you give this a try 🙂
Love making these. Question about freezing them…how would you reheat or defrost them for best results?
Hi Robin! Check out the very bottom of the pink tip box (above the recipe) for Tessa’s instructions on how to best freeze, thaw and reheat these pretzels!
Super simple recipes to follow and much easier to shape than others i have tried.
My question is what to do with the lye water bath once done?
Hi Lauren! So glad to hear that you enjoyed these pretzels! Since the lye is already diluted, you can just pour it down the sink, and then let cold tap water run for a bit. That’s what the reputable source King Arthur Baking says to do for disposal. I hope that helps! Happy baking 🙂
I loved this recipe! Did the baking soda bath cause lye just isn’t something I’d be using repeatedly and didn’t want to buy something so specific for a single recipe. Since some of the comments mentioned letting the dough rise, I did so for about 30 minutes. They were soft, fluffy, and so warm and delicious! I topped with everything bagel seasoning and truggle salt and dipped in queso. It was delicious!
I’m about to make these awesome looking pretzels and I’m having a hard time finding the lye. I looked at michaels and they have velona sodium lactate 60%. Could I use that?
Hi Christina! No, the two are not interchangeable. Here’s a link to the lye we used while testing this recipe. While lye produces the best exterior texture for pretzels, you could also follow the instructions for a baking soda bath too. I hope that helps! Please let us know how it goes if you give this recipe a try 🙂
Just made this and eating as I type! Sooo good and easy! Definitely doing this again. Thank you!
Yea, I also found it too dry but once I started to roll it out the dough soften. Also, not sure but 10 cups of water and 2/3 cup of baking soda seems excessive for 10 pretzels. I got 10 because I made each 100 grams and had a total of 1000 grams of dough. I think 5-6 cups of water would do the trick. Other than that I enjoyed the recipe being straightforward and the pretzels came out delicious.
I have to say I too found this dough to be WAAAY too dense and dry… and I am not anywhere near a baking rookie. Just hadn’t done prezel dough. It felt like it was a bit flour heavy looking at it. Looking around online I think you’re a good cup of flour over the proper ratio.
I take it back. It seemed too tight. But I have it a half hour to rise and it softened up nicely. I think the people that are saying it’s too dry are taking it directly out of the mixer and trying to work it. It needs rest time. At least 5-10 min. I suggest a rise.
Hi! I made the pretzels using lye for the first time. Thanks for the tips! If the pretzels are a bit wet on the bottom or in between where the dough crosses itself, is that the lye and should I be concerned? They are definitely cooked all the way through with a very dark brown outside.
Hi Jaime! No, after they’re baked the lye is safe to eat. The heat of the oven typically dries up any remaining water, but if they’re still slightly wet after baking, it sounds like you may just need to let the lye bath drip from them a bit more before adding them back to the prepared baking sheet next time. Please let us know what you think of the pretzels when you give them a try! 🙂
Loved the recipe. Quick, easy and delicious. Used baking soda for the bath and let the pretzels rise for 30 min before poaching them.
Perfect recipe! This is the easiest pretzel dough I’ve ever worked with!!!! They are picture perfect!
I have made these pretzels four times now and they continue to be huge hits!! They are super easy and consistently deliver awesome pretzels. I have made full size, half size and pretzel sticks and they all are great. My favorite size is 50g as there is room for more than one!
I am very impressed with this recipe. We gave them a trial run today using the baking soda bath while we wait for the lye to be delivered. The pretzels got nice and brown on the outside slightly crispy and the inside had a nice pretzel chew. Will definitely make this recipe again.
The water/flour ratio was off — very dry, very dense, and impossible to roll into a pretzel. I made balls and made pretzel rolls!
Hi Tom! Hmm, that definitely doesn’t sound right. How do you measure your ingredients? By volume (using cups), or by weight (using a digital kitchen scale)? When measuring by volume, it’s so easy to mis-measure ingredients (especially flour) and throw off the entire chemistry of a recipe. Tessa talks about how to best measure ingredients to ensure accuracy every time, in this article here! I hope you give these pretzels another try sometime – they’re truly so delicious! 🙂
We made this yesterday and we were nervous. We had great success! We baked the baking soda for 1hour at 300 degrees for the pretzel bath. The pretzels were dark and crispy on the outside and chewy on the inside. I couldn’t believe how easy it was to do. (We borrowed a KitchenAid mixer.) It was fun and we will definitely do it again.
Thank you!
Such an easy, straightforward recipe. The first time, I tried it with the baking soda soak and it turned out great. I bought lye just to give this a go, and it was just as good. I went with a 10-15 minute proof before the lye/soda, just to give it some softness. Highly recommend this recipe! I bought the ingredients to try out the beer cheese next.
Just tried this recipe for the first time. I grew up about 15 minutes from a Danish city in California called Solvang. We always went for the fresh soft pretzels that came with a little cup of cheese and a popsicle stick for spreading onto the pretzel. Fond childhood memories. I tried this recipe and it turned out wonderful. I’ve never used lye before and I probably will be more cautious next time, I did not see how much to lye to add and how water to use. I think the strong smell made me nervous Lol and something stained my wood cutting board ..perhaps the syrup or the lye? I will definitely make more or these. Also I must mention I spent most of my time trying to rollout the dough into even 11 inch strips and then curling them into the perfect shape lol I probably over complicated it, I tend to do that (I’m an engineer) – maybe next time I will just twirl the strips of dough to make pretzel strips haha
Hi Nicholas! Before your next pretzel bake, check out the pink tip box above the recipe. Tessa included a bunch of terrific tips and step-by-step instructions for using a lye bath safely. It is technically a dangerous chemical, so you definitely want to be extremely cautious when using lye. Also, to your note about how much lye to water to use, it is stated in the recipe itself: 2 tablespoons (40 grams) food grade lye and 1 liter (1000 grams) water, at room temperature. I hope that helps! Happy baking 🙂
I made this and they turned out delicious! BUT, I don’t know what I did wrong but it was NOT easy. My dough was super dry and I had to add a lot of water to get it to come together. I’m sure I added at least an extra 1/2 cup of water. The dough was still very difficult to work with. Start to finish it took me about 2 1/2 hours. Most of that was spent getting the dough to the right texture, stretching (couldn’t get it to roll) and shaping the dough. I will make them again because they lye and malt barley syrup weren’t cheap but what did I do wrong? How do I make it easier? I don’t see any comments about the same issue.
Hi Jessie! I’m so glad you still enjoyed these pretzels, even though you had issues along the way! It sounds like maybe you accidentally added too much flour? How do you measure your ingredients? By volume (using cups), or by weight (using a digital kitchen scale)? When measuring by volume, it’s so easy to mis-measure ingredients, particularly flour, and throw off the entire chemistry of a recipe. Tessa talks about how to best measure ingredients to ensure accuracy every time, in this article here! The only other thing I can think is that perhaps the pretzel dough wasn’t kneaded long enough. As yeasted dough is kneaded, the dough should become fully hydrated and stretchy – but if the gluten isn’t fully activated, the dough can be uncooperative. I hope something here proves helpful, and if not, please feel free to reach back out so we can continue to help troubleshoot! Happy baking 🙂
I had the same issue with the dough and I measured everything by grams. It was impossible dough to work with and I gave up after only making 3 pretzels.
Hi Laura! Hmm, that’s super strange. The dough should be easily stretched and pliable, and certainly not difficult to work with. Is it possible your yeast is not active? If your yeast is old and no longer active, that could be the reason for your difficult-to-work-with dough. If you yeast was new and active, is it possible that the pretzel dough wasn’t kneaded long enough? As this dough is kneaded and the gluten strands build, it should become fully hydrated and stretchy – but if it’s not kneaded enough, this can’t happen and the dough won’t be pliable. I hope something here helps, Laura, and I hope that you give this recipe another try sometime – these pretzels really are delicious 🙂
How long will the dough last without cooking? Can it be frozen and thawed for later use?
Hi Richard! We have not tried freezing the unbaked pretzels, and often yeasted doughs don’t have the best results when attempting this (not always the case, certainly, but often). Tessa describes how to best freeze the baked pretzels in the pink tip box above the recipe. This is the best way she has found for preparing these in advance. I hope that helps 🙂
When do you add the barley malt syrup? I’m not seeing that step in the recipe but it’s in the ingredients list
Hi Nicole! Apologies for the mistake in the recipe. It currently says at the beginning to “combine the yeast, sugar, and 1/4 cup of the water” and the barley malt syrup is an alternative to the sugar. I will update our recipe now to include this. Thanks so much for bringing this to our attention 🙂 Please let us know what you think once you have tried the pretzels!
Hi. I want to make these for a crowd and would like to serve them warm. Could i put the pretzels in a Ban Marie (sp?) to keep them warm? I don’t think that they would get soggy as there is no steam in the pan they would set in.
Hi Jennifer! We haven’t tried that, so I couldn’t say for sure – but as long as they aren’t exposed directly to the water and don’t get soggy, and they aren’t in there for toooooo long, I think that should be okay! I do also want to mention that these pretzels are phenomenal cold, too, so no worries if you can’t serve them warm!! Let us know how it goes! 🙂
Looks great, I plan to try this soon! Is the lye water harmful to the touch? Specifically, how careful do I need to be with the lye water dripping off the pretzel dough?
Hi John! Lye is a harmful chemical, so you definitely do need to be careful, especially when mixing the lye with water (always add lye to water, never water to lye, to avoid any potential for splashing). While it’s totally safe to eat once baked, you do want to be very careful during the prepping and pre-baking lye bath processes. Use plastic gloves for your hands, and avoid any splashing or dripping on your clothing or skin. Tessa includes all these safety tips and more in the pink box above the recipe. There is also a baking soda bath alternative, in case using the food-grade lye is not an option for you! We can’t wait to hear what you think of these pretzels, so be sure to let us know once you have tried them! 🙂 Happy baking!
So the baking soda bath is before or after baking the dough? It’s put after the pretzels have been baked, so the recipe reads like it’s a step you take after baking the pretzels. Is the baking soda after the bath or are the steps out of order?
Also, how long do you whisk for the first step with the yeast? It just says ‘whisk’ but not how long to do it for which seems very important for most baking.
Hi Cat! I’m sorry the recipe was not clear to you.
The baking soda bath is written after the baking instructions because it is an alternative to the recipe as written; our preferred method of making pretzels is using a lye bath prior to baking. The baking soda bath is an alternative if a lye bath is not an option for you. You would follow the directions for the baking soda bath, and then follow the baking instructions above as written.
To answer your other question, the initial directions to whisk the yeast, sugar and water say “whisk to combine”, meaning exactly that; you are just simply mixing these ingredients together until combined (which only takes a few moments), and then setting aside so the yeast can proof for a few minutes.
I hope this helps! Happy baking 🙂
You bath the dough before baking. ..i have a bread machine ..making my dough in that …its souch faster. And u cant make any mistakes
Do you have a suggested (product) plastic container for the lye bath? Should the container be shallow or deep? Thank you!
Hi Mitchell! Most importantly, you want to make sure that your container can hold 1 liter of water. It can be shallow or deep, but we’d recommend for a beginner to follow the photos in this blog post and place your pan on a parchment covered baking sheet in case of any spillage. Tessa uses an 8×8 glass pan, and I use my Pyrex 8-cup measuring cup, which works perfectly as well. I hope that helps! Please let me know if you have any other questions, I can’t wait for you to enjoy these! They’re forever stocked in my freezer 🙂
These were super easy to make & really great to eat! I used the baking soda bath & they were perfect! But they dont store well & i gotta work on getting them thinnerl! Thanks for this recipe!
So glad you enjoyed these pretzels! Make sure to check out the pink tip box for more tips on how to store and freeze pretzels. We always keep a batch of these pretzels in the freezer!
Tessa, I made these today. First time making pretzels. They turned out beautiful! I used the lye bath. Recipe was easy to follow, instructions were clear. This was relatively quick to make. I will make these again! Next time, I’m making the beer cheese too!
Happy Baking!
Fawnda
So happy you loved this recipe, Fawnda! Can’t wait for you to enjoy them next time with the beer cheese, it’s incredible!