This post may contain affiliate links. Read our disclosure policy.
This Ultimate Dinner Roll recipe is the most delicious dinner roll recipe you and your family will ever try!
There’s no need to be intimidated by homemade yeast bread baking – especially with a practically foolproof recipe like this one for the best-ever Ultimate Dinner Rolls.
I promise this dinner roll recipe is way easier than it may seem. These will become the surprise star of your Thanksgiving dinner table, Easter brunch, or just your Sunday night family dinners!
I actually originally developed this recipe in 2013 after testing tons of tweaks on dinner rolls for my Ultimate Dinner Roll Guide post here. I learned exactly what made homemade dinner rolls fluffy or hard, tender or crusty, and compiled my favorite tweaks to create this recipe for Ultimate Dinner Rolls!
Over the years, I’ve continued to tweak and improve the recipe to make it even more soft, fluffy, and flavorful.
I hope you give this dinner roll recipe a shot soon. If you’re still nervous about working with yeast, get my *free* Beginner’s Quick Guide to Bread here.
How to Make the Ultimate Dinner Rolls
Top Tips for Fluffy, Soft Dinner Rolls
- Avoid adding too much extra flour to the dough. This dough is enriched with milk, butter, and sugar. These ingredients slow down gluten development and can make the dough a little sticky. Your instinct might be to add extra flour; however, any extra flour will create a denser, tougher roll instead of the light, fluffy, soft dinner roll we want.
- Measure your flour correctly. I highly recommend using a digital kitchen scale for accuracy, but if you don’t have one, be sure to use the spoon and level method to ensure you’re not accidentally compacting too much flour in your measuring cups. Learn more about that here.
- Don’t skip the sugar. There’s just a touch in these dinner rolls, to help make the rolls tender and golden brown. Learn more about sugar’s role in baking here (spoiler alert: it does SO much more than simply sweetening!)
Do I Have to Use Bread Flour?
Bread flour has a higher level of protein content than all-purpose flour, which helps create tall dinner rolls with a nice chewy, fluffy texture. If you don’t have bread flour, use the same amount of all-purpose flour – but your rolls may just be slightly shorter and less chewy, and may take longer to knead and rise.
Which Yeast Is Best to Use For Dinner Rolls?
- This dinner roll recipe utilizes a shortcut ingredient: instant yeast, also called rapid-rise or quick-rise yeast.
- One of the three should be available at most grocery stores or you can buy my all-time favorite yeast on Amazon.
- These types of yeast are specifically formulated to allow you to skip proofing (aka the step where you combine the yeast with warm liquid for 5 minutes). You can add instant yeast directly into the mix with all of the ingredients.
- If you don’t have or can’t find instant yeast, you can easily use active dry yeast instead. Add it right in with the dry ingredients like instant yeast – just know the dough will take about 20% more time to rise.
- Or, to speed up that rise time slightly, simply combine it with the warm water and milk called for in the recipe and allow it to proof for 5 minutes before adding into the bowl with the other ingredients.
What Type of Milk Should I Use?
Whole milk produces the absolute best flavor and texture. I don’t recommend using a non-dairy or low-fat milk unless you absolutely must.
What Type of Salt for Dinner Rolls?
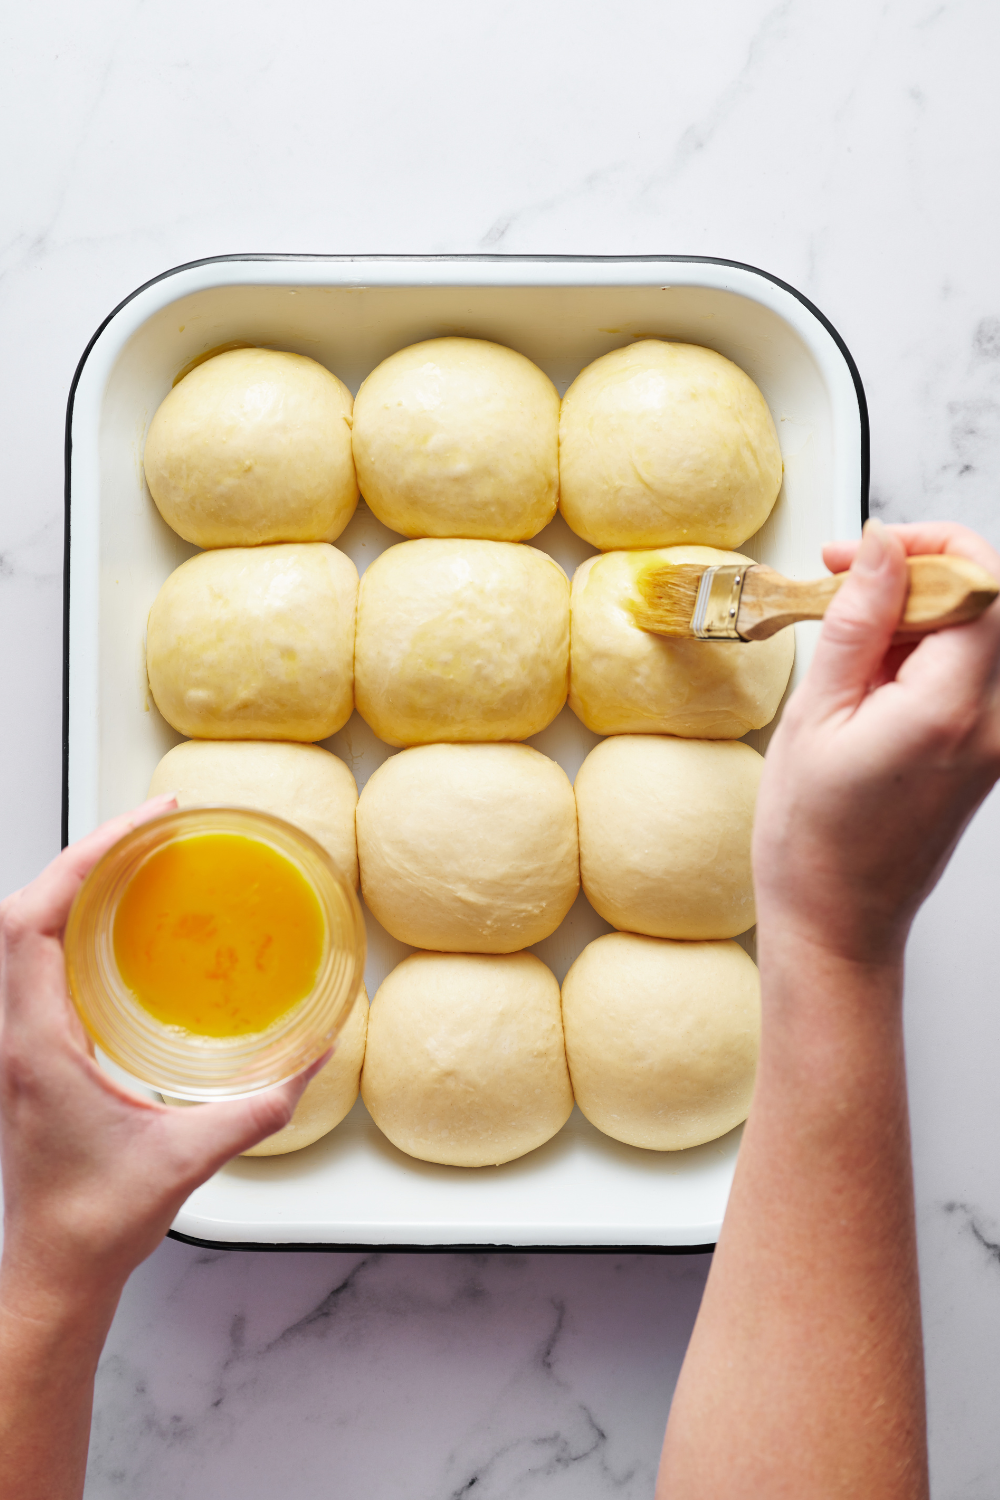
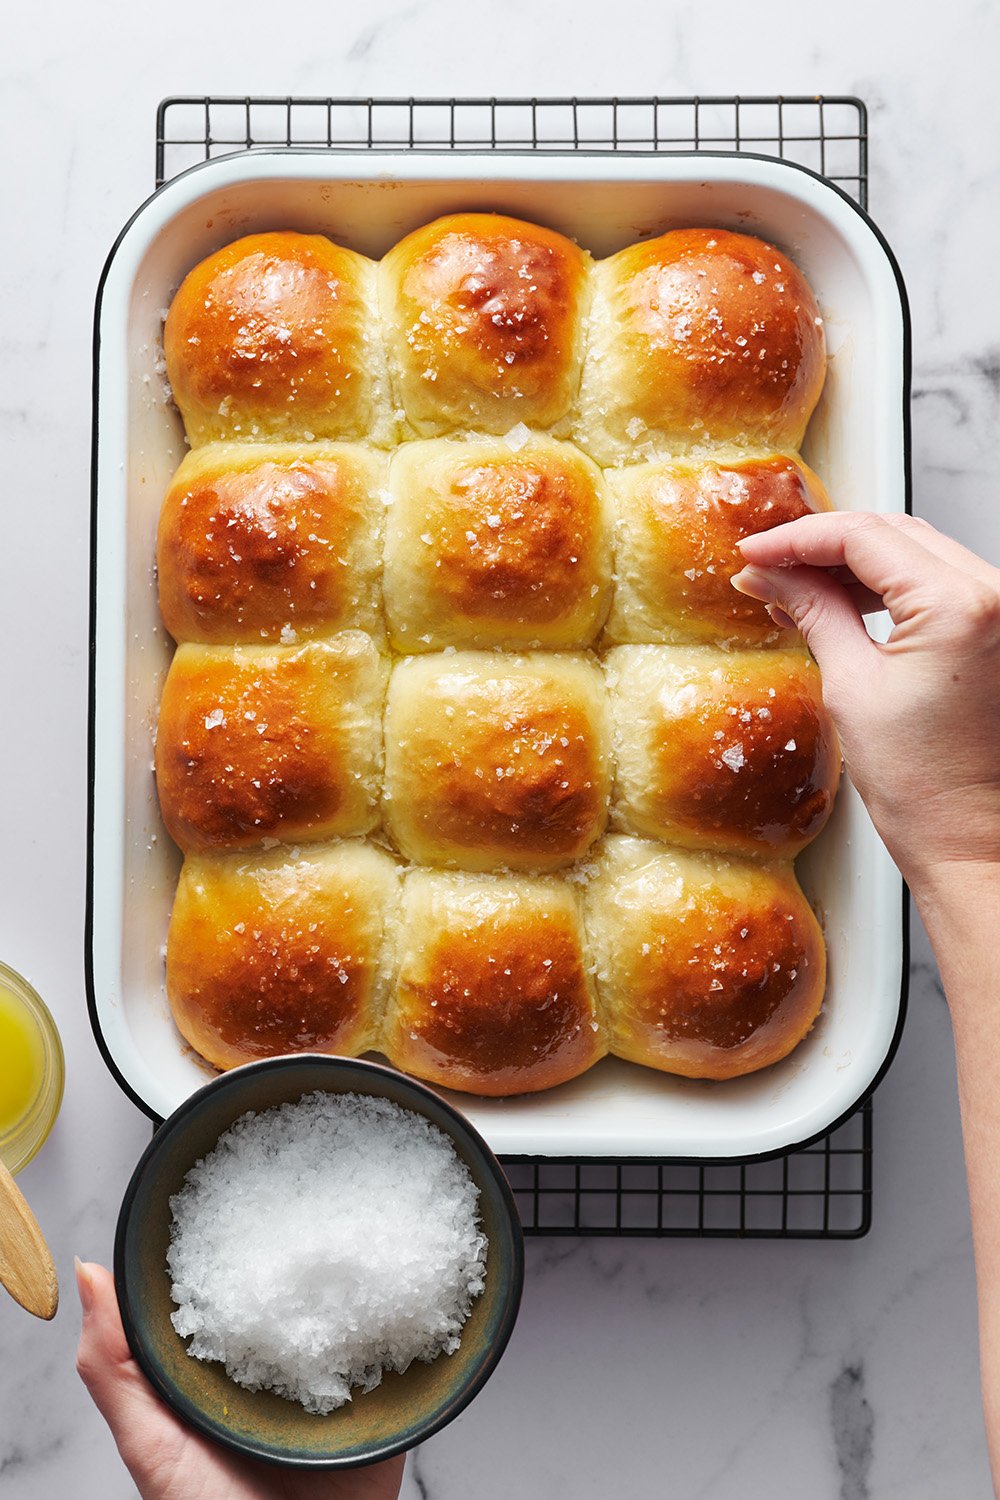
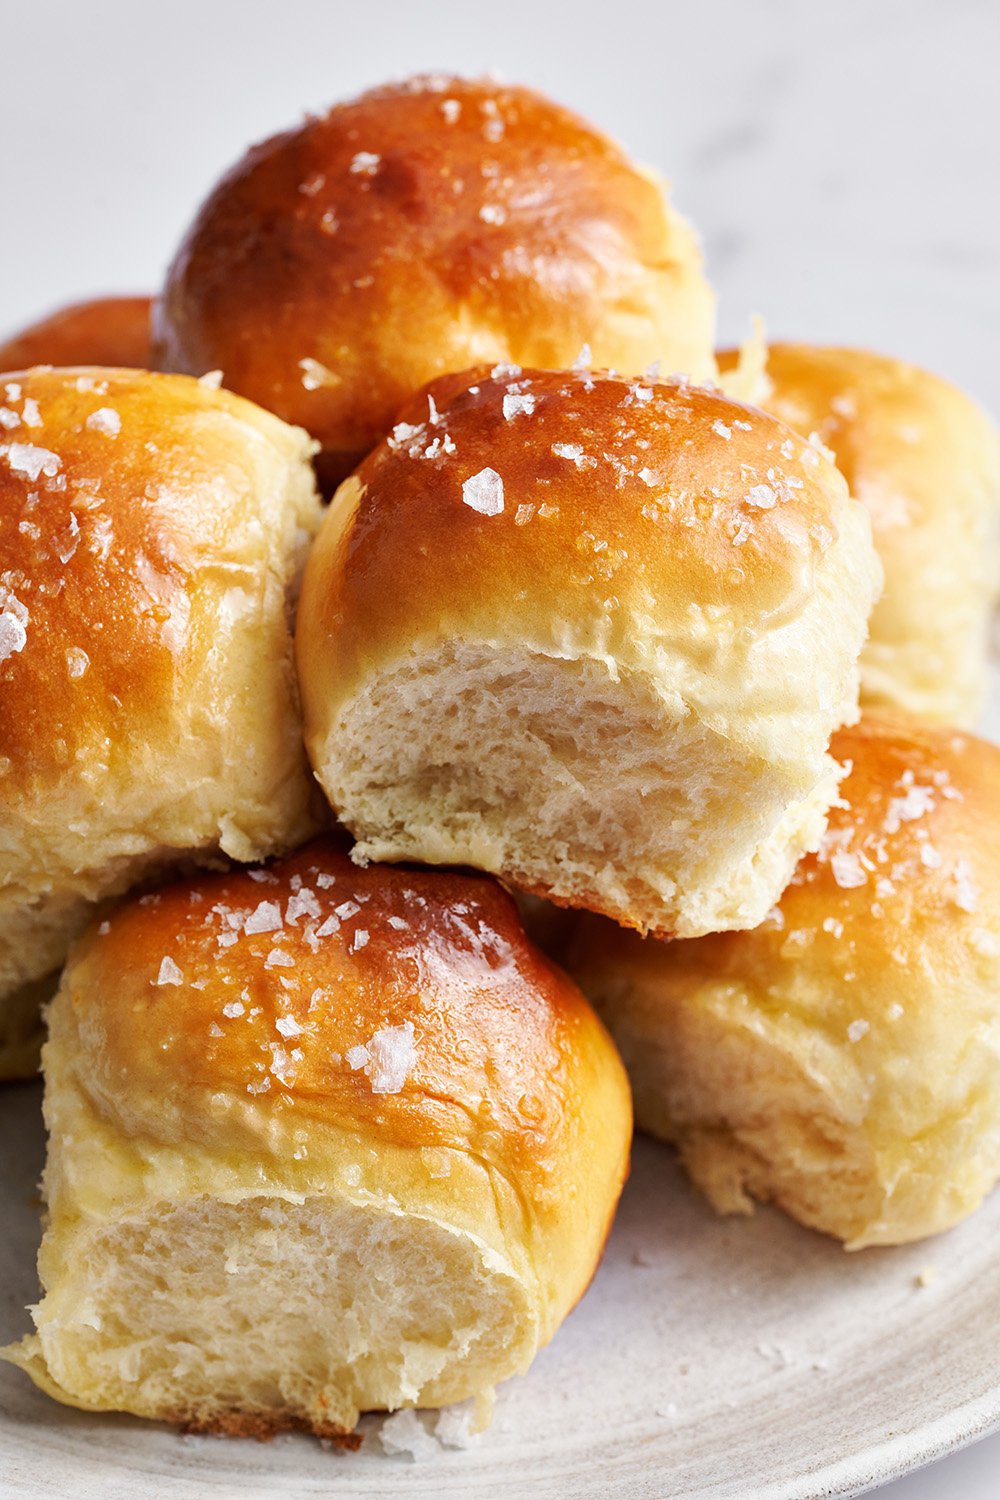
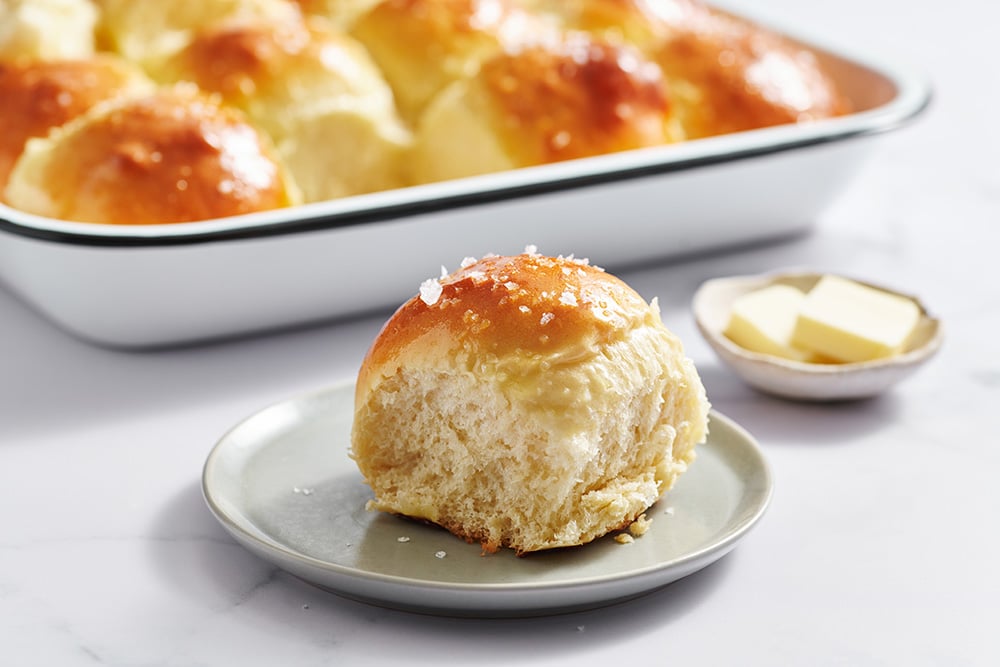
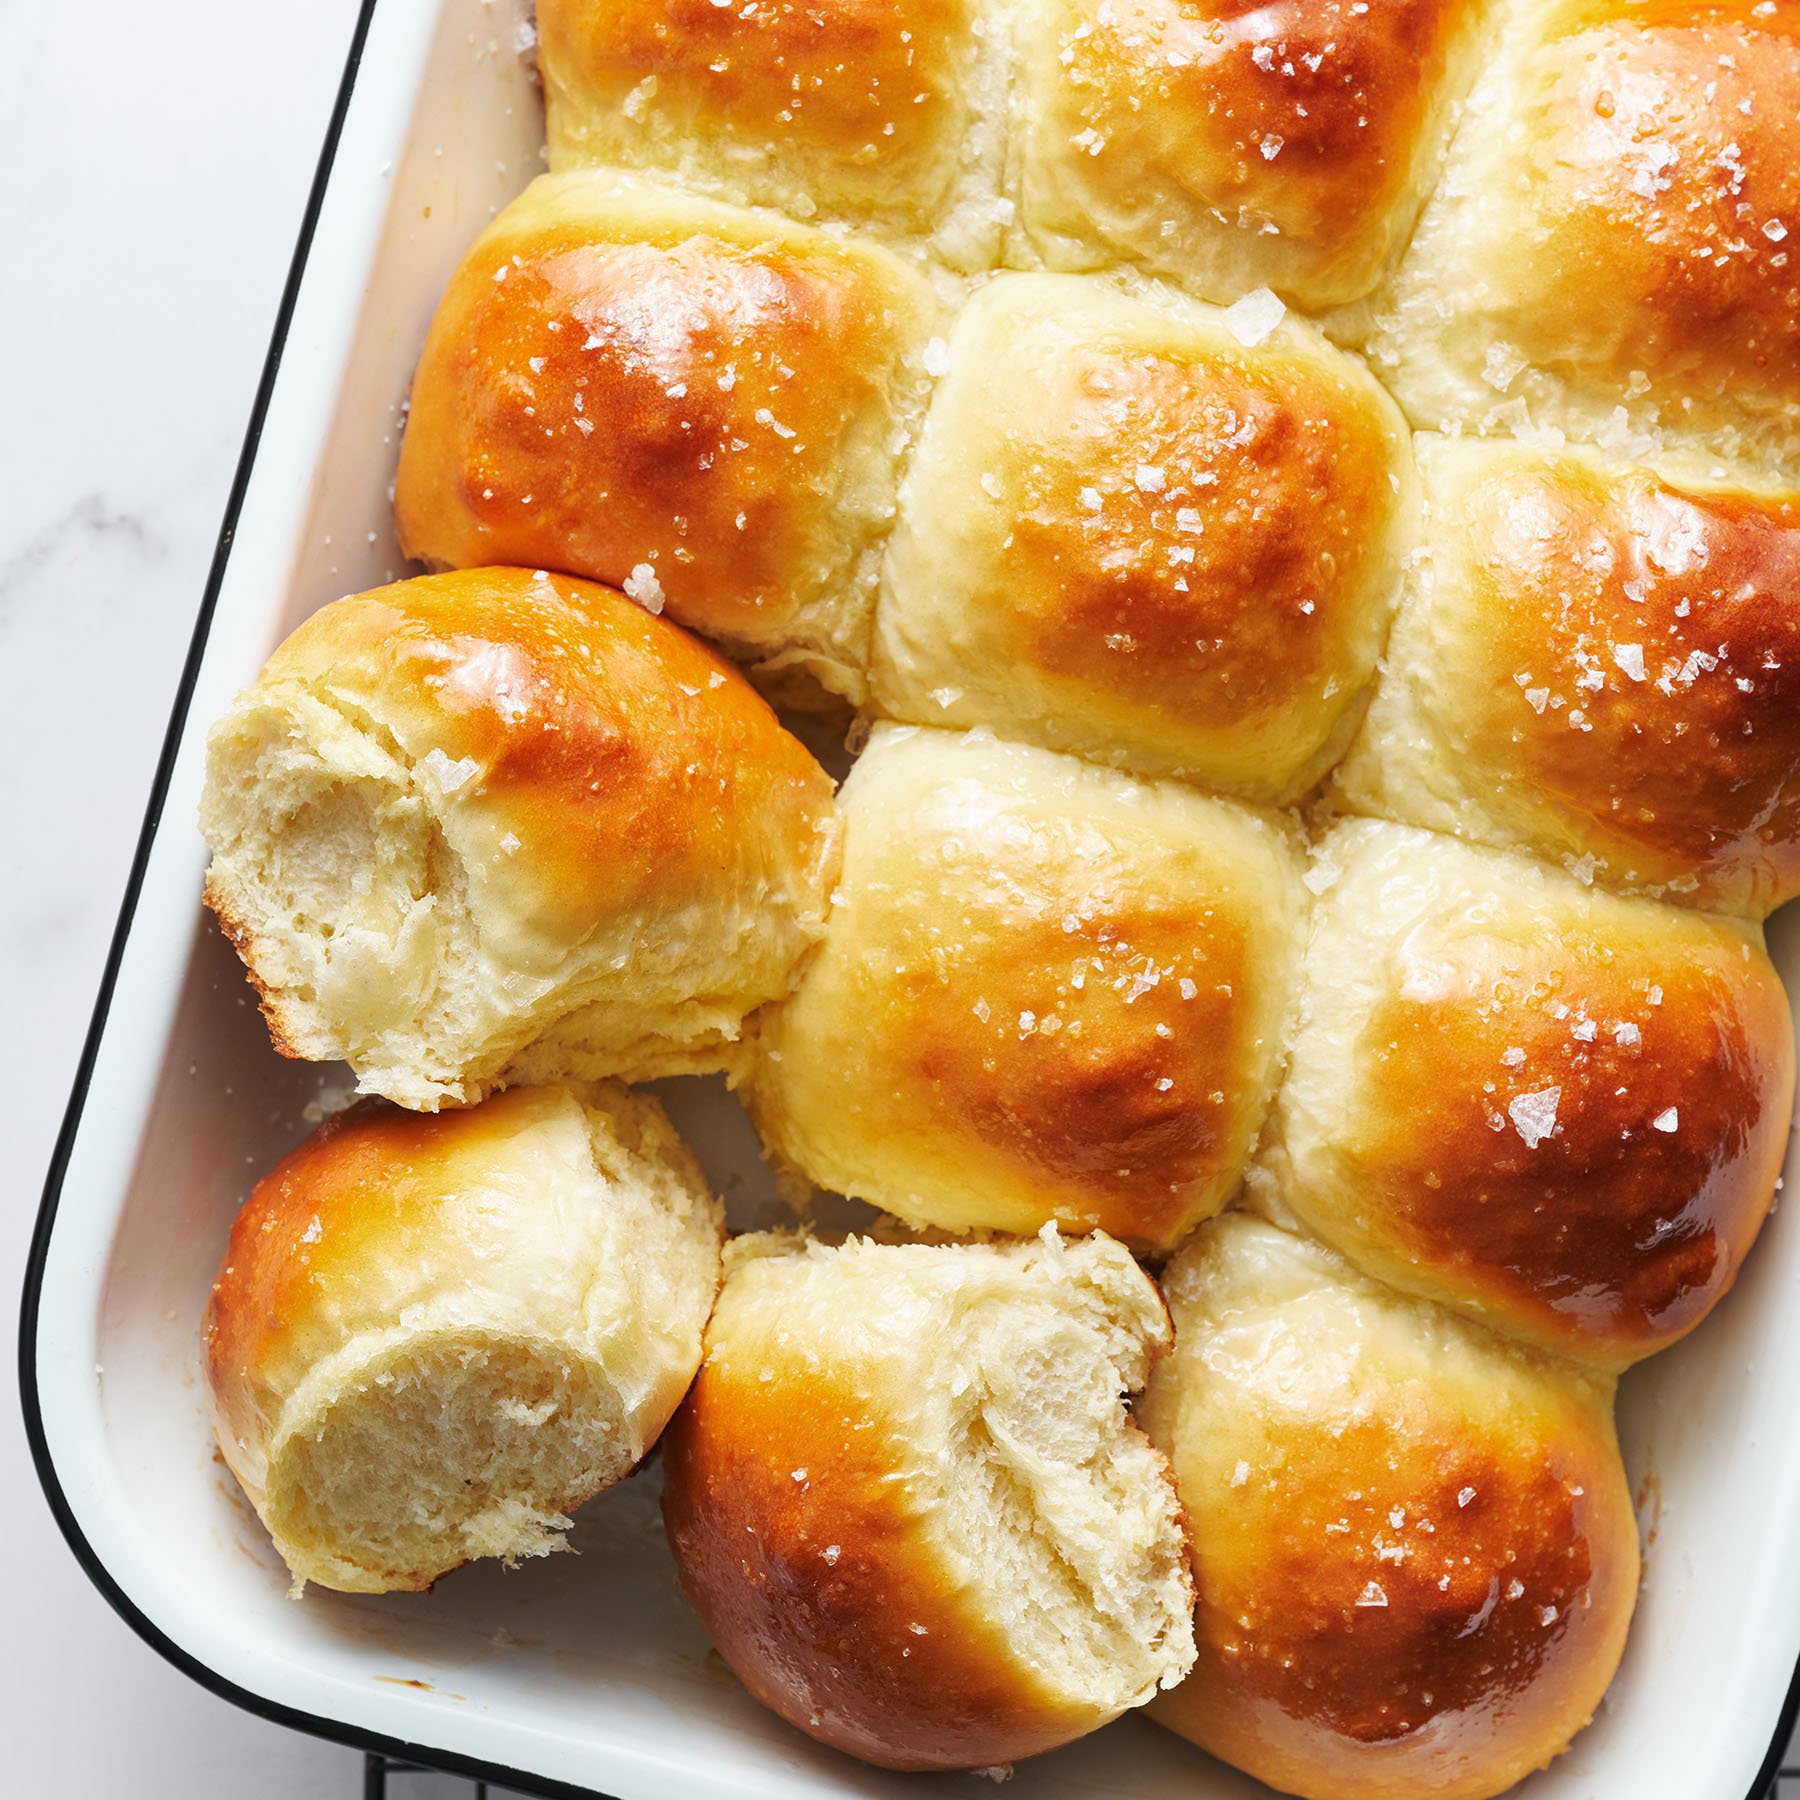
I recommend using fine sea salt inside the dinner rolls, and I also love sprinkling flaky sea salt on top of the freshly baked and buttered rolls, for even more flavor. Learn more about different types of salt here.
Can I Knead the Dough By Hand?
Yes! I call for a stand mixer to make easy work of kneading in this dinner roll recipe, but you can also knead by hand. Be sure to knead the dough properly, until the dough is smooth and elastic, to get rolls that hold their shape and bake up nice and fluffy. You can see my full tutorial on how to knead dough here.
How to Tell When Dough Is Risen
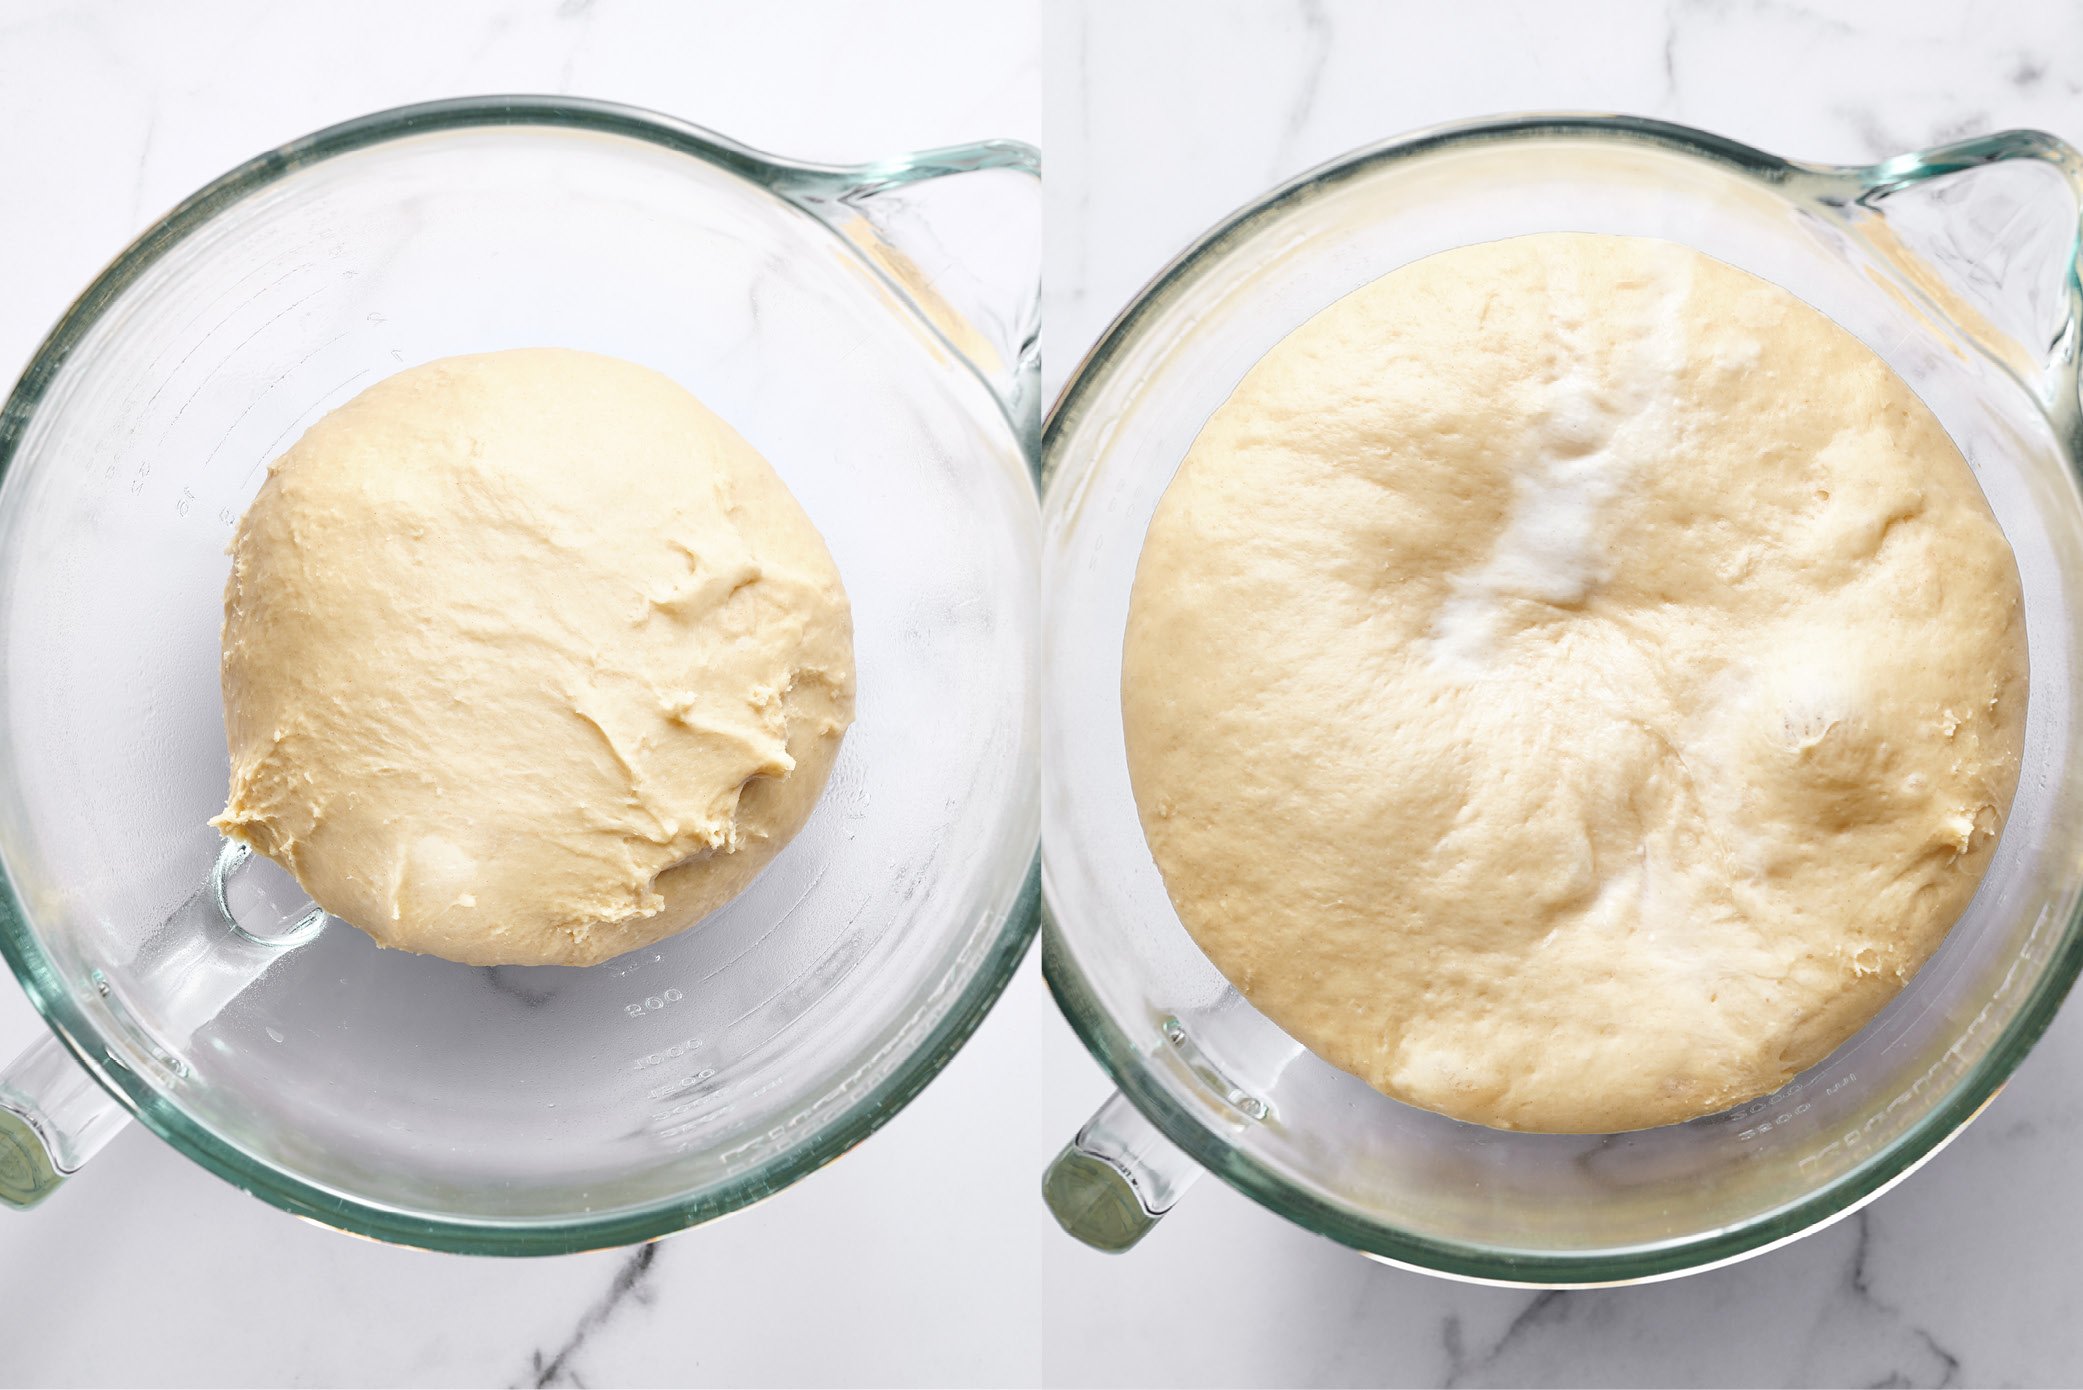
After kneading, shape the dough into a ball. Place in a lightly oiled mixing bowl. I like to use glass so I can see how much it’s rising. I’ll even snap an iPhone picture of the dough before rising so I can compare later. The dough should be turned over to oil the top so that it doesn’t dry out. Cover the bowl with plastic wrap, foil, or a clean kitchen towel. Let the dough rise in a warm, draft-free location. Ideal rise temperatures are between 80°F and 90°F. Lower temperatures will require more rising time; warmer temperatures will mean a shorter rising time.
The dough is done rising when it’s about doubled in size and passes the “ripe” test: gently stick two fingers in the risen dough up to the second knuckle and then take them out. If the finger marks remain, the dough is ready for shaping into balls. If not, cover and let the dough rise longer until it is.
The same finger test can be done again when the rolls are shaped before baking. Here’s what my dough looked like before and after rising:
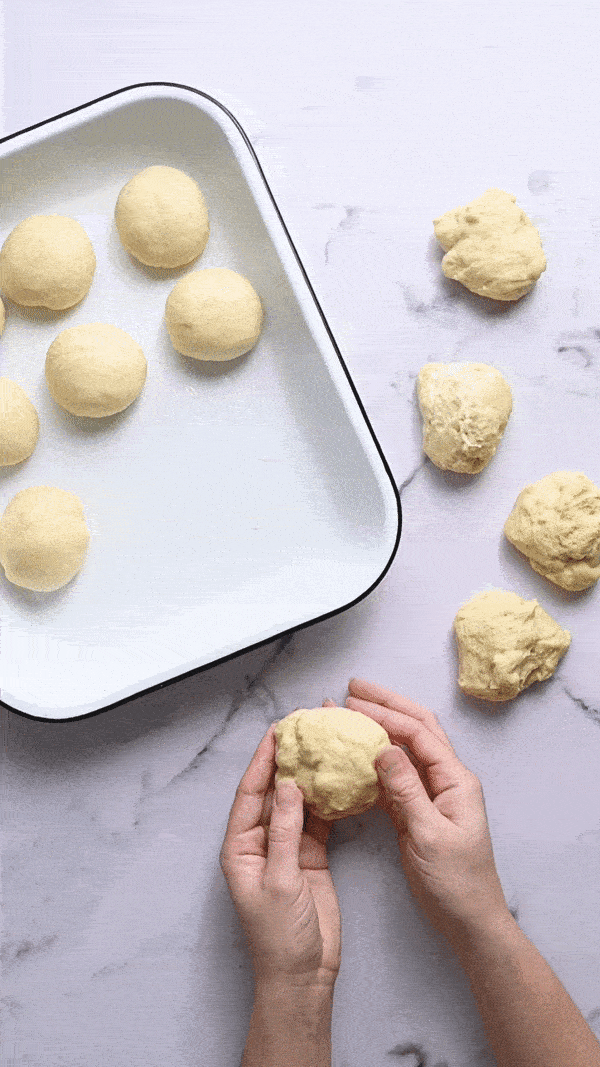
How to Shape Bread Rolls
- Once the dough is risen, press it down to gently deflate.
- Place the dough onto a clean surface (not a floured surface).
- Use a bench scraper to section the dough into 12 equal pieces. Don’t worry if they’re not perfectly equal in size. However, if you’re a perfectionist, you can weigh the entire mass of dough, divide that number by 12, and then portion each piece perfectly by weight.
- As you’re shaping each piece into a round, make sure to pinch the dough into one central point to create a tight ball. This will help the rolls rise beautifully. Don’t flour your work surface when shaping the rolls because you want some resistance to roll them into taut balls.
You can also get creative with shaping this dinner roll recipe! Check out my article for 5 Ways to Shape Bread Rolls here.
What Type of Pan for Dinner Rolls?
This recipe was written to use a 9×13-inch baking pan. While I usually prefer metal baking pans over glass or ceramic (metal conducts heat more efficiently), I actually prefer the table presentation ceramic pans offer when making dinner rolls. Also, because ceramic (and glass) conduct heat more slowly than metal, it allows these rolls to stay soft in the centers.
How to Make Dinner Rolls Ahead of Time
Most yeasted doughs can be made ahead of time and baked off later by simply chilling the dough. Refrigerating basically stunts the rise time and can actually allow more flavor to develop!
For this dinner roll recipe, here’s my recommended method:
- Make the dough all the way through to rising once and shaping into rolls.
- Once the rolls are shaped, cover the pan well with plastic wrap and place in the refrigerator for up to 24 hours.
- When ready to bake, bring to room temperature as the oven preheats before baking as the recipe directs.
- If the rolls haven’t doubled in size yet, allow to sit at room temperature until they do.
- The rolls are best served the day they’re baked. However, you can easily reheat the rolls briefly in the oven or toaster oven at 300°F until warmed through to refresh before serving.
If you need to prep these rolls further in advance, see the freezing instructions just below.
How to Freeze Dinner Rolls
- Freeze the dough after it has risen for the first time and been shaped.
- Place the rolls in a baking dish, cover tightly with plastic wrap, and store in the freezer for up to 2 months.
- When ready to bake, loosen the plastic wrap and thaw to room temperature.
- Let rise until an indentation made with your finger into the dough remains.
- Proceed with the recipe as written.
More Dinner Roll Recipes You’ll Love:
-
1/4
cup
lukewarm water
-
1
cup
warm milk (100 to 110°F)
-
1
tablespoon
unsalted butter,
melted plus more for greasing
-
2
large eggs,
lightly beaten
-
2
tablespoons
granulated sugar
-
1 1/2
teaspoons
fine salt
-
2 1/4
teaspoons
(1 packet) instant yeast
-
4 1/2
cups
(572 grams) bread flour
For egg wash & finishing
-
1
egg,
lightly beaten
-
Melted butter
-
Flaky sea salt,
for sprinkling
-
Combine the water, milk, 1 tablespoon of the melted butter, eggs, sugar, salt, and yeast in the bowl of a stand mixer. Add 2 cups of the flour and stir with a wooden spoon until the dough forms a rough, shaggy mass. Attach the dough hook to the mixer, turn to medium-low speed, and gradually add the remaining flour, kneading until a mass of dough begins to form. Continue kneading on medium-high speed for 4 to 5 minutes until a soft, smooth ball of dough is formed. The dough should feel elastic and slightly tacky to the touch.
-
Lightly spray a large clean bowl with cooking spray and place the dough in the bowl. Cover the bowl lightly with plastic wrap. Let rise for about 1 hour to 90 minutes at room temperature or until the dough is big, puffy, and about doubled in size.
-
Grease a 9x13-inch or similarly shaped baking pan with butter. Gently deflate the dough. Use a bench scraper, knife, or pizza wheel to divide the dough into 12 equal pieces. Shape each piece into a ball and place in the prepared pan. Lightly cover the dough with plastic wrap and let the rolls rise for about 1 hour, or until about doubled in size.
-
Preheat the oven to 375°F.
-
Brush the rolls gently with the beaten egg. Bake the rolls for 20 minutes, or until golden brown. Brush with melted butter and sprinkle with salt. Serve warm. Store leftovers in an airtight container or ziptop bag for up to 3 days.
If you’re interested in improving your bread baking skills, check out my FREE guide:

This recipe was originally published in 2013 and has been updated with new photos and more baking tips. Photos by Joanie Simon.
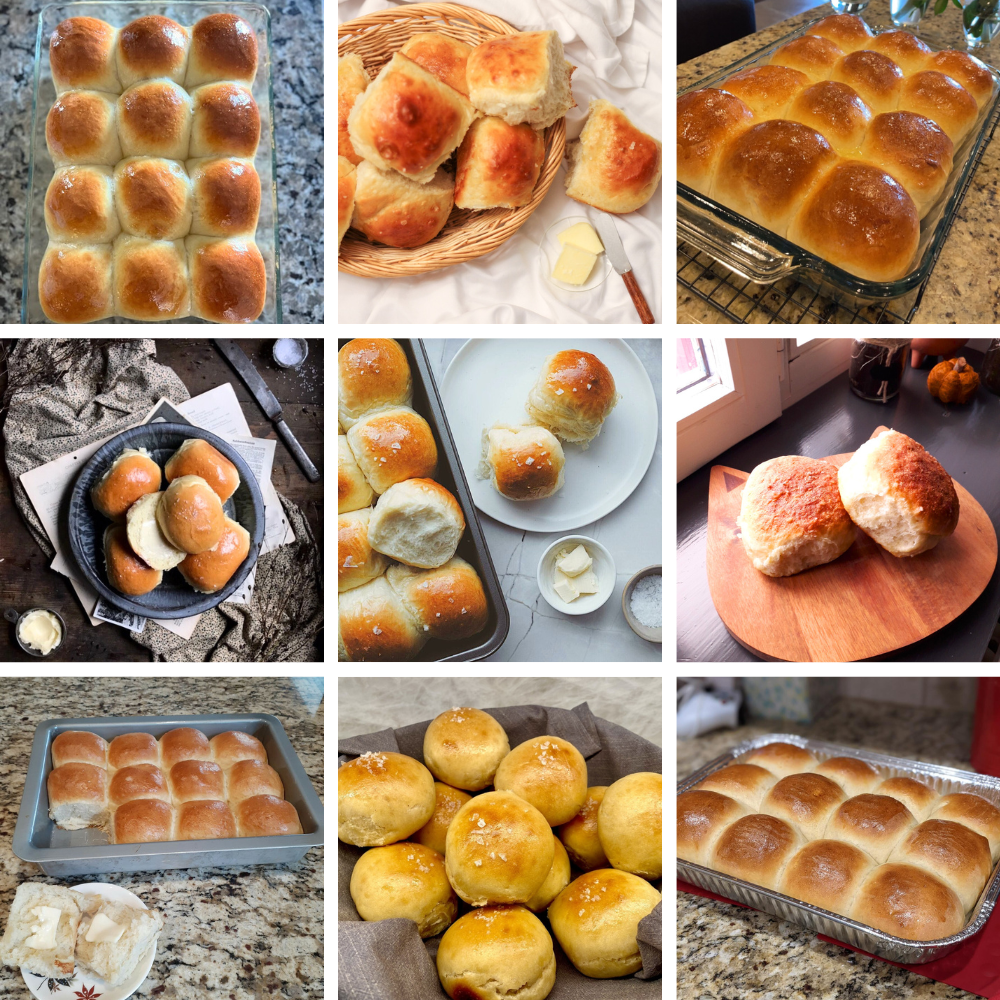
November Baking Challenge
This recipe was the November 2021 selection for our monthly baking challenge! Every month you can join the challenge by baking the recipe and snapping a photo for a chance to win prizes! Learn more about my monthly baking challenges here. Check out everyone’s dinner rolls:


I was wondering if you knew of a way, or your best suggestion for making these rolls stay fresh longer? Is there a way to store them that would help them taste and feel similar after say, three or four days? Or an ingredient you know of even? Or is feezing/thawing the dough the way you’d handle it?
Yes, freezing and thawing the dough would give you the best taste and texture!
I made these last Thanksgiving and they were the STAR of the meal. So easy and fabulous. I will never buy a dinner roll ever again.
Oh, I’m so pleased to hear that, Alex!! Thanks so much for sharing 🙂
Wow! Made these today, and they are amazing! This will now be my go to recipe! Thank you 🙂
hi Tessa..these rolls look amazing!!i would love to make them. do you mind sharing the recipe in grams? i’m not very familiar with cup measurements :p
thanks 🙂
Hi Tess,
there are 2 comments about freezing the dinner rolls, one says to shape into rolls and let rise then flash freeze the other one says to freeze10 minutes after shaping. Which way is best and do i need extra yeast in the recipe?
Thanks,
Lori
I have used your roll recipe for years now. It is perfect, easy, and never fails me! Thank you!
So happy to hear that, Dawn!!
These rolls were perfect!!! They tasted as good as they looked! Thanks for this wonderful recipe!
Without a doubt the BEST and EASIEST recipe I have found…these are a big hit with everyone in my family!!!
That’s wonderful to hear, Denise!
Can this particular dough be shaped into knots or other shapes?
I haven’t tried that! Let me know if you give it a try 🙂
I have made these dinner rolls and each time I surprise myself with the end result. It’s easy and something to put on the table that’s tasty and beautiful to look at.
Turned out great!! My grandkids love them.
Have you tried making a loaf of bread with this recipe?
I was looking for something I could make that was not too hard, satisfying for lots of people’s tastes, and fun to do. Your recipe filled the bill! Thanks so much. I really enjoyed the texture, handling the dough, forming the rolls, and then presenting the results to my family and to members of a class I teach. The aroma was the best advertisement! I want to work on the subtle skills that enhance flavor and texture, but my first try was a success.
Woohoo, Lindsey! Happy to hear that 🙂 And you’re so right, there’s nothing like the aroma of baking bread.
I was looking for something I could make that was not too hard, satisfying for lots of people’s tastes, and fun to do. Your recipe filled the bill! Thanks so much. I really enjoyed the texture, handling the dough, forming the rolls, and then presenting the results to my family and to members of a class I teach. The aroma was the best advertisement! I want to work on the subtle skills that enhance flavor and texture, but try was a success.
Saw this recipe last week and thought to try it. Made these twice so far and they are awesome. Easy to make and my family loves them. I’m also checking out your other bread recipes that I can try. Thanks for the recipe and great video tutorial.
I made these for thanksgiving today – EPIC!!! So excited they turned out exactly like yours. I was worried because I just used All Purpose Flour – but they still turned out amazing.
Thank you so much for a great recipe
I havent made your rolls yet but I watched your video and they look easy and yummy! Im considering adding them to my Thanksgiving dinner but I would have to change one thing. I never buy bread flour, instead I keep some wheat gluten in my freezer and add to my plain flour whenever I make bread or rolls. That is the difference between plain flour and bread flour… bread flour has more gluten for a higher rise than when you use plain flour. Thanks for the wonderful recipe and your teaching video. Im sure it will help those who are afraid of yeast dough to try making it.
I tried your recipe it was really good. Thanks. I made the dough have it refridgerated overnight and bake it the next day. Texture was really good spongy and chewy.
I MADE THESE ROLLS FOR DINNER TONIGHT AND THEY WERE AMAZING.
Thank you!! Best recipe ever, so soft and fluffy. I love them. THANK YOU.
I’ve made these three times now and they look beautiful but turn out dense. Any suggestions? I follow your recipe exactly every time and I’m stumped!
Dense bread is usually due to the flour being over-measured. If you live in a very dry climate you may need to reduce the flour but for best results always weigh the flour. If you don’t have a scale use the spoon and level method detailed here: https://handletheheat.com/ultimate-guide-measuring/
Another cause of dense bread is not allowing it enough time to rise. Always use the visual indication in a recipe for how the bread should look when it’s risen. You can also replace half the bread flour with all-purpose flour to create a lighter texture too. Hope that helps!
Made these, flavored with garlic butter…10 stars!!!!!
I made the dinner roll once with bread flour and once with ap flour they same to good both ways . I also made them into hamburger buns and turned out great I weigh them out at 4 oz balls and pressed them down to make them round they also turned out great thank you for your recipes al
i just made these, but I knew I was in trouble after I finished mixing in the remaining bread flour. My dough wasn’t soft and fluffy like yours in the video. I did measure the flour as well as weigh it out. My dough looked like I had used too much flour. Any suggestions?
Hi Tessa! I made these a couple of weeks ago and they were wonderful! I was wondering if I could use this recipe and stuff them with some pepperoni and mozzarella cheese to make Pepperoni and Chesse Rolls?
Omg this is the first time i made rolls that look like rolls and not like flat wanna be rolls great recipe thank you for sharing life saver 🙂 God bless you
I don’t have a stand mixer, can these be done by hand? I don’t expect you can use a handheld mixer either? Looking to try these for Christmas 😀
I’ve always been hesitant about baking homemade bread….working with yeast made me nervous. I was so pleased at how easy these rolls were to make and how absolutely perfect they came out. The video was a great addition-I could see I was on the right track during the entire process. I am more confident now about baking with yeast. Thanks so much!
I am a first time roll maker and your video was very helpful! I made these today for thanksgiving and they turned out awesome!
Thrilled to hear that! Hope it was a great holiday.
i made these for thanksgiving 2014 they were great had nothing but compliments about them. they are also great warmed up do not get hard.
That makes me so happy! Glad the recipe was a part of your celebration.
Is it okay to use self-rising flour for this recipe? I’m excited to try this recipe for Thanksgiving!
No, I would not use self-rising flour as the recipe does not require leavener other than the yeast.
I just made these tonight for Thanksgiving tomorrow! TOTAL SUCCESS!!! I did substitute honey for the granulated sugar (because we have bees so I try to use our honey in recipes as often as I can). They turned out great, and everyone in the family fought over the sample roll. (I also doubled the recipe in my Bosch mixer and it worked great.) Thanks for the recipe!
Soooo happy they were a success! I bet your honey made them extra tasty. Happy Thanksgiving!
Can I use oil instead of butter for the dough and brush the top of the rolls with some eggwash instead of butter?
Thanks.
First time making rolls as I have just brought a stand mixer, the dough seemed more sticky than yours but was fine when I shaped the rolls and they turned out perfect. I live in England, can you explain the difference between Dinner rolls and normal rolls? Thank you for the confidence boost, I will try other bread recipes now.
hi tessa
i read your whole recipe but couldn’t find anything in written “freeze the dough for so-and-so minutes”. i dont understand what other people are talking about.. am i missing something? my PC crashed so I’m using my smartphone to view your recipe. i can’t find your video as well. would you be kind enough to post your original & complete recipe in this comments reply? i love these rolls and would love to try them.
thanks 🙂
This roll recipe is perfection! I was so surprised when my rolls turned out just as fluffy and golden brown as yours!
I kneaded the dough by hand for 10 minutes but followed the directions exactly other than that and they are amazing!
Definitely one to add to my recipe box (: thank you!
Can I make these in my bread maker?
You can make the dough through the first rise but then of course the rolls will need to rise and bake in the oven.
Hi, Tessa. Just wondering if i could use whole wheat flour instead of normal bread flour for this recipe ? and would it be possible to skip the butter ? Im planning to serve this to a friend who is having health issue. Thank you so much.
All whole wheat flour would be pretty dense. I’d do half all-purpose, half whole-wheat if possible. The butter helps to tenderize the dough and brown the rolls as they bake. You can leave it out but it won’t be the same. If it’s a dairy thing you can use dairy-free butter substitute.
am i able to use regular baker’s yeast i don’t want to get a whole pack of instant yeast just for one recipe.
Sure, it’ll just take longer to rise.
Hey Tessa. Do you think I could freeze the rolls after they have risen? Or place the rolls a good distance apart on a cookie sheet and flash freeze them to then place them in a bag? I’d love to hear your thoughts. These rolls look so freaking delicious and I cannot wait to try them.
I think flash freezing the risen rolls would work best! Defrost overnight in the fridge, then let them come to room temperature before baking as the recipe directs. I’ve also actually frozen these rolls completely baked and reheated in a 350°F oven for 7 to 10 minutes with success. Happy baking!
I stumbled upon this page when seeking a new dinner roll recipe. In the time it’s taken these rolls to complete their first rise, I’ve managed to repin a good 20-30 of your recipes! This is the beginning of a beautiful relationship. (And a new pant size.)
After having a tried-and-true recipe for dinner rolls, i decided to try these for Easter. My other recipe took longer and was a bit more involved. This simple recipe was WONDERFUL. I do not have a mixer so I kneaded the dough about 6-8 minutes. I also made them the night before, put in the fridge and let stand before i baked them. Delicious! I love that they made 15 rolls, a perfect serving for us. They will move to the top of my list!
Lynne, thank you so much for your kind words about the recipe!! I’m so happy they made it to your Easter table. Thanks for taking the time to comment.
Second time’s a charm! I made these today, and they came out great. Ingredients are everything sometimes.
Glad to hear that!
I made these for Thanksgiving, and they were delicious! I had never made rolls from scratch before, so I was thrilled that they turned out like they were supposed to. 🙂 Thank you so much for sharing the recipe! 🙂
Ohmygosh, I was watching Chelsea Lately on DVR and totally had her name in my head, so sorry Tessa! Oh lordy.
Haha no worries! I love Chelsea Lately! I’m so happy you enjoyed the rolls 🙂
Chelsea, I made these rolls for Thanksgiving yesterday and they were PERFECT and so easy to make! Thanks girl!
Made these for Thanksgiving today, they turned out great fluffy and delicious everyone loved them, they were so easy to make especially after watching the tutorial. thanks for sharing this recipe.
I made these today for Thanksgiving. Came out very tasty, although a little dense. I’m not sure the dough rose enough, since it didn’t appear to double in size in 1 hour like yours seems to do in the video. I’ll definitely try them again soon!
Just a follow-up: I’ve made these every year for Thanksgiving dinner over the past 10 years! They’re always great and a family favorite.
These look amazing and simple! 🙂 I’d like to make them tomorrow night for Thanksgiving… will they keep overnight in the fridge from fresh??
Thanks! I’m not sure what you mean by “from fresh” but you can either complete the recipe through shaping the dough into rolls, let the unbaked rolls rise in the fridge overnight then bake off when you’re ready or you can simply bake the rolls tomorrow, underbaking slightly, then reheat in the oven until golden and warm on Thanksgiving.
Hi Tessa, I made these the other day and they were awesome. I want to make them again for Thanksgiving but I want to double the recipe. Do you know if I can use the same amount of yeast or should I double that as well.
Hi Erika, you should be fine with using the same amount of yeast, just be sure to use instant yeast, also sometimes called “rapid rise”. You may also not want to double the salt but instead use 1.5 times the amount, so 2 1/4 teaspoons salt. Everything else should be fine if doubled. Hope that helps. Happy Thanksgiving!
Could you please post your pizza dough recepie?
Thanks,
Linda
Just tried making these this morning and they turned out absolutely perfect! Great recipe!
The recipe says bread flour. The bread flour I have sure won’t make white fluffy roles. Did you use regular flour.
No, I used King Arthur bread flour. I’m not sure what kind of bread flour you have but if you want you can use regular all-purpose flour. I find that bread flour helps makes these rolls nice and sturdy and round while being soft with a slight chew. Stay tuned for a post I will be publishing next week breaking down all the ingredients in dinner rolls.
can i make this without using a mixer?
Certainly! It will just take about 10 minutes of kneading by hand.
I love making fluffy rolls. Still looking for the perfect recipe-yours look AMAZING! Can’t wait to try your recipe!
I suck at baking bread—but no more. This recipe works super fine. I’ll use it in my experiment next weekend. Taking 3 small balls of dough and placing in muffin tins to form clover rolls.
Thanks for sharing the recipe.
That’s why I love this recipe… it’s pretty foolproof even for the inexperienced bread baker. Clover rolls sound wonderful, I hope they turn out great!
At what point could I freeze these so that would just have to thaw and bake on Thanksgiving?
You can freeze 10 minutes after your shape the dough into rolls. Defrost overnight in the fridge and proceed with the next steps in the recipe (letting the dough rolls rise then baking).
Just an FYI you can’t freeze dough made with instant/quick yeast. You won’t get a rise when thawed. Unlike regular yeast freezing kills instant yeast.
I don’t know where you got that from, but it’s simply not true.
I made these tonight, and they were great! My dough didn’t quite double, and wasn’t very puffy, so I thought they might not turn out, but they were perfect! Definitely making them for Thanksgiving. Thanks for the recipe!
I’m glad they turned out!
I love your videos. I’m such a roll making novice, this helps so much! Not to mention you have the prettiest hands and manicure, so it makes it really easy to watch. Is it creepy I just said that? 🙂
Hahaha thanks Heidi! 🙂
I love baking bread and those are some really good results! For sure bookmarking these for Nov 28th 🙂
Thanks Gerry!
I don’t know how you can possibly top the Texas Roadhouse rolls of a few months back, which are wonderful, but I’ll give these a try and compare! In the few months I’ve been reading your blog, I’ve come to really trust your sense for a good recipe. Thanks!