Homemade pie crusts are about a thousand times more flavorful, flaky, and tender than the store-bought kind. It takes a little bit of extra work to get a perfect pie crust, but it absolutely does not need to be as intimidating as it may seem.
Until the dough comes together in a cohesive ball, it seems like something has gone wrong. Not to mention all of the frustrations when pie dough shrinks or loses its shape after baking. I’ve factored in as many potential pie crust woes into this recipe to make it as foolproof as possible.
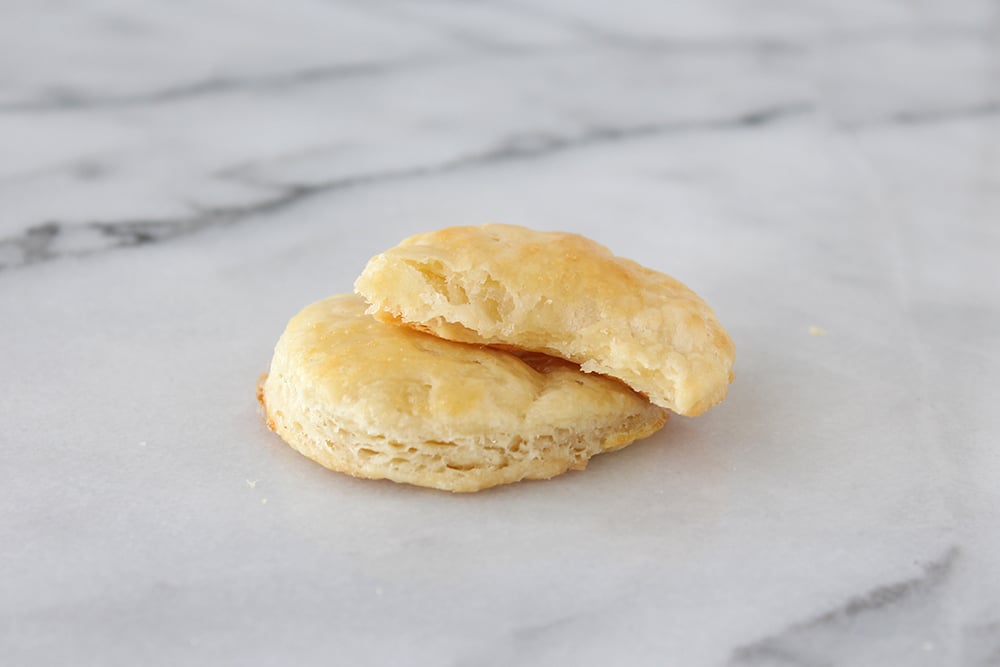
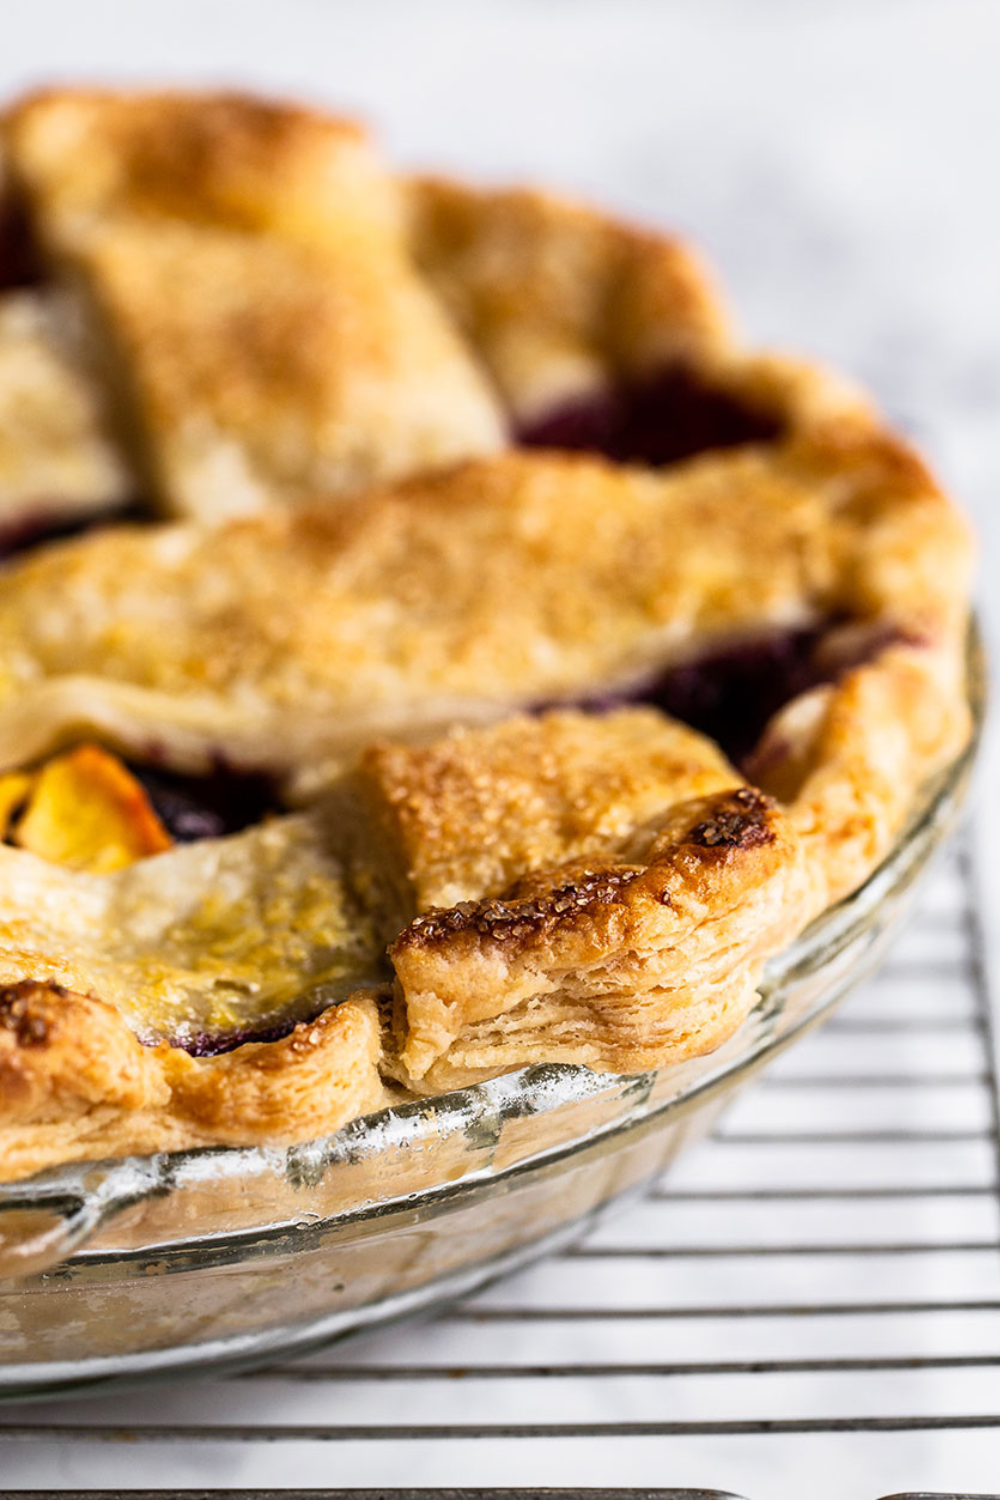
I actually completely overhauled my pie crust recipe in 2020 to make it even more tender and flaky. I took a bunch of feedback I’d received over the years from readers to improve the recipe and I’m SO happy with the results. Take a look at just how FLAKY:
I spent weeks testing, experimenting, and researching different pie dough methods, tips, and tricks. Some worked, others didn’t.
I’m sharing a ton of tips that truly work in this post, so let’s go ahead and get right into the juicy stuff. (Or should I say flaky stuff?)
How to Make the Best Ever Pie Crust
For Flaky Pie Crust, Keep Everything COLD, Especially Your Butter
If your kitchen is above 73°F, you can refrigerate all of your ingredients and equipment including your bowl, rolling pin, and pie plate until it’s between 65-70°F (dip an instant-read thermometer into your flour to gauge the temperature). If it’s a hot day, or you have hot hands, you’re probably better off making your pie dough in a food processor.
If your kitchen is warm, fill freezer bags with ice and a little water and set them on your work surface for 10 minutes to chill it before rolling out your pie dough. This will prevent the butter from becoming greasy as you work with the dough.
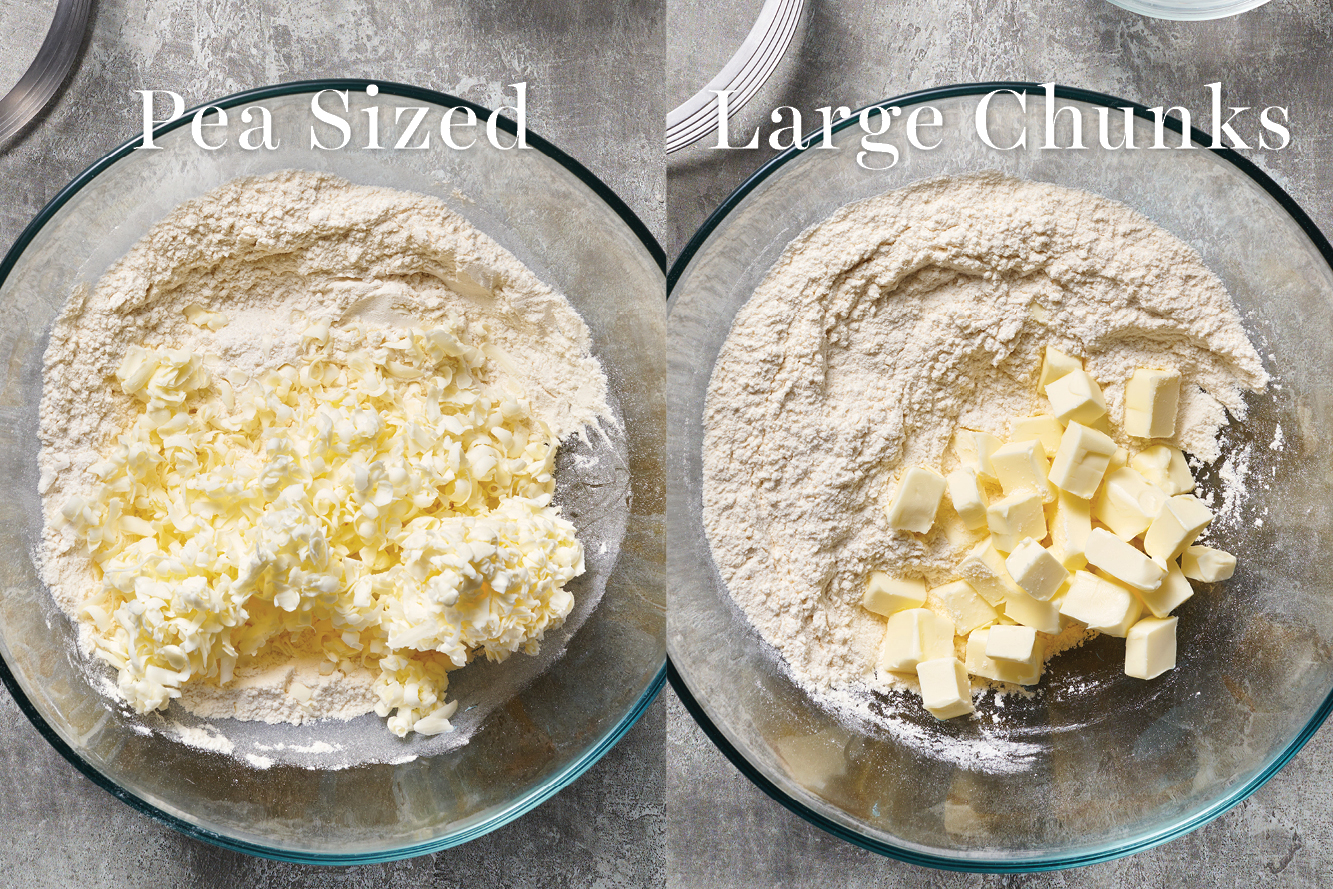
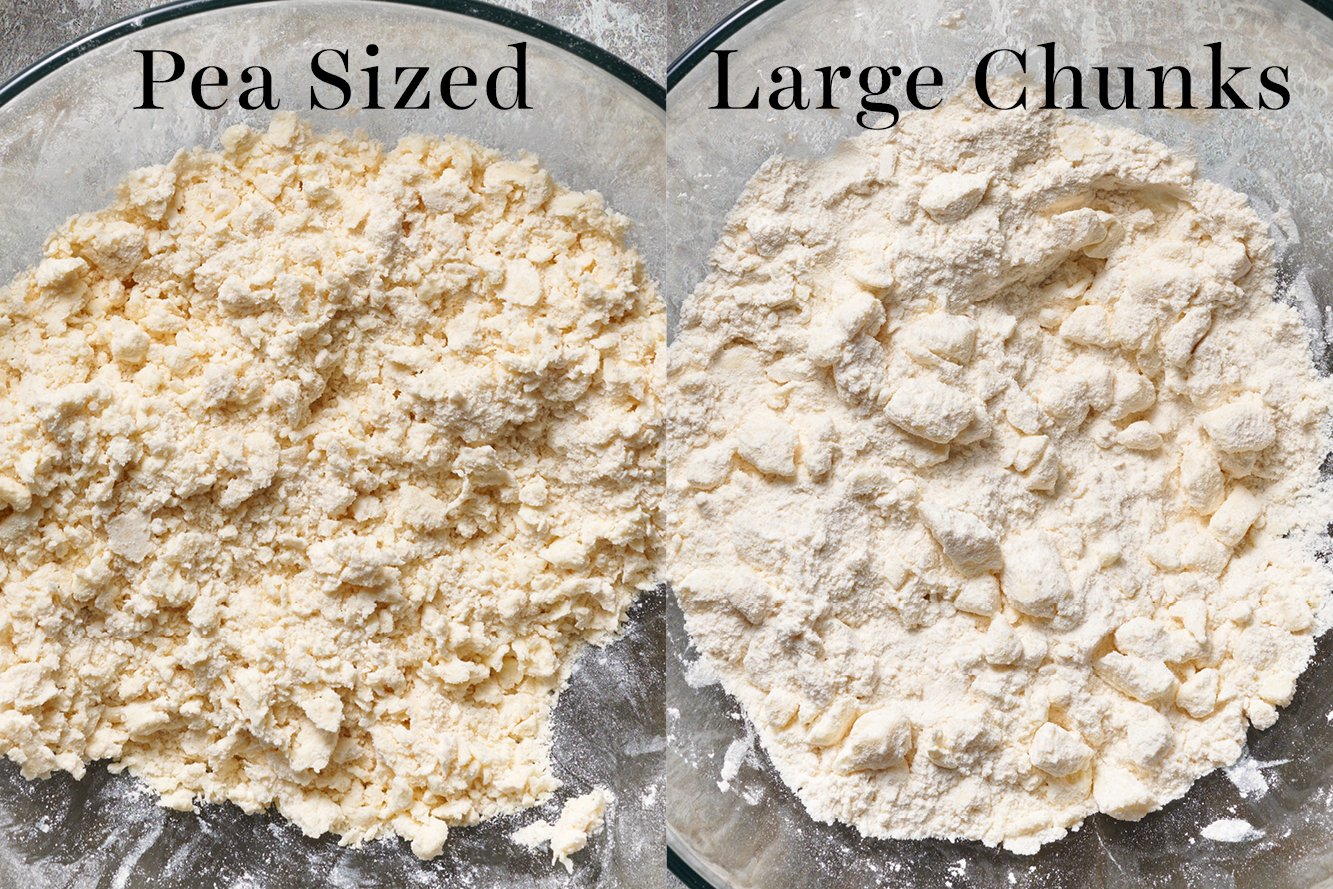
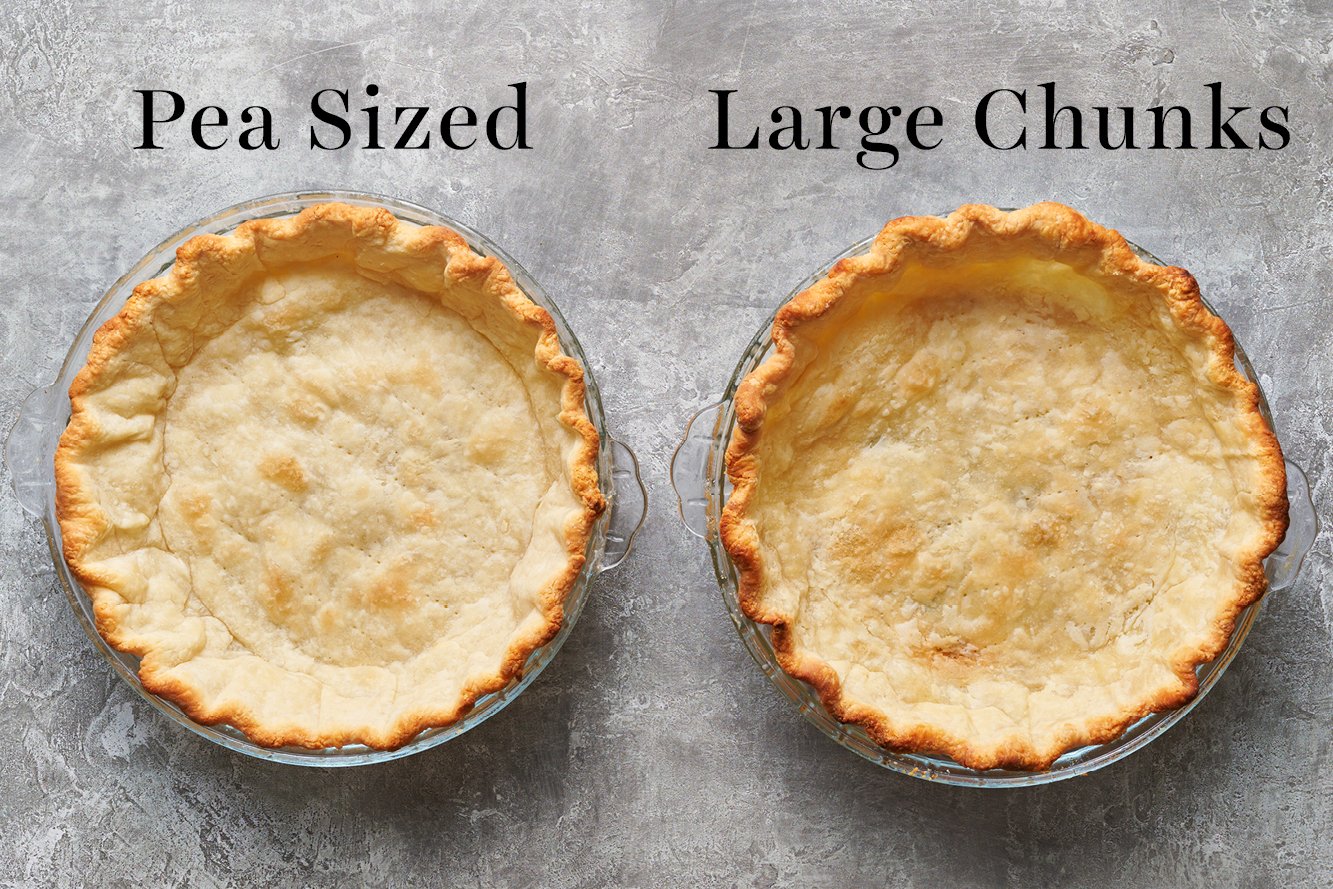
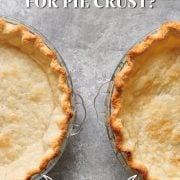
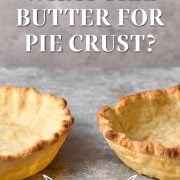
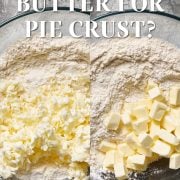
Pea-Sized vs. Large Chunks of Butter in Pie Dough
- The general rule of thumb is that smaller pieces of butter will result in a more mealy textured crust that holds up better to custard fillings.
- Larger chunks of butter will yield a flakier crust better suited for fruit fillings. Larger chunks also run the risk of creating pools of butter as your pie dough bakes.
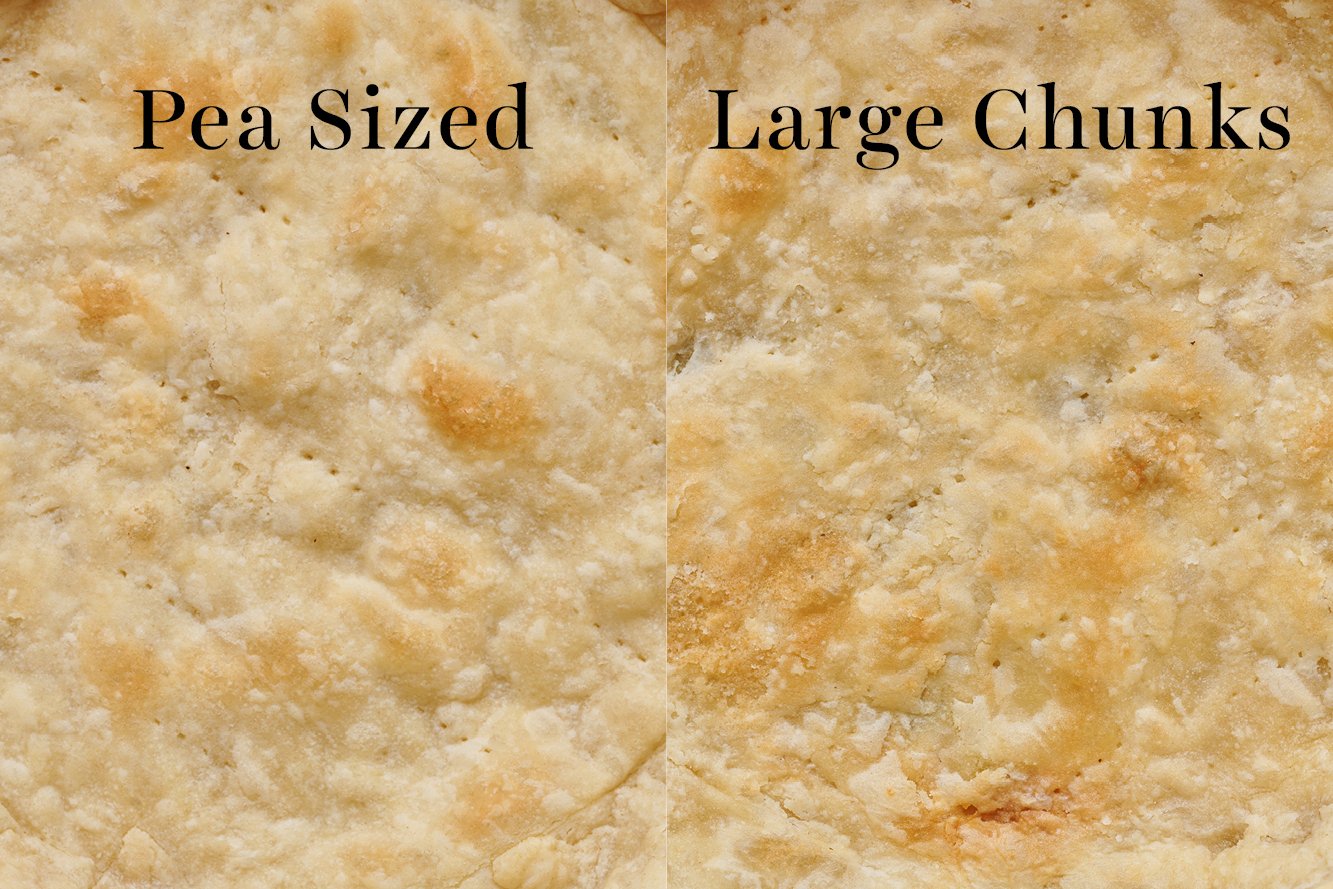
- Overall, the differences can look relatively minor from a visual perspective once the crusts are baked.
- If you don’t have a ton of pie dough experience or confidence, I’d recommend small pieces of butter. It makes the dough much easier to work with!
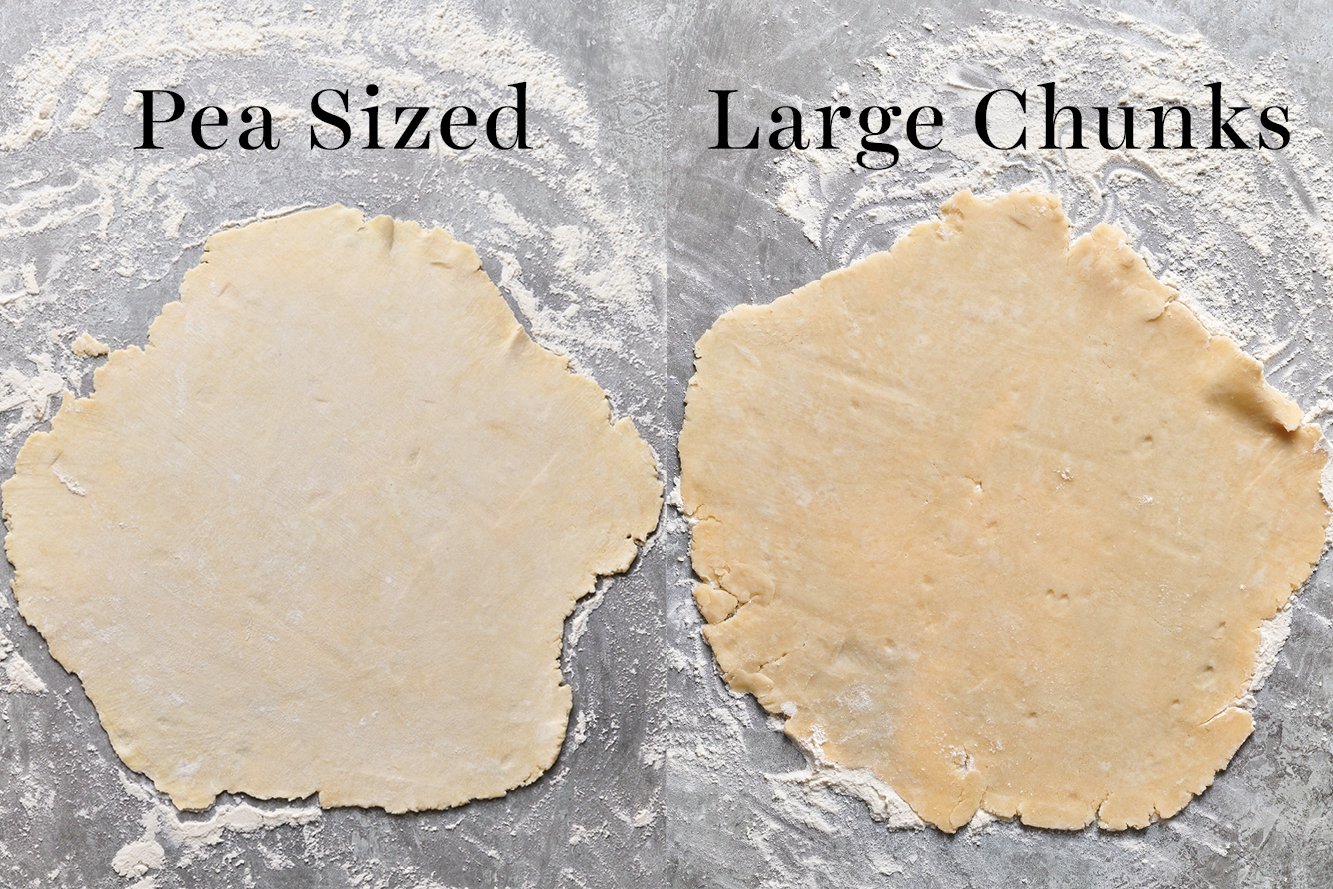
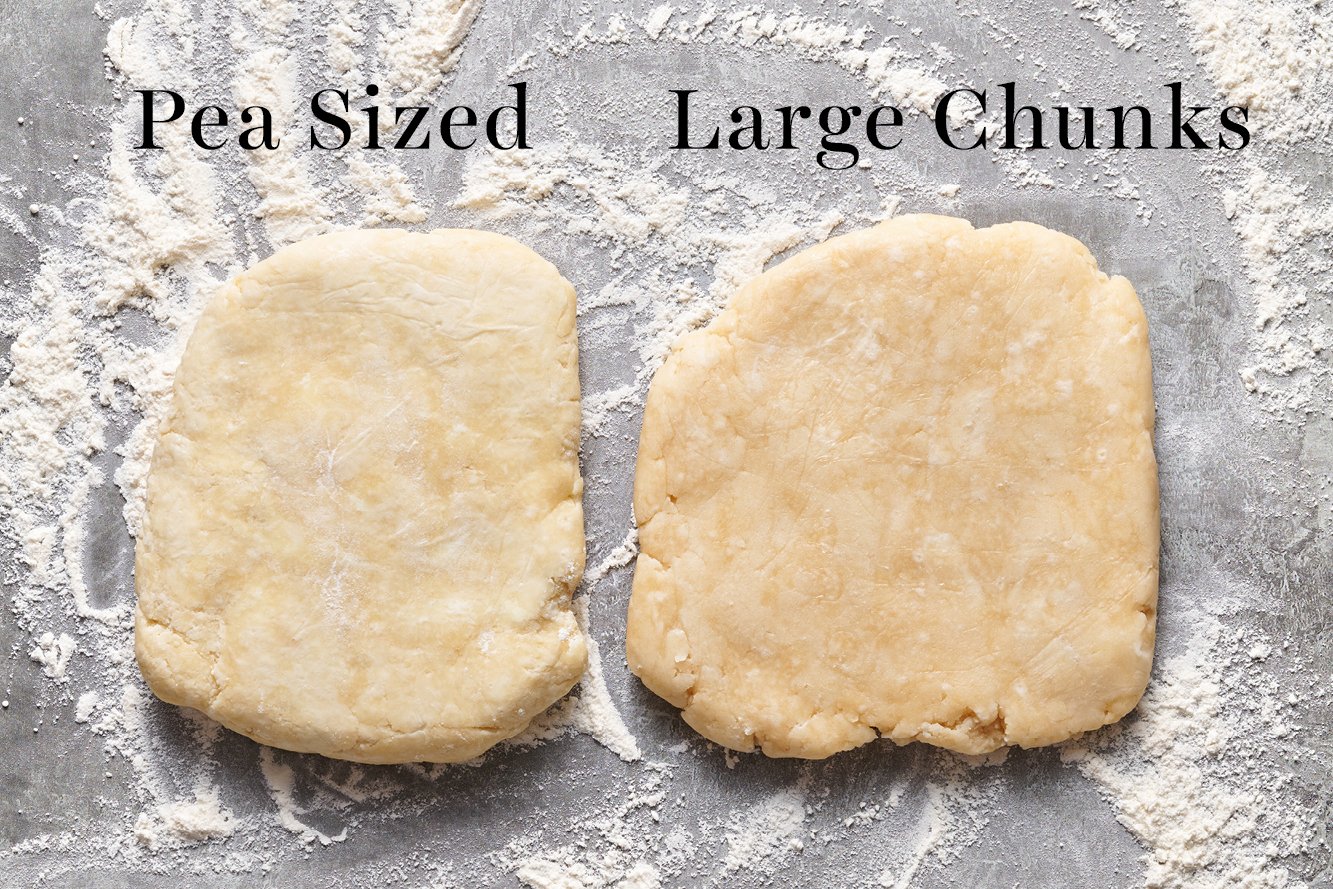
- Take a look at what a difference it makes to use pea-sized vs. large chunks of butter in pie crust:
Cut the Butter Into Small Uniform Pieces
It should take just a couple of minutes to cut the butter into the flour mixture so you don’t risk the butter getting too hot. For this reason, it’s helpful to start out with pieces of butter that are already small in size. I’ve included several options for processing the butter below. My personal favorite is to grate it like cheese!
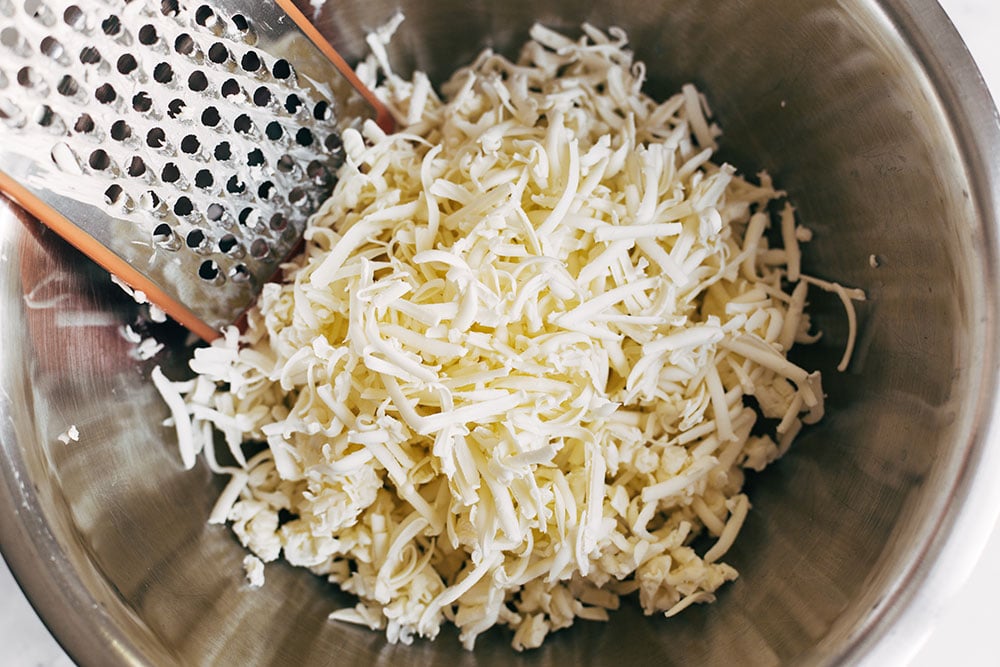
Method 1: Grater or Knife
Take your butter and freeze it for about 10 minutes, or until it’s super cold and firm. Using the large holes on a grater, literally grate the butter like cheese. If you have it, you can use the grater attachment on your food processor, but otherwise use the large holes on a box grater. Return the grated butter to the freezer for another 10 minutes until it’s firm before adding into the flour mixture.
If you don’t have a box grater, freeze your butter for even longer, until firm, then use a sharp knife or bench scraper to slice it into chunks.
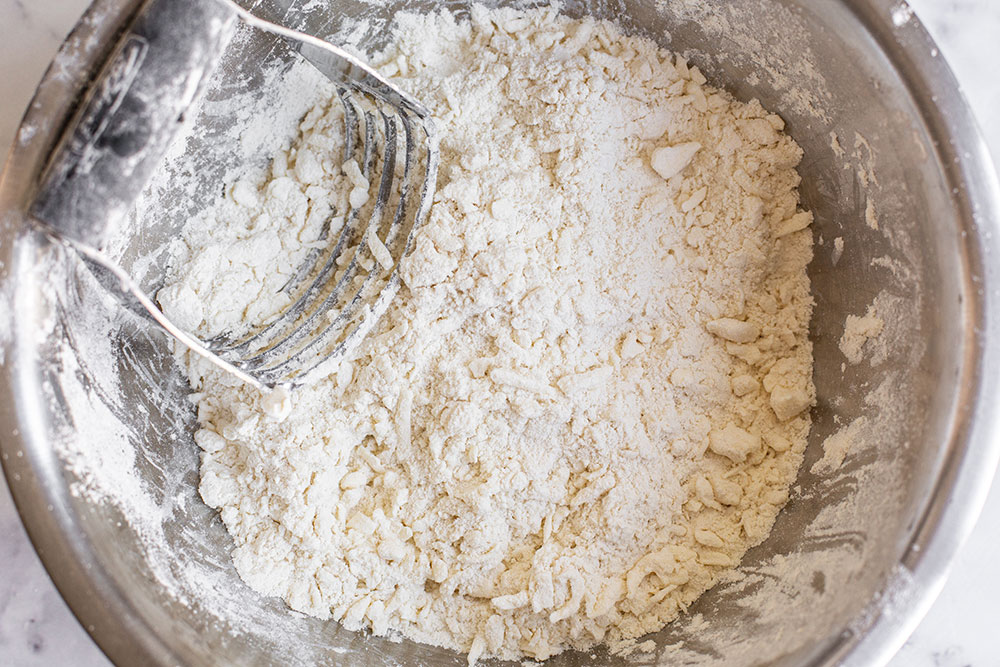
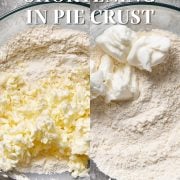
Working quickly, use your hands to further cut and break the butter into pieces the size of small peas. You can also use a pastry cutter/blender or two knives.
Method 2: Food Processor
Since I live in Phoenix where temperatures often exceed 85°F, I typically use a food processor to make pie dough. It’s quick, easy, and prevents the butter from warming up too much. Cube your sticks of butter with a bench scraper and freeze until firm. Add into the dry ingredients in the bowl of the food processor with the butter and pulse until the butter is the size of peas.
You want the butter to end up the size of little peas. This will help bring the dough together cohesively without overworking it.
Overworking the pie dough develops more gluten, which can make the baked crust tough and dense instead of light and flaky. This can also cause the crust to shrink while it’s baking. Additionally, overworking the dough with your hands can start to melt the butter, preventing that flaky texture from forming.
Creating pea-sized bits of butter will also prevent the butter from pooling into greasy puddles as the pie bakes. I used to use larger chunks of butter and would encounter these grease pools too often, so I’ve scaled back to much smaller pieces.
How Much Water to Use For Pie Dough?
This is one of the trickiest parts of making pie dough. The reason is that many factors affect how much ice water you’ll need to add, such as the climate and humidity of your kitchen and the brand of flour you’re using. That’s why the recipe calls for a range of water. Add half of the total amount to start with. Toss it in to combine either by hand or with a few pulses of the food processor.
Pick up a piece of the mixture and pinch it between your fingers. It should hold its shape. If it crumbles away or seems really floury and dry, then you need to add more water.
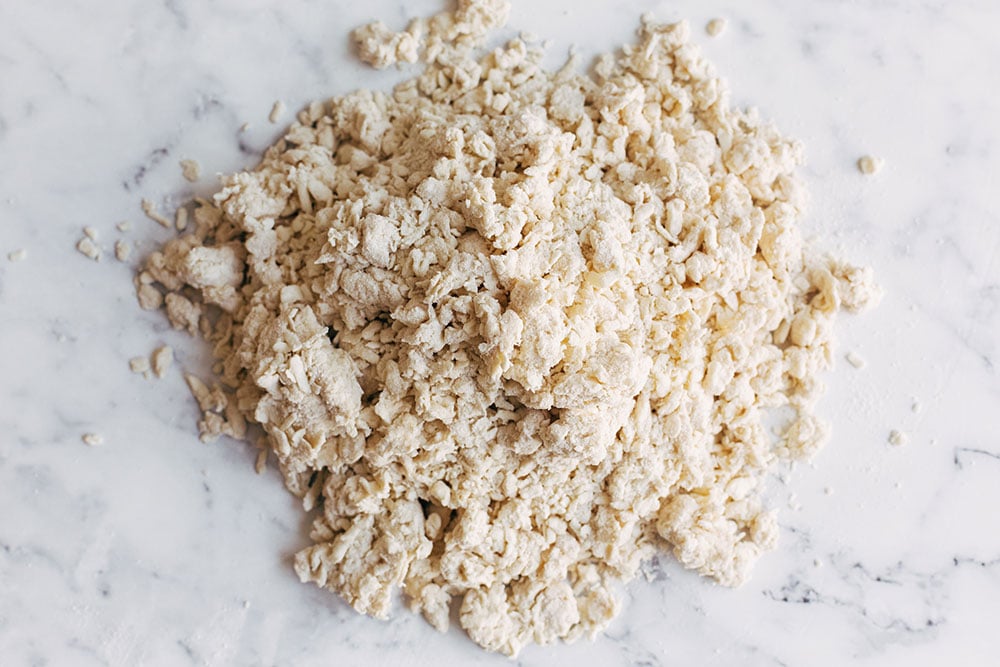
At this point, I like to turn the mixture out onto a work surface and begin pressing it together into one messy lump of dough. Doing so will give you a better indication if you need to add more water.
The dough won’t look like much at first. It’ll be kind of craggly and messy looking, and that’s okay.
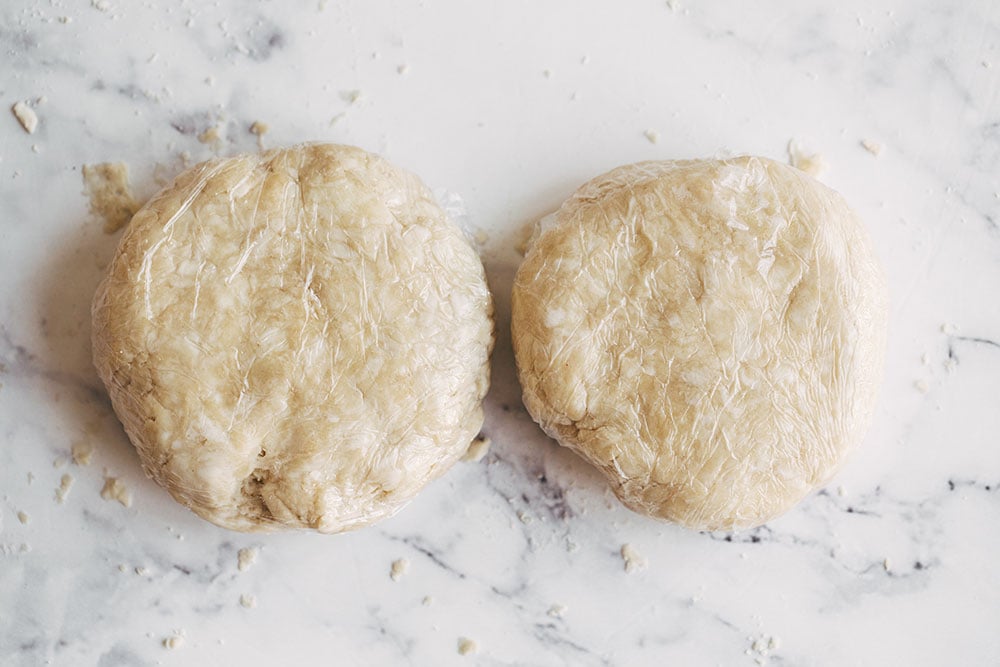
Once you have a fairly cohesive mound of dough, flatten it into a disk and fold it onto itself, kneading gently as you work.
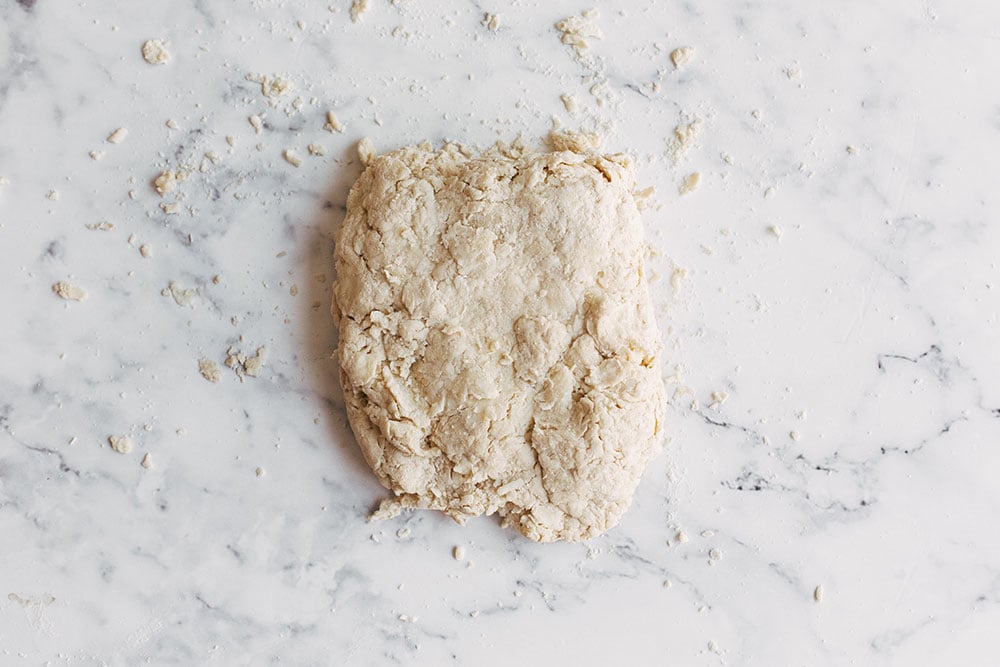
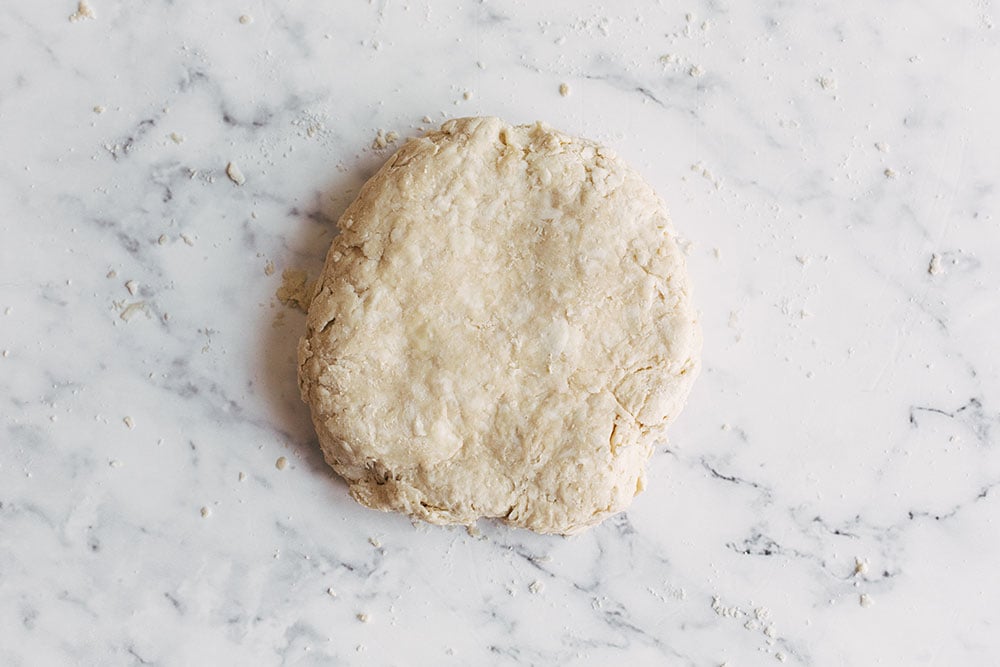
Do this a couple of times to ‘laminate’ the dough. Every fold will give you more flaky layers. Just be careful to be gentle and work the dough only until it comes together into a smooth cohesive disk like this:
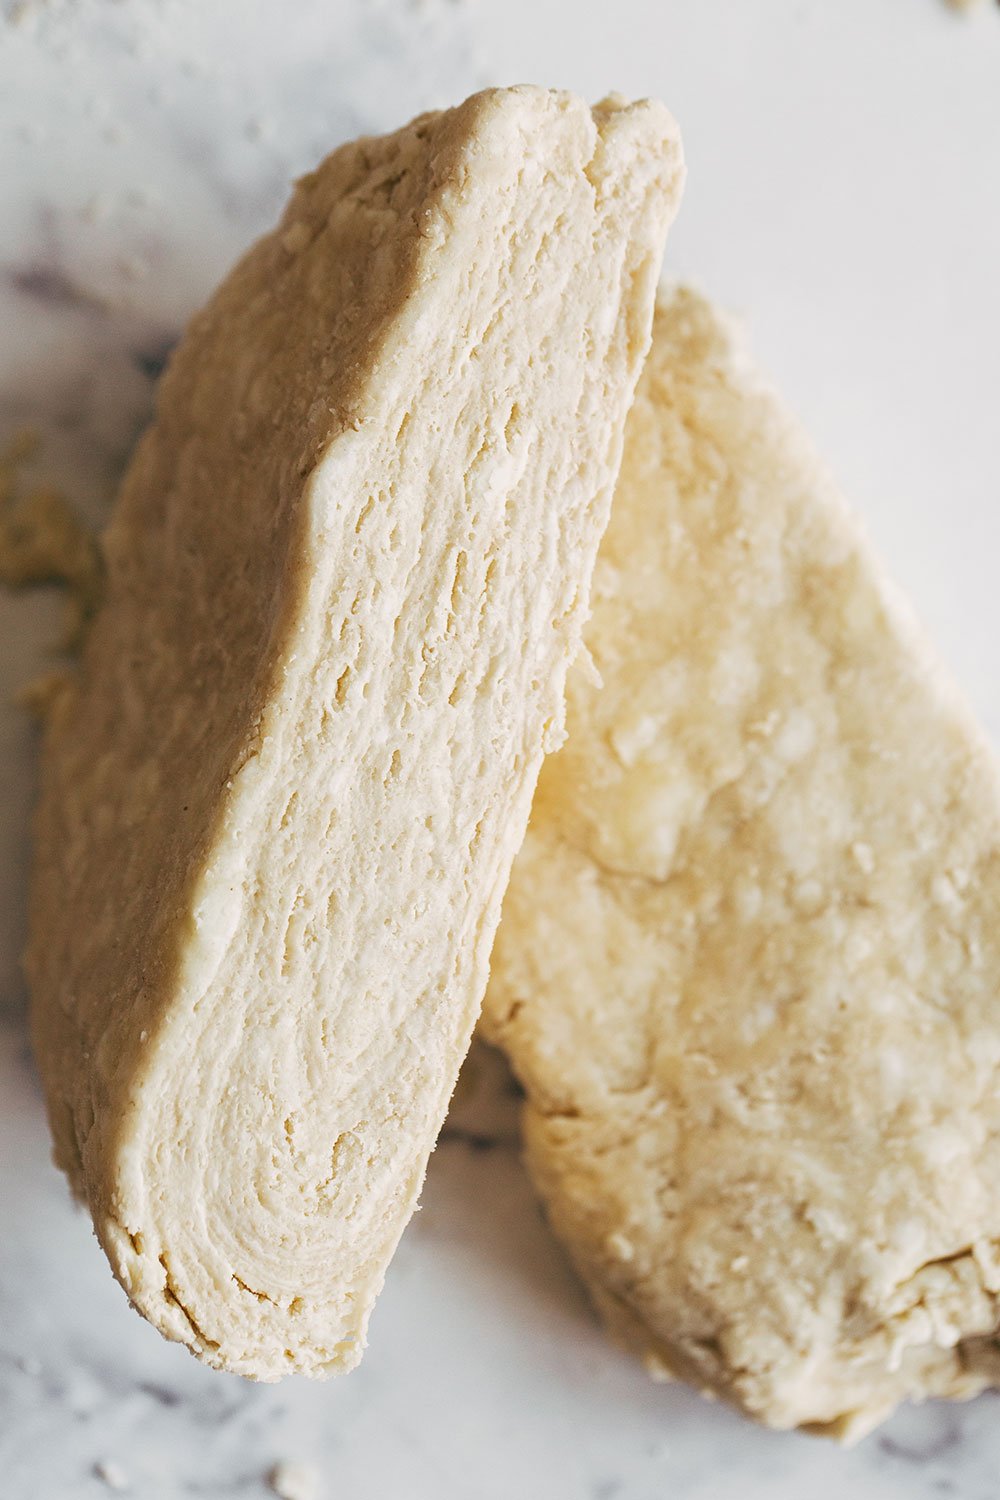
If you were to cut the mass in half, such as for a double-crust pie, you can visibly see the layers of butter thanks to that extra folding step. These layers are going to bake into crispy, tender, flaky goodness:
Give the Dough a Rest
If you have problems with your crusts shrinking while baking OR if your crust becomes tough, then it needs more time to rest so the gluten can relax so it doesn’t snap back to its original smaller shape. I’ve included these resting periods in the recipe directions.
After mixing it: wrap it in plastic and refrigerate overnight. You can shorten this to a few hours if you must, but I find overnight really makes a difference in preventing classic pie issues.
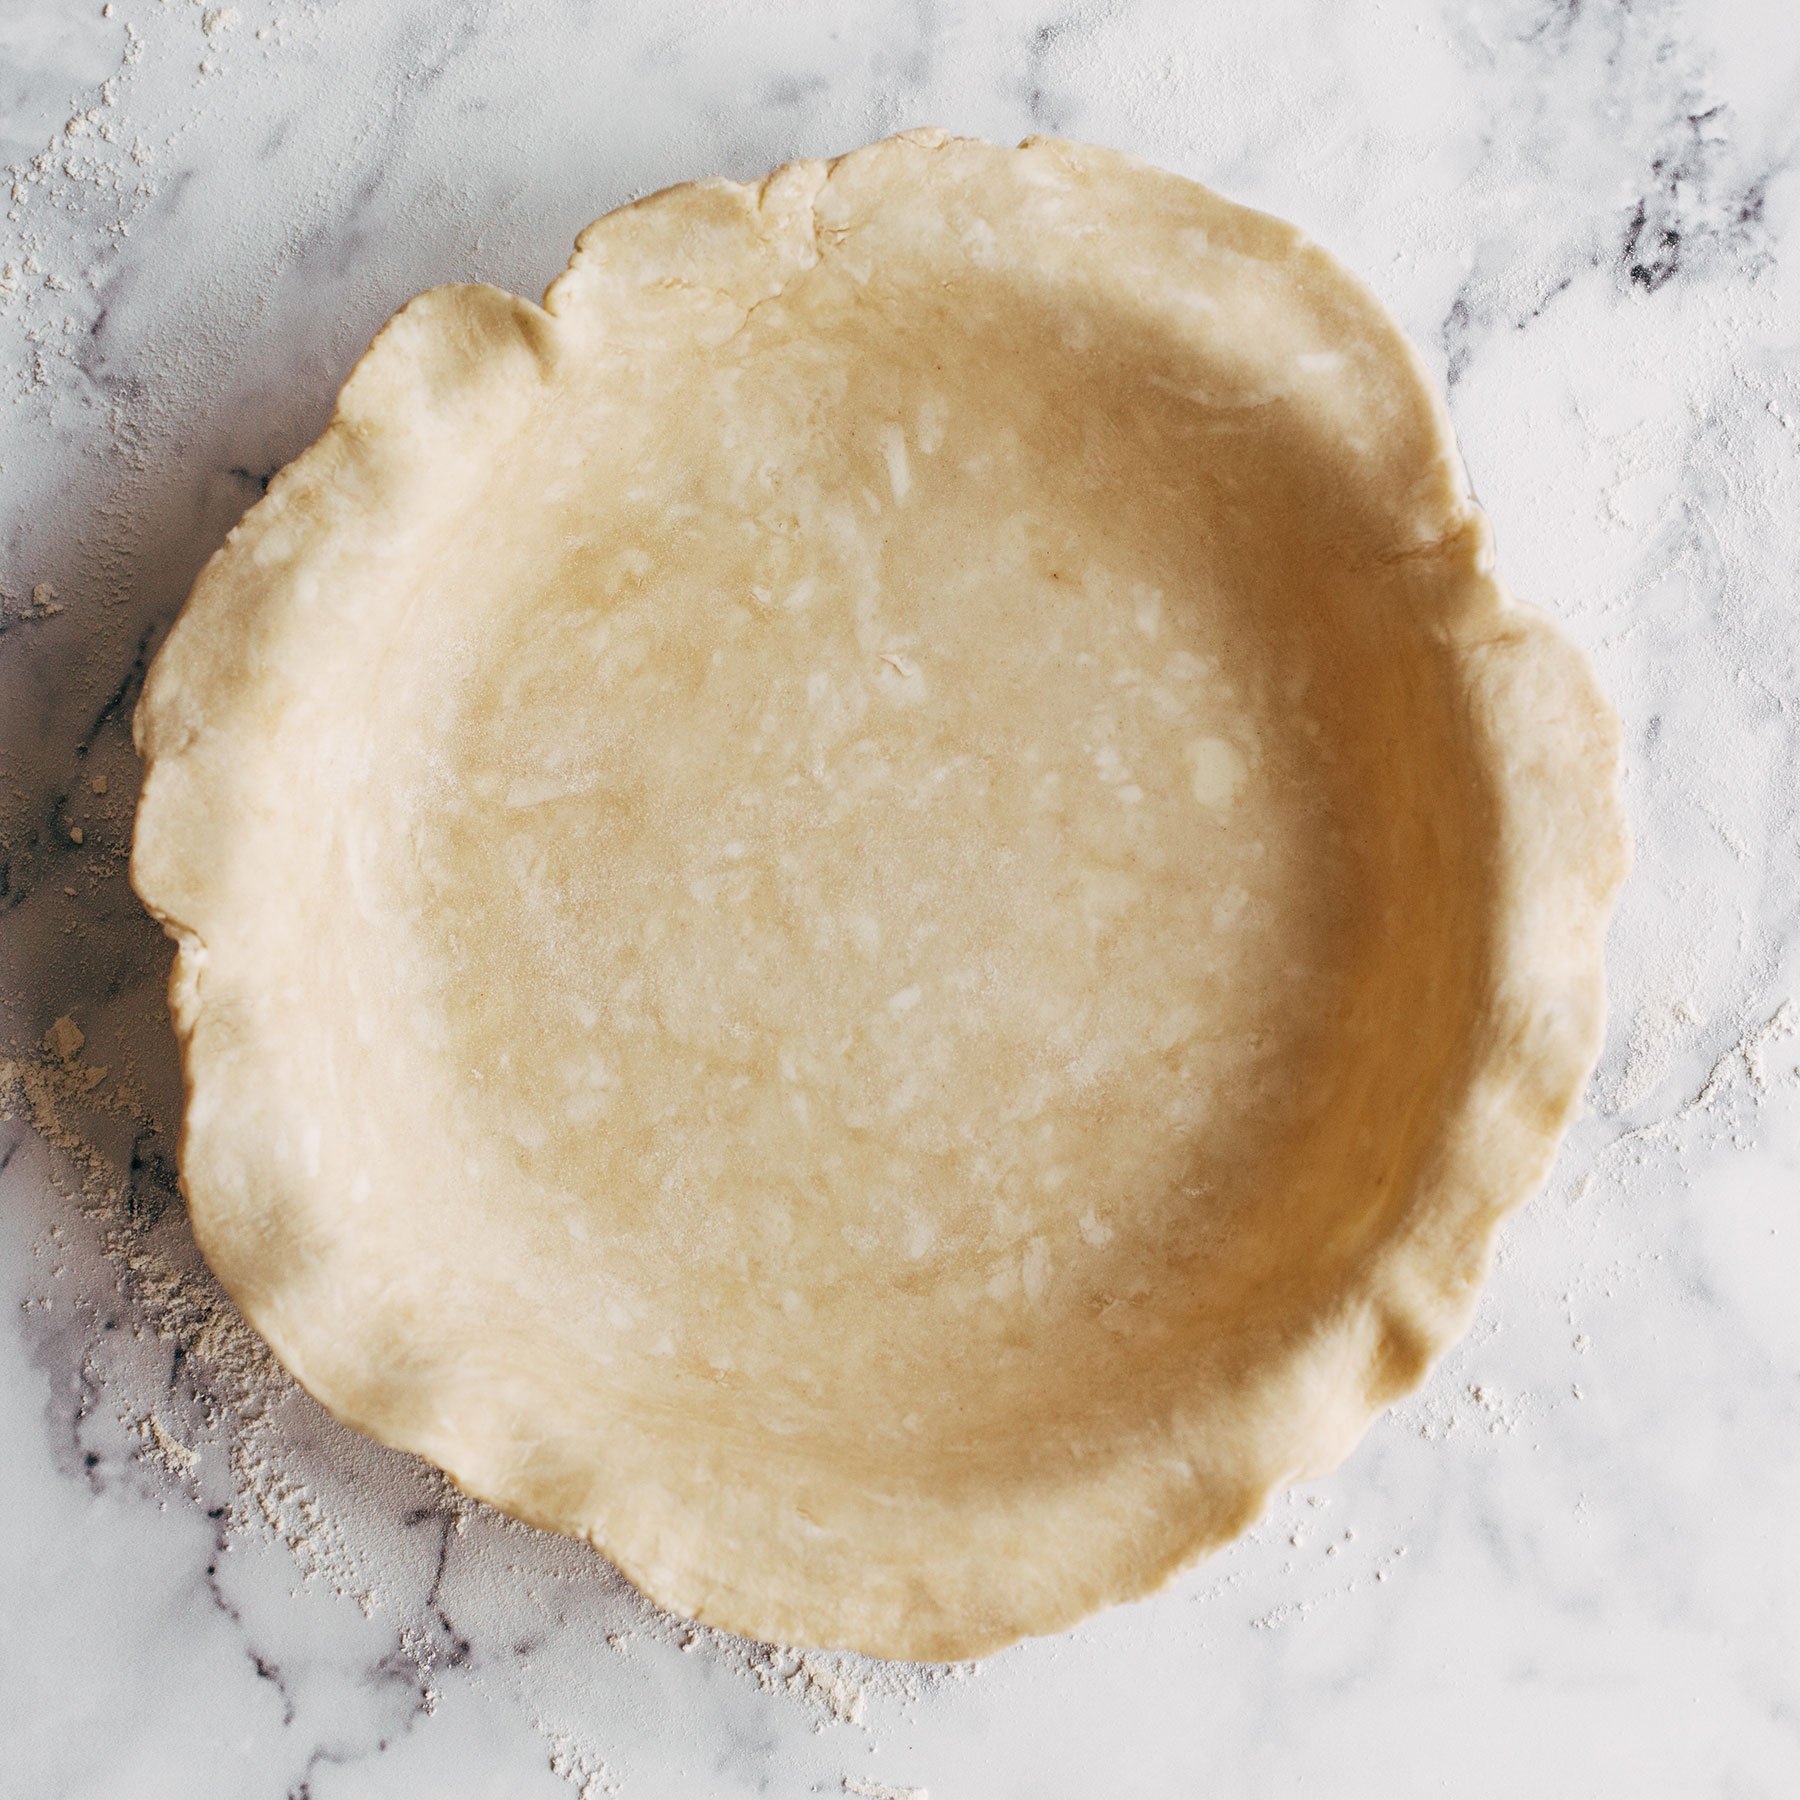
After rolling it out: let it rest in the fridge after you’ve rolled it out and placed it in the pie dish and/or after you’ve assembled. Do NOT stretch the dough to fit into the tin, as it will snap back like a rubber band while baking.
Now let’s move on to the other area of pie crust that I think frustrates a lot of people.
How to Roll Out Pie Dough
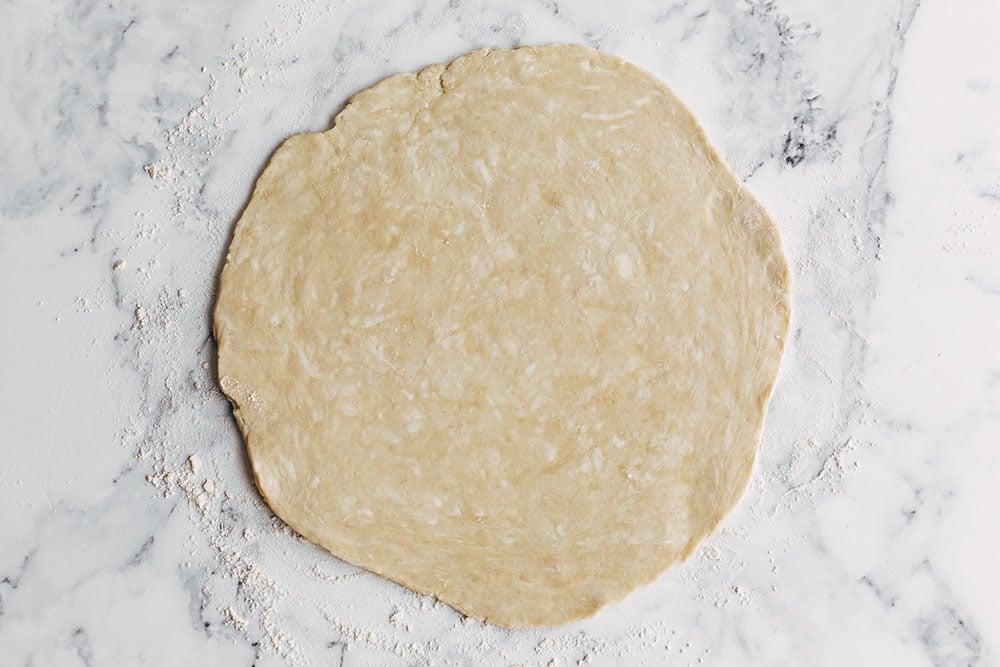
I typically roll out my dough on a marble pastry board, but that is totally optional. You can use the trick I mentioned above of icing down your counter before rolling to help keep things nice and cool. Avoid overworking the dough as you roll it out. Keep the dough moving on a lightly floured surface so you don’t roll over the same areas repeatedly, making it tough.
You’ll want about a 12-inch diameter for a 9-inch pie pan. Some pans are deeper than others, so factor that into your rolling. Whatever you do, make sure the thickness is about 1/8-inch for your pie crusts. Thinner will result in rips and tears. Thicker and it won’t cook through and get flaky.
Flour your work surface, the dough itself, and your rolling pin throughout the process as needed. There are two inexpensive tools that I find are both a MUST when it comes to rolling out pie dough: a flour shaker and a bench scraper.
The flour shaker allows you to easily add flour wherever sticking might be happening. The bench scraper allows you to easily keep the dough moving as you roll it out, which is essential. I keep the dough moving in quarter-turns to prevent sticking and to keep it an even thickness.
Alternatively, you can roll the pie dough out between two sheets of parchment paper or plastic wrap. I find that most non-commercial paper and plastic wrap isn’t big enough to accommodate a 12- to 14-inch diameter circle, so I don’t often use this method.
If at any point the butter begins to get melty and sticky, return the dough to the fridge immediately.
Use your fingers to flute the edges of the pan if you wish. I find that I need to make a more dramatic flute than I might think since the design will loosen during baking. Whatever you do, don’t make the flute too thick and heavy, otherwise it’ll slump down the sides.
More Dough Than Other Recipes?
You might notice in the recipe below that I call for more ingredients than other recipes. This is because I think it’s easier to work with dough when you have a little more than you may need. It comes together more cohesively and if you get any rips, tears, or make any mistakes with a design, you have extra.
This especially comes in handy if you have a deeper pie dish or if you want to get fancy with any designs.
Pie Crust: Butter vs. Shortening?
I’ve done an extensive amount of testing on pie crust. Let’s just say my kitchen has seen a LOT of butter. I made the messes and did the testing so you don’t have to. Here’s what I learned.
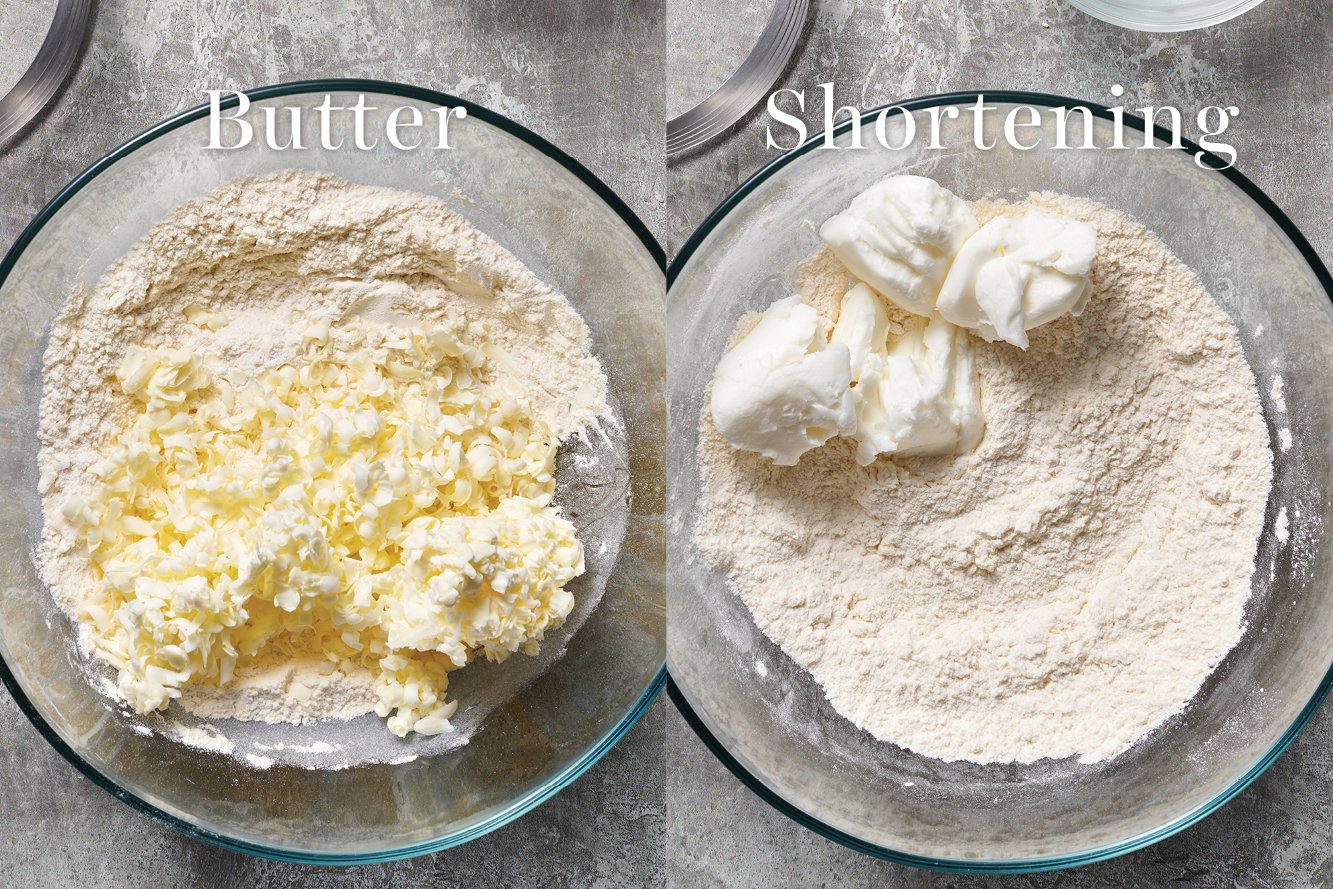
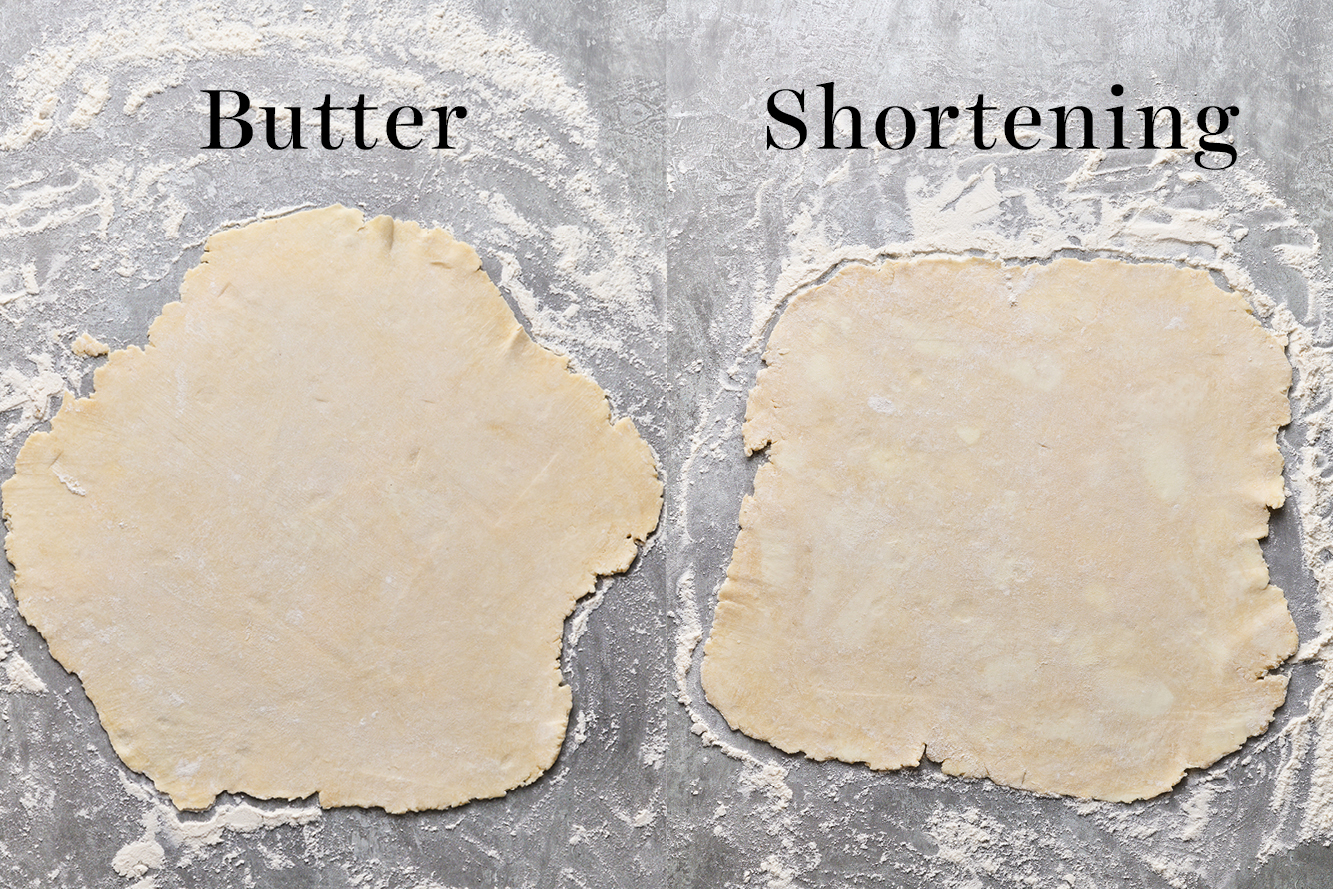
When it comes to pie dough, I’ve heard a lot of confusing and conflicting opinions about which is the better fat. If you’re curious, you can learn more about the general differences between butter and shortening here. But I actually tested the two fats in pie crust side-by-side to compare. I still need to do testing with lard, so stay tuned for that!
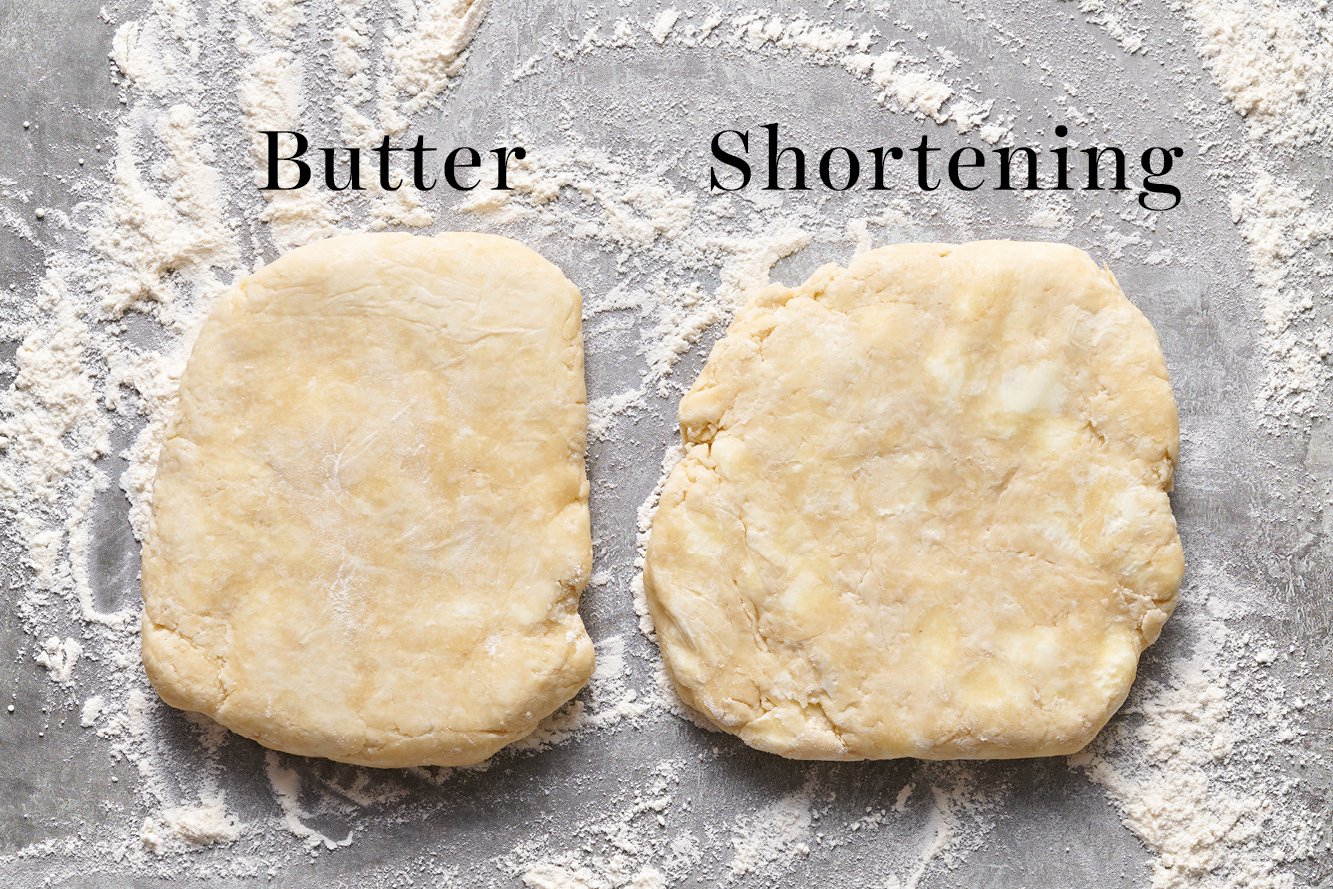
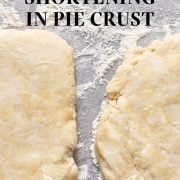
Shortening
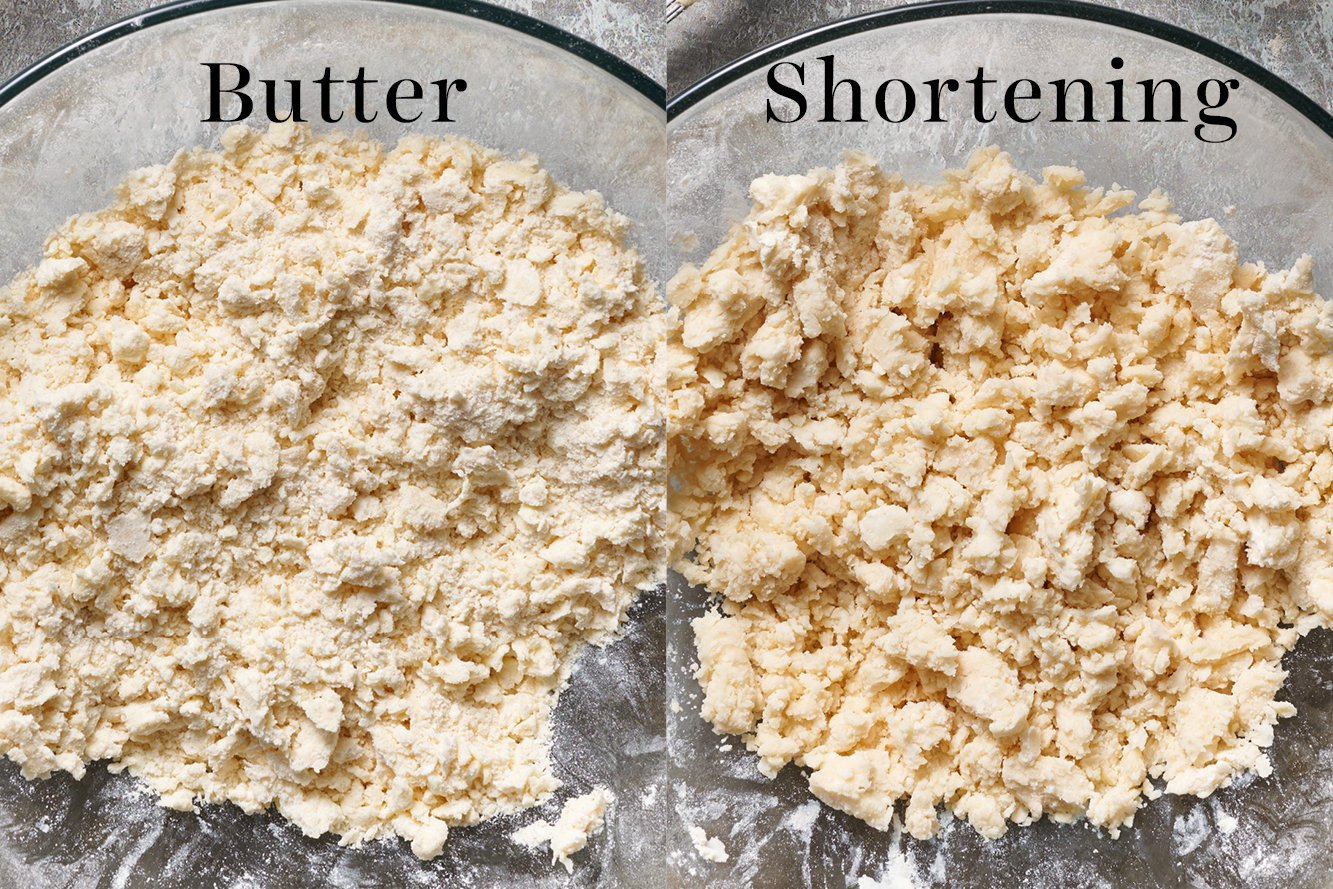
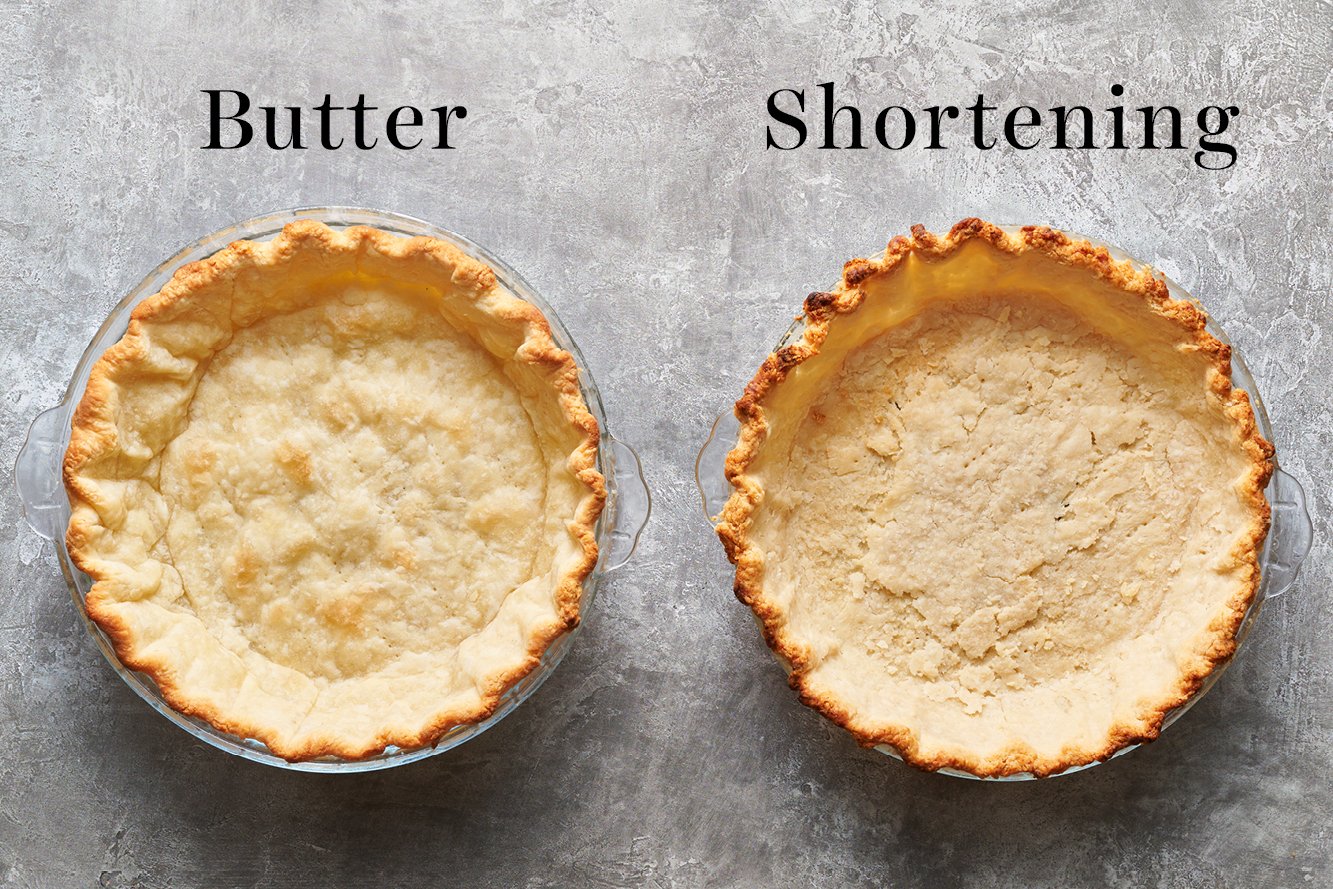
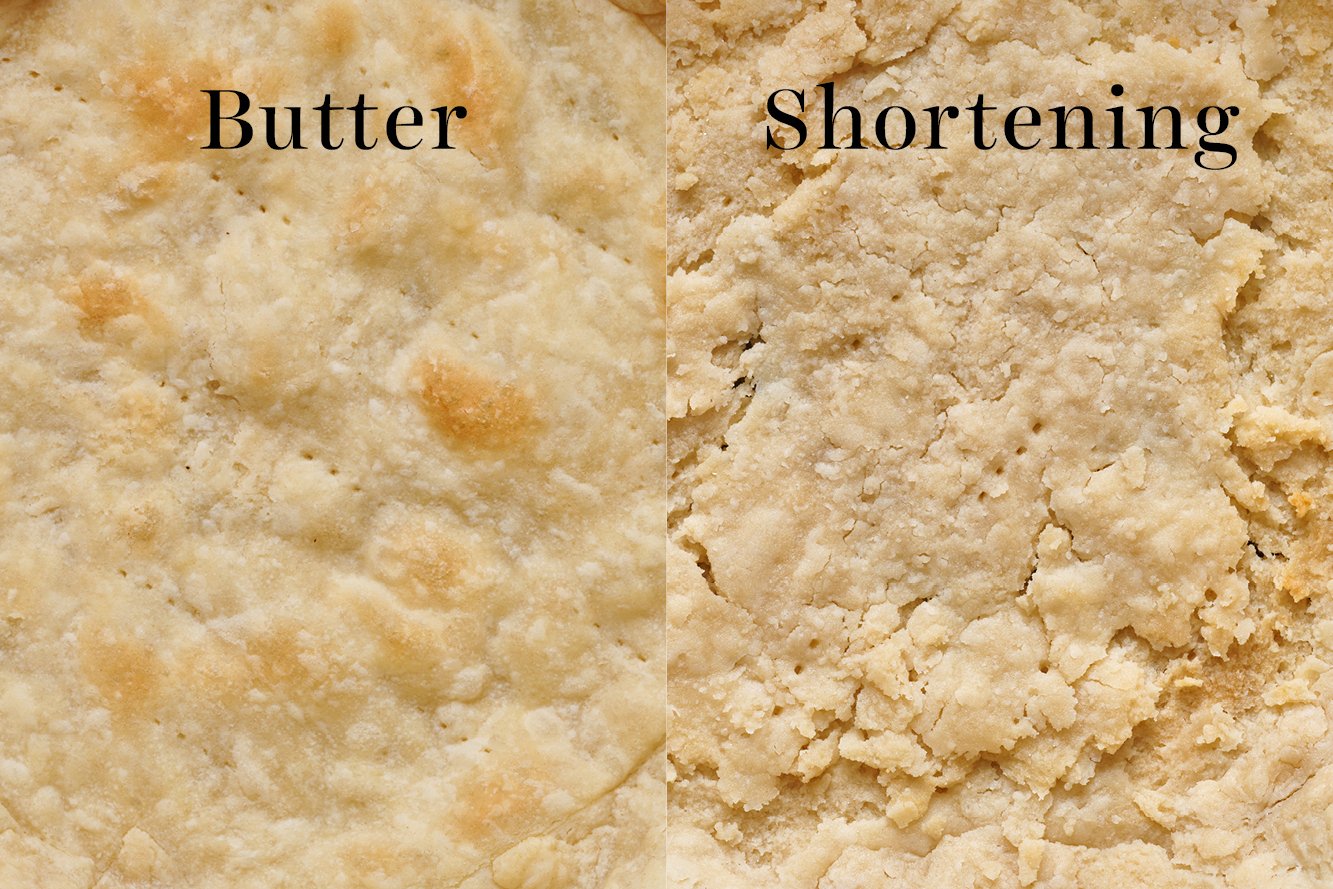
All-shortening dough can be easier to work with in one sense because unlike butter, shortening requires less chilling time. Shortening has a higher melting temperature than butter. However, this also means that unlike the very hard chunks of cold butter that remain in the control dough, shortening is soft enough that it is easily overworked, resulting in a crumbly crust instead of a flaky crust. In our blind-baked shortening crust, the parchment paper holding the pie weights actually stuck to the crust, pulling some of it off with it.
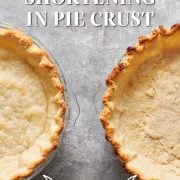
As you can see in the photograph, the all-shortening dough ended up being flat, tender, and fairly crumbly. The texture was actually reminiscent of shortbread, and it was completely lacking in flavor. In fact, the flavor reminded me of store-bought dough.
Butter
In this all-butter dough, there were plenty of visible chunks of butter studded throughout. Once it came together and was chilled, it was a bit of a challenge to maintain that perfect temperature where it’s warm enough to shape but cold enough that the butter doesn’t melt. Especially for me living in the desert. The extra effort paid off immensely, though. This pie crust was ridiculously light, flaky, and loaded with rich buttery flavor. You could immediately tell this was homemade, in the best way. This is why I almost always prefer a 100% butter pie crust.
If you like the benefits of shortening, then I’d recommend a 50-50 ratio of butter and shortening to get the best of both worlds.
Other Pie Crust “Tricks” Put to the Test
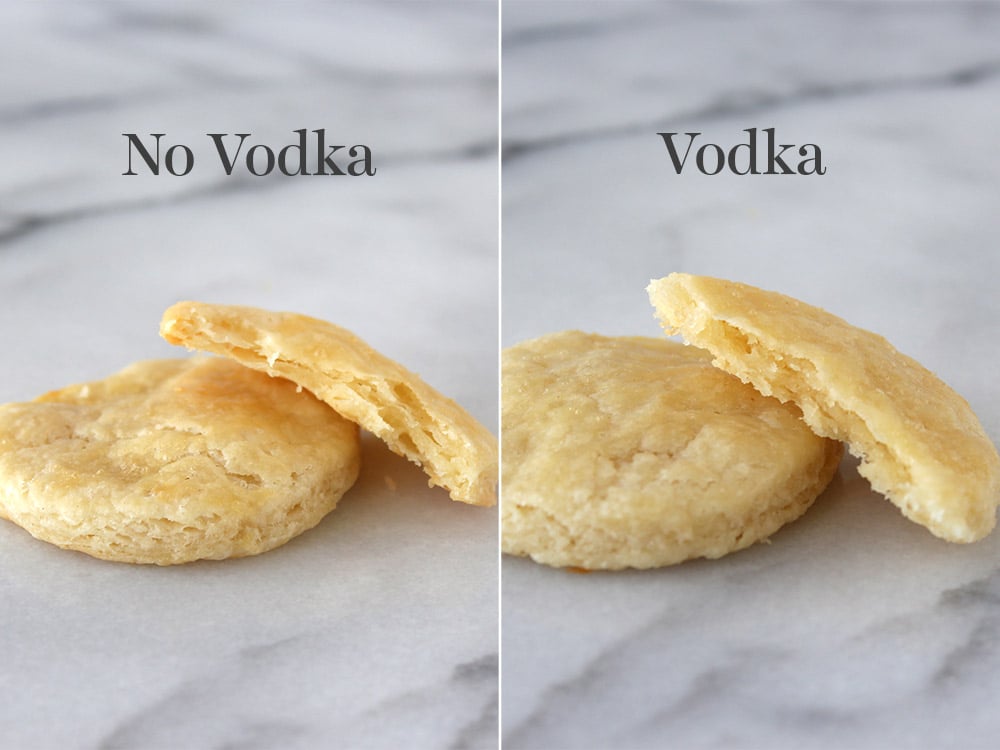
Vodka in Pie Crust?
A few reputable sources have claimed that by substituting a portion of the water with vodka in a pie crust recipe, you prohibit gluten development and therefore ensure a tender, flaky crust. I tested this against my standard pie crust recipe and found the differences to be slight. I don’t think it’s worth the extra effort if you don’t have chilled vodka on hand.
Optional SECRET Ingredient!!
As you can see, I’ve done a lot of side-by-side testing of pie crust variations. Most of the time the classic recipe has won out, with a single exception: SOUR CREAM!
 Sour cream acts as a tenderizer in baked goods, and I was curious to see if it would significantly affect the texture of pie crust.
- I added 2 tablespoons of sour cream to my standard single recipe along with the butter.
- This dough was very soft and slightly sticky, but easy enough to work with.
- The texture was ultra-light, puffy, and flaky, almost like puff pastry.
- This pie crust puffed up to a surprising height.
- If you have sour cream handy, I definitely suggest giving it a shot.
How to Add Sour Cream
Add in 2 tablespoons to the single recipe below, and reduce the water by about 2 tablespoons, or as needed.
Can you Make Pie Dough Ahead of Time?
Yes! Here are your options:
1. Chilling the dough disk: Pastry dough can be shaped into a disc and refrigerated for up to 3 days, as long as it’s well wrapped in plastic.
2. Chilling the unbaked pie shells: Refrigerate for up to 3 days. Simply roll out your dough, lay it into your pie tin, crimp the edges, and cover loosely with plastic wrap. When ready, simply remove from the fridge, fill, and bake. This works perfectly for single-crust pies like pumpkin or sweet potato.
3. Freezing dough: Pastry dough can also be shaped into a disc and frozen for up to 2 months, well wrapped in plastic, and placed in a freezer bag or airtight container. Defrost in the fridge overnight before rolling out.
4. Freezing pie shells: Unbaked pie shells can also be covered and frozen for up to 2 months. No thawing necessary.
How to Bake Pie Dough
I’ve included instructions on how to blind-bake the crust for recipes that require an already-baked crust. Otherwise, just follow the directions in the pie recipe you’re following for baking the crust – or, check out my full article on How to Blind Bake Pie Crust here!
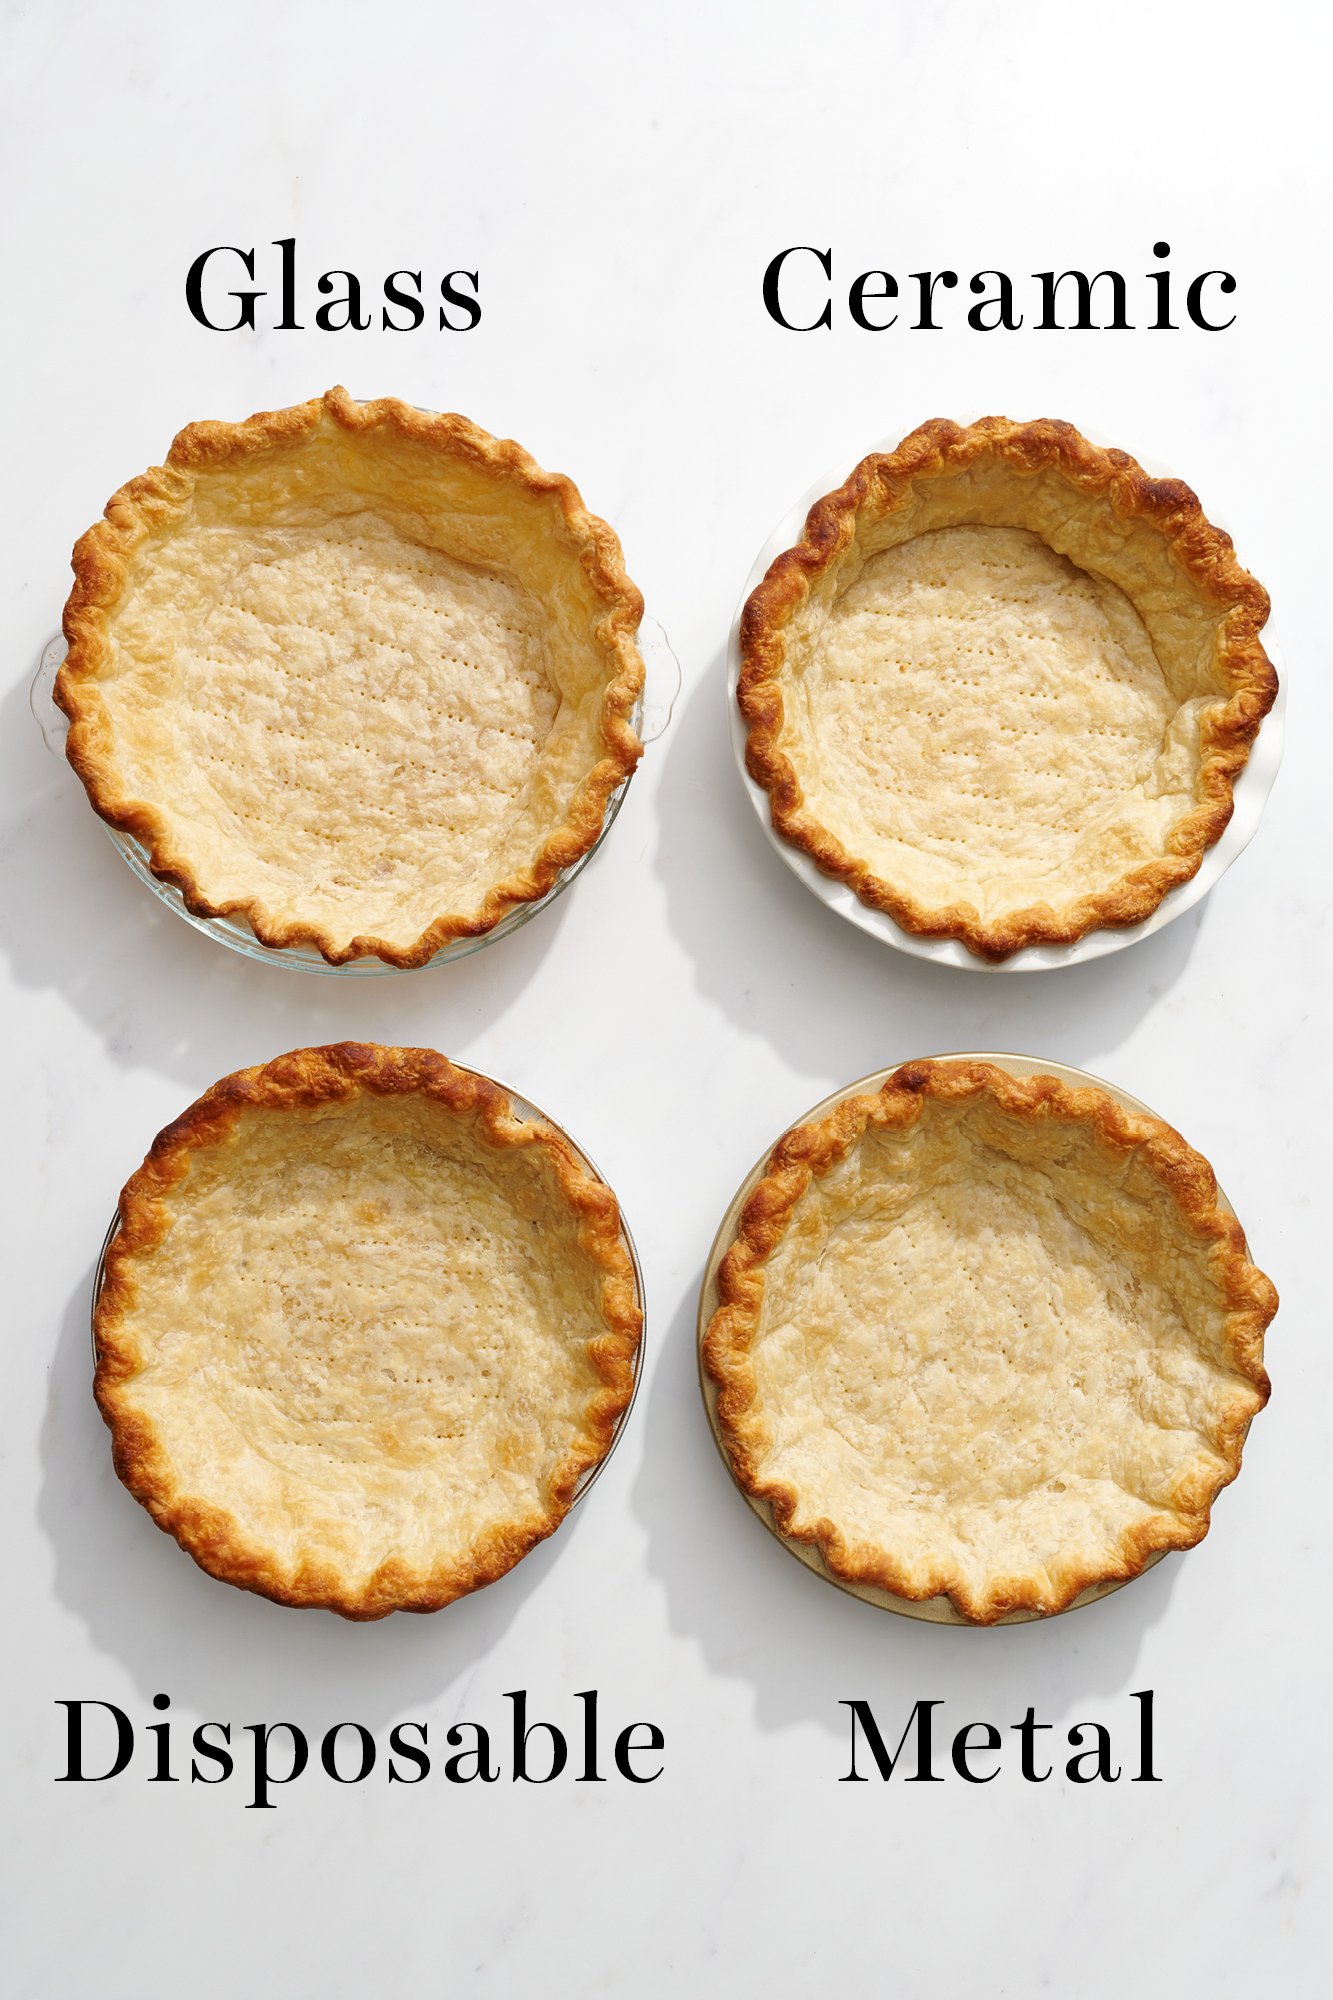
The Best Pie Pan for the Best Pie Crust
The material of your pie pan can make a big difference in how your pie bakes. I recently used this Best Ever Pie Crust recipe to experiment with different pie pans, to determine which pie pan is best. Check out my Best Pie Pan article here to see my side-by-side experiments using glass, ceramic, metal, and disposable pie pans, and learn which pie pans I recommend.
Expert Tip!
Place your pie pan on a rimmed baking sheet before putting in the oven. This helps you to remove the pie tin without damaging the crust with your oven mitts. Better yet? Place the sheet on a BAKING STONE to ensure a golden crispy bottom crust and avoid any sogginess.
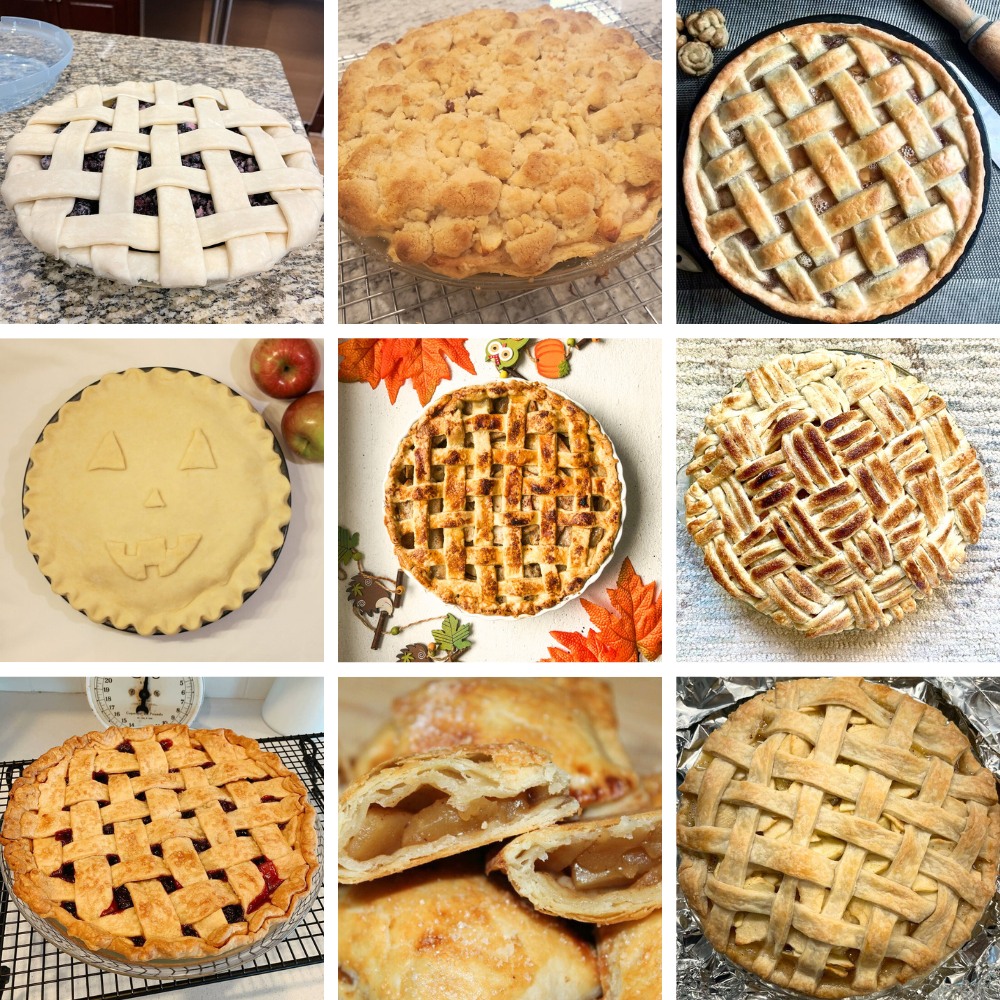
Take a look at these pies using this recipe, all made by HTH community members – many of whom had previously struggled to master pie dough! Follow the tips in this article to bake pies that look like these:


Why can’t I print these pages. ? Is there something I’m doing wrong? Thanks a bunch
Hi Marla! I can’t speak to your printer itself, but the printable version of this recipe should be accessible by clicking the little red printer icon at the top of the page. I have included the link to this printable page, too, in case that helps! Happy baking 🙂
I just found your wonderful site while searching for apple pie recipes. I love how you do actual research and share the comparison and results. Priceless.
I do have a question about baking pies in cast iron. Do you have any experience, advice, warnings, etc.?
Thank you so much.
Dee Dee
Hi Dee Dee! We’re so glad to hear that you are enjoying Handle the Heat! Unfortunately, no one on our team has experience baking pies in a cast iron, so we can’t give you any tips, sorry! Good luck with your experimenting! 🙂
If I want to try the sour cream trick, but am making the double recipe, do I add 4 tablespoons of sour cream?
Hi Julie! Yes, that is correct! Let us know what you think once you have tried this out! Happy baking 🙂
Looked great – rolled out great and then baked at 425 and ended up with a 1/4″ of melted butter pooled on the bottom.
Ugggh!
Oh no! I’m so sorry to hear that, James! Was your dough very cold at the time it was placed in the oven? Sometimes butter will melt out fast if the dough isn’t thoroughly chilled. Also, do you have an oven thermometer? If your oven was colder than it says at the time of baking, that could also have caused the butter to leak out! Feel free to reach back out to us with any more information or questions – we are always happy to help! 🙂
Takes a bit of practice, but I found using a metal bowl set on top of a gel ice pack REALLY makes a difference in ensuring you don’t over work the dough.
Great tip, Andy! Glad this recipe is working for you! 🙂
Hi – my crust seems like it’s melting/drooping over the edges in the oven. I made sure the butter was super cold and the pie was in the freezer before it was in the oven but the edges of the crust aren’t seeming to hold their integrity.
Any tips?!
Hi Olivia! Oh no, I’m sorry your pie melted in the oven! Here are a few thoughts that will hopefully help:
– The crust wasn’t cold enough. I see you said the pie was in the freezer before it went in the oven – but how long was it in the freezer? It needs to be fully chilled for best results, and just a few minutes in the freezer might not be long enough if the dough warmed up a lot while being rolled out/filled – especially if you filled the pie with a warm filling.
– Your crust may be too thick. If you make your crust super thick, especially where the top and bottom crusts meet/join, it can melt and slump in the oven.
– You may have baked the pie at too low a temperature. Pies need a pretty high temperature so they set without the butter melting. This recipe calls for 425°F.
– Tying into the previous note, your oven might be running a little cold. Do you have an oven thermometer to check that? Check out Tessa’s article here about ovens, full of tips!!
I hope something here helps!! Good luck with your next pie 🙂
Hi Tessa and gang. I’d like to use both butter and shortening. Is it possible to provide me with the amounts of each of these ingredients?
Thank you
Hi Susan! Tessa has done a lot of experimentation with butter vs. shortening, as you can see from the post above, and also her article linked here! If you prefer to use a combination of both, we recommend following Tessa’s Best Ever Pie Crust recipe, and using a 50/50 ratio of butter to shortening (so 71 grams of each for a single crust, or 190 grams of each for a double crust batch), and then continuing with the recipe as written!. I hope that helps! Feel free to reach out if you have any further questions 🙂
Thank you so much for your advice regarding butter to shortening ratio! Tessa’s Best Ever Pie Crust has always been my go-to, but I’ve always used a butter shortening combo when I make pie crust. As I “asked my question” yesterday, I had already made one (2) crust batch using 1:1.25 (116 gr butter & 169 gr shortening), so I wasn’t to far off. I was surprised how many recipes that I found used different ratios of those 2 ingredients. I have a scribble pad full of notes and calculations to I landed on the one I’ve mentioned above. Fyi, I love that her recipe is makes a generous amount of dough, some are so skimpy that there’s literally not enough crust to roll out to a nice depth or make a decent edge. I always laminate the dough too. So at one time being intimidated when making pie crust, now I am totally confident and find that it’s fun and super rewarding to make pie with perfect crusts. Thx again!
Hi Susan! I’m so happy to hear that you love this recipe, and Tessa will LOVE to hear that your confidence has grown so much as a result!! It genuinely makes our day to hear such things 🙂 I hope you enjoy your pie – I’m sure it will look beautiful and taste incredible!! Happy baking! 🙂
Excellent crust! Easy to make and easy to work with.
Only one issue: When wrapping to chill, is it better to shape the disk *after* it’s wrapped, rather than *before*? And should it be as tall as a 4″ disk will be? It not only seemed tall when it went into the ‘fridge, it took that much longer to roll out for crust.
Hi Michael! Yes, you want to make a disk and then wrap it and refrigerate. You can refrigerate the dough disks as a little flatter, if you prefer, but Tessa just recommends this 4-inch wide size for maximum flakiness benefits! I’m so happy you enjoyed this pie crust! Happy baking 🙂
I was thrilled to see that your recipe is nearly identical to the recipe I was given over 20 years ago by a local New England woman. She gave me the recipe verbally, and I still remember her saying “A cup and a quah-tah of shaht-ning. (I use butter of course.) Her recipe also included a tablespoon of vinegar, which may act similarly to the sour cream or vodka. I think the only thing left to try to get the perfect pie crust is to freeze and grate the butter! Awesome idea.
Has this recipe been updated? I watched the video that popped up where Tessa said she used large chunks of butter, but the text in this recipe said she USED to use large chunks of butter, but has scaled back to pea-sized. When i made the caramel apple streusel pie for Thanksgiving, i used larger chunks and it did melt like she indicated in the text of this recipe (everyone still loved it though)! I’m trying again today, so I’ll try the pea-sized chunks of butter.
Hi Tarah! Yes, this recipe was originally published in 2017 and updated in 2020 with recipe improvements, updated tips, and new photos. Tessa actually talks about it in the beginning of this post 🙂 I’d recommend following the tips in the pink box above the recipe. We also include step-by-step photos so you know what your dough should look like. I hope that helps! Please let us know how it goes 🙂
I found the handy hints SO helpful. I used the food processor method, because I have warm hands and with the warm weather it’s just a bad combo. The mixture came together very quickly in the food processor.
I used the single batch for a small Nectarine Galette and mini Caramel Pear Pie and there really was a decent amount of dough to work with. The pie crust was absolutely delicious and this is officially my go-to pie crust recipe!
YUM! Both desserts sound absolutely amazing, Trish! So happy this is now your go-to recipe, thanks for sharing! 🙂
Hey! I’m making your French silk pie tonight, and would like to use this crust. However, am I reading this right? It takes 6 hours in the fridge then another 2 in the fridge and then (obviously) approx 30 mins to bake?
Only asking because I want to make this pie by like 7pm. It’s 5am, and my head is spinning lol I’ve never made crust before, so now I’m second-guessing if I have enough time.
Hi Jasmine! This Best Ever Pie crust is best made with an overnight rest (which can be shortened to a few hours, if you must, but it’s definitely best with an overnight refrigerated rest!). Then, once rolled and placed in your pie pan, it needs to rest another 2 hours in the fridge. Meanwhile, the French Silk Pie needs to chill and set for hours. It looks like you needed this pie a couple of days ago, so I hope it all worked out for you!! 🙂
I made my first pie yesterday using your crust recipe and it worked! I was intimidated at first, but I’m amazed at how it turned out. I have a question though for the future. I used a glass pie dish, it was a 50 min bake. The inside of the bottom didn’t seem to cook through all the way. The top was crisp (a little burnt spot on the crust), as was the outside…but for some reason the bottom didn’t make it all the way. Is there a way to remedy that for next time?
Hi Lauren! Try baking your pie on the lowest rack in your oven, and even bake it on a preheated baking stone if you have one. Depending on the recipe you’re making, you can also follow our instructions to par-bake or bake the crust completely prior to filling. I hope that helps!
Made this with 3 different pies – pecan (HTH recipe), pumpkin and apple. All had buttery, flaky crusts. Great recipe.
I was skeptical about a new pie crust recipe, but you haven’t steered me wrong yet. This is the BEST pie crust I have ever made (and I have been making pie crust for over 50 years). It was a little more labor intensive, but soooo worth it. Rolled out like a dream, and flakier than I could imagine. Thank you, thank you, thank you 🙂
Wonderful, Mary! Thrilled to hear how much you loved this recipe!
Thank you! I’ve always used shortening for my crust and have never really been satisfied. This recipe yielded an outstanding pie crust, my go to recipe from here on.
So happy you tried this recipe and that it’s now your go to! Yay! Thanks so much for the comment 🙂
I would like to make the double recipe using sour cream addition, but I did not see what increments should be using for the double, only the single? And do I add it in when I add the butter into the dry mixture?
Hi Lexy! The Double Crust ingredients list is directly below the Single Crust ingredient list in our recipe. As you plan to double the recipe, you’ll add 4 total tablespoons of sour cream. And yes, add the sour cream in along with the butter. Please let us know how it goes!
Thank you! Thank you! Thank you for the amazing tutorial on how to make pie crust. I was so intimidated and you gave me the confidence to try again. I have never had a successful experience until now. Now that I know I can do it I will ALWAYS make my own. Can’t wait to finish this pie (sweet potato pie – your recipe) and dig in.
Woohoo!! So glad to hear that, Cynthia!
such an amazing recipe. Delicious and super flaky!! i love it <33
My daughter got me into baking and this is def my go to now. I absolutely love it and i don’t usually like pie crust that much!!!!
Amazing!! So happy to hear that, Rosalinda!
That’s great recipe and easy to work with, although it ended up too thick in my opinion
So glad you enjoyed this recipe, Jenny! An 1/8-inch thick crust is the common thickness for pie crust, I’d be careful making the crust any thinner as it will result in rips and tears, and your pie slices might not stay together as well. Did you make sure the crust was an even thickness throughout? If you thought the edges of the crust were too thick by fluting, you could try using a fork next time to flatten the edges instead, which is a pretty design as well 🙂 Hope that helps!
First time I’ve attempted pie crust and it turned out well!
Woohoo, that’s so exciting to hear!
This is hands down the best, flakiest pie crust I’ve ever made! It will definitely be my go-to crust from now on! The dough was very easy to make and so easy to work with. Thank you!!
Yay!! Happy to hear it’s now your go-to recipe, thanks so much for sharing! 🙂
Love this recipe! You can smell the butter as you’re rolling it out! Yum!
Delicious, flaky pie crust. Recipe is very user friendly and easy to work with. Definitely my new go to pie crust recipe.
So happy to hear that, Alisha!
This crust is so flaky and flavorful and easy to make! It rivals my grandmother’s recipe which has been the long-standing ‘best pie crust’ recipe in the family for years! The difference is that little bit of sugar that boosts the flavor and texture!
Wow, that’s so amazing to hear! Thanks for sharing, Madeline!
My dough came out beautifully. It was so flaky and so delicious
I made the double recipe. It made a great pie crust. I tried it using the food processor but mine was not quite big enough to handle the double recipe.
This pie crust is so versatile that it can be used for both sweet and savoury recipes. Must try!
Amazing, flaky pie crust!! I also followed Tessa’s advice and added 2 Tbl of sour cream to the dough. It was flaky and crispy and so yummy . Good idea to bake on a stone, too. Crust browned beautifully on the bottom.
So glad you enjoyed this recipe and tried the addition of sour cream! 🙂
This is a really great pie crust recipe. I love that it’s all butter. I usually have problems with my crusts shrinking but not with this one. I left this in the fridge overnight as the recipe instructed and I think that made the difference! We baked it and filled it with custard, bananas, and whipped cream for a banana cream pie. The crust was so flaky! Thanks for a great recipe!
Wonderful! So happy this recipe worked perfectly for you, banana cream pie sounds fantastic!
I love the recipe! The dough was easy to work with and the final product was out of this world flaky!
I’ve tried many pie crust recipes and this is the only one that reliably comes out well for me. So flaky and delicious! Really versatile for different pie or galette flavors.
This pie crust is very soft and flaky and melts in your mouth. It’s excellent.
Such a good and easy pie crust!!
Great pie crust! I made pumpkin pie in a glass pan and the crust baked nicely throughout. Crispy, not soggy on the bottom!
I’ve got 4 words for you. Oh my freaking gosh!
First time I’ve ever made a pie crust and turned out fantastic! I took the advice of not re-using the pastry for the top and instead I made little chocolate pastry scroll thingys. They were such a yummy treat! I’ve got your brown butter coffee cake in the oven right now and smells and looks awesome! I absolutely love everything you guys do at HTH and I can only imagine the amount of effort put in to perfecting this awesome recipe.
Tessa is my idol! <3
Lotsa love,
Abby
Aw yay!! So happy you enjoyed this recipe, Abigail! Chocolate definitely makes everything better, yum! I’ll be sure to relay your rave review to Tessa, thanks so much for sharing! 🙂
Super simple instructions and the recipe comes together so well. The results prove the science in baking truly works. So flaky and delicious! I made these into hand pies and will definitely be using this crust recipe again.
Delicious! So happy you enjoyed them, yum!
I’ll admit, I was EXTREMELY reluctant to make this, seeing as how I am partial to an old family that I’ve tweaked to perfection (she said modestly) and the handful of other recipes I’ve tried turned out…poorly. I had lost all faith in making someone else’s crust – but, my mother convinced me to do it for this challenge and, well, I really shouldn’t be suprised at this point but I’m pleased to inform you that your recipie did not disappoint. Lovely flavor, very crispy, delightfully lofty, and, it was SO much easier to work with than mine! Only goes to show you should always listen to your mother.
Wow, this is such an honor! We’re absolutely thrilled you loved this pie crust recipe. Hopefully this is your new go-to pie crust recipe!
It was an easy recipe to follow! And i loved grating the butter! It made it easier to cut in!
Hooray! It’s truly such a game changer to grate the butter!
The easiest and most delicious pie dough recipe ever!
So glad you think so!
Love this pie recipe
Is totally the best pie crust ever. I’ve used it so many ways now.
SO glad to hear this!
Thanks for the recipe!
I have tried A LOT of pie crusts over the last few years. This one was very easy to work with and tastes DIVINE!
So glad to hear it!
The only pie crust recipe I use! Turns out great every time.
Easy to follow directions and so tasty!
Hooray!
This pie crust truly is the best ever! I could not believe how flaky and buttery and perfect it was. This is going to be the only crust I make from now on and bonus it was easy to make too!
This is so amazing to hear!
This pie crust recipe was great! I am notoriously not a fan of traditional pie crusts and always choose alternatives or eat around it. But his pie crust turned out great – buttery, flakey, crispy, and actually delicious!
Yay!! I hope this recipe becomes a holiday tradition!
This is the first time EVER that I have had success making pie dough from scratch. This recipe is easy to follow and works like a dream. No more store bought pie crusts for me! Thank you HTH!!
So, so happy to hear this. Thanks Kathleen!
So excited I made a 2-crust pie! My first ever. The crust was delicious and the directions very straightforward. This recipe is a keeper!
Yay! This is so amazing to hear, Kathleen!
Great tips for making a pie crust. Unfortunately mine didn’t turn out great. It was definitely my fault. I needed to roll it thinner and I used a different baking method than I was used to. I’ll definitely try again.
Practice makes perfect! Let us know the next time you try this recipe out!
Amazing pie dough! So flaky and tender. I use this for EVERYTHING during the holiday season!
So glad you enjoyed!
Wow!!! I’ve been so scared to make pie dough because it sounded so difficult but this was one of the easiest doughs to put together
I made little hand pies and they came out absolutely delicious!!!! 10/10 would recommend
This pie crust is delicious and easy to work with. I like that it makes extra dough because I need it.
Yay! So glad you love this pie recipe 🙂 The extra dough always comes in handy.
Delicious Crust! Very easy!
So glad you enjoyed this recipe!
So easy and flavorful. Made it in the food processor and it came out really good!
So thrilled you enjoyed this recipe, Carly!
I did it! I’m so excited that I made a pie with a double crust! The directions were great and the process very straightforward. I’ll definitely message this again.
I did it! First time ever messing a pie crust and it worked! Very easy recipe to follow and delicious. I’ll make this again, for sure.
YAY! So glad this pie crust was a success for you, Kathleen!
This pie crust is AMAZING! I’ve used it for chicken pies, mini quiches and apple pie, although they did shrink a bit (my fault there, probably overworked the dough), they tasted soooooo good and was so buttery and flaky, not soggy at all!
So thrilled you love this pie crust recipe!
Though i have a food processor, i prefer the by-hand + grated butter version.
Added 2tbsp blueberry powder for halloween effect. Made a galette and was surprised to see the bottom didnt get soggy.
Turned out great! My first home made pie crust! Thank you Tessa for such detailed posts like this.
Great idea adding the blueberry powder! So glad you love this recipe.