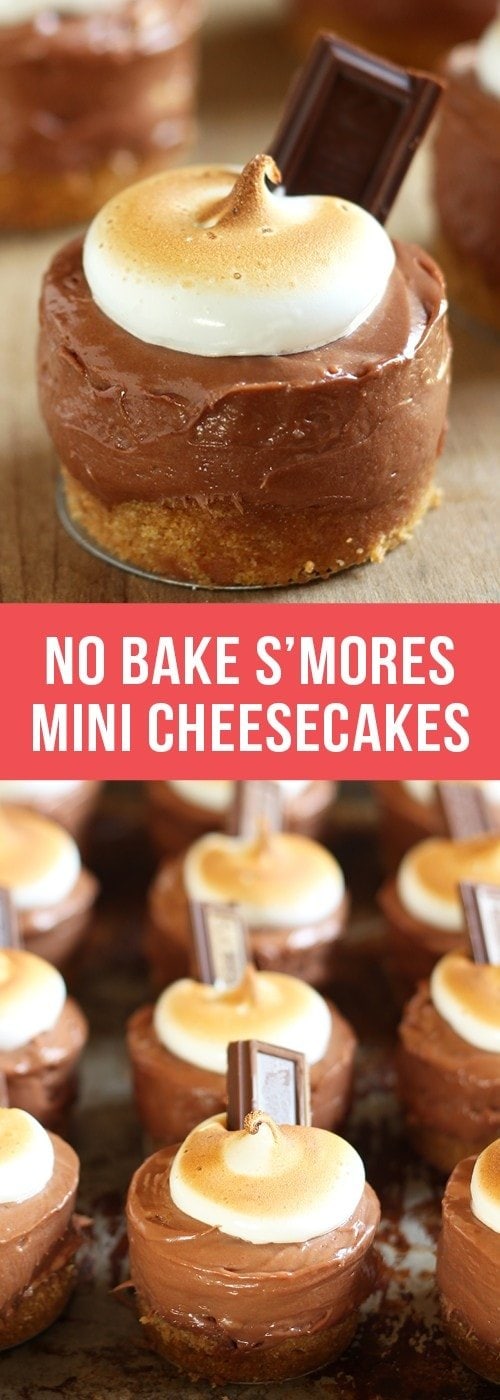
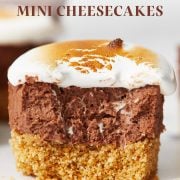
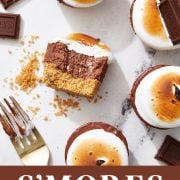
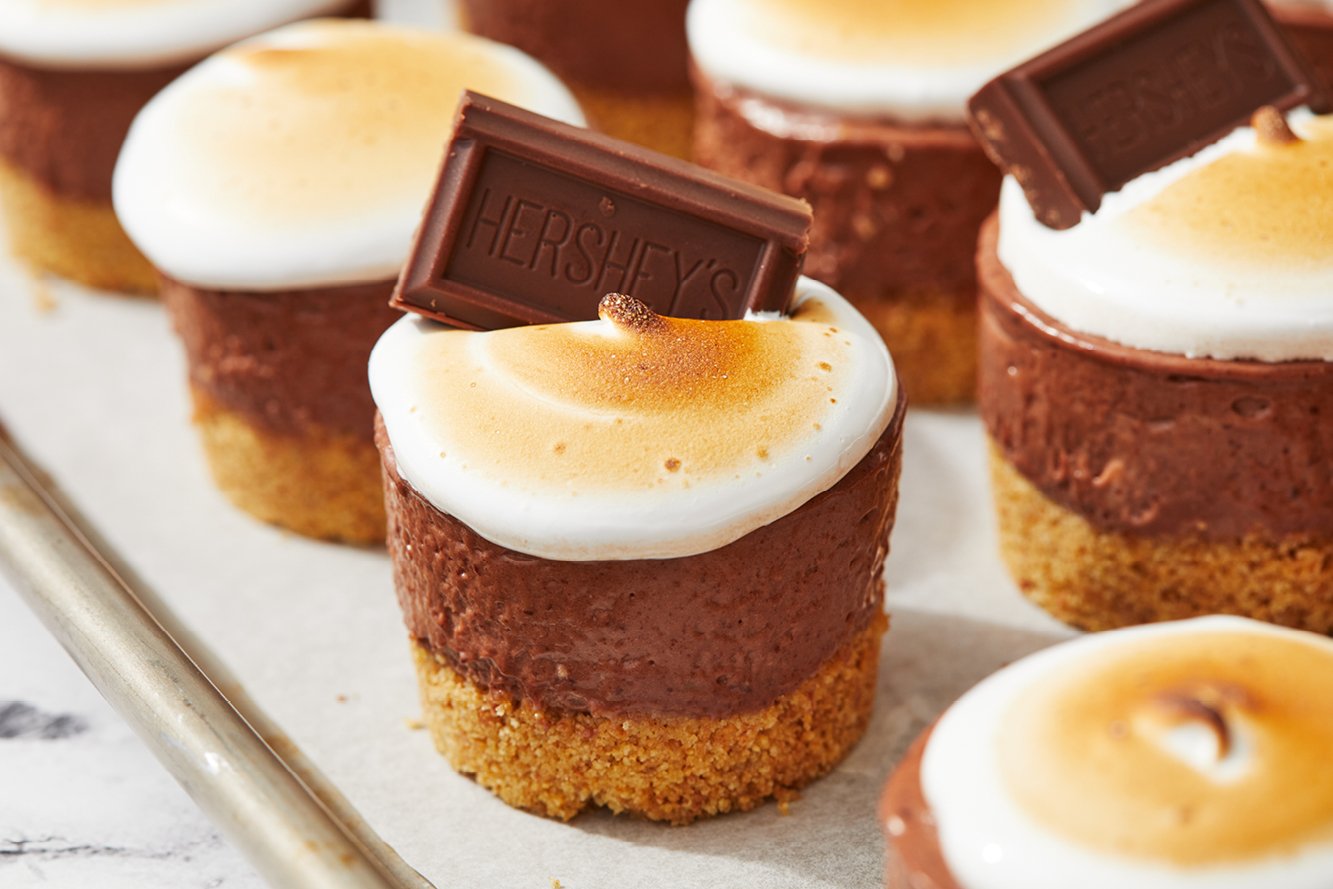
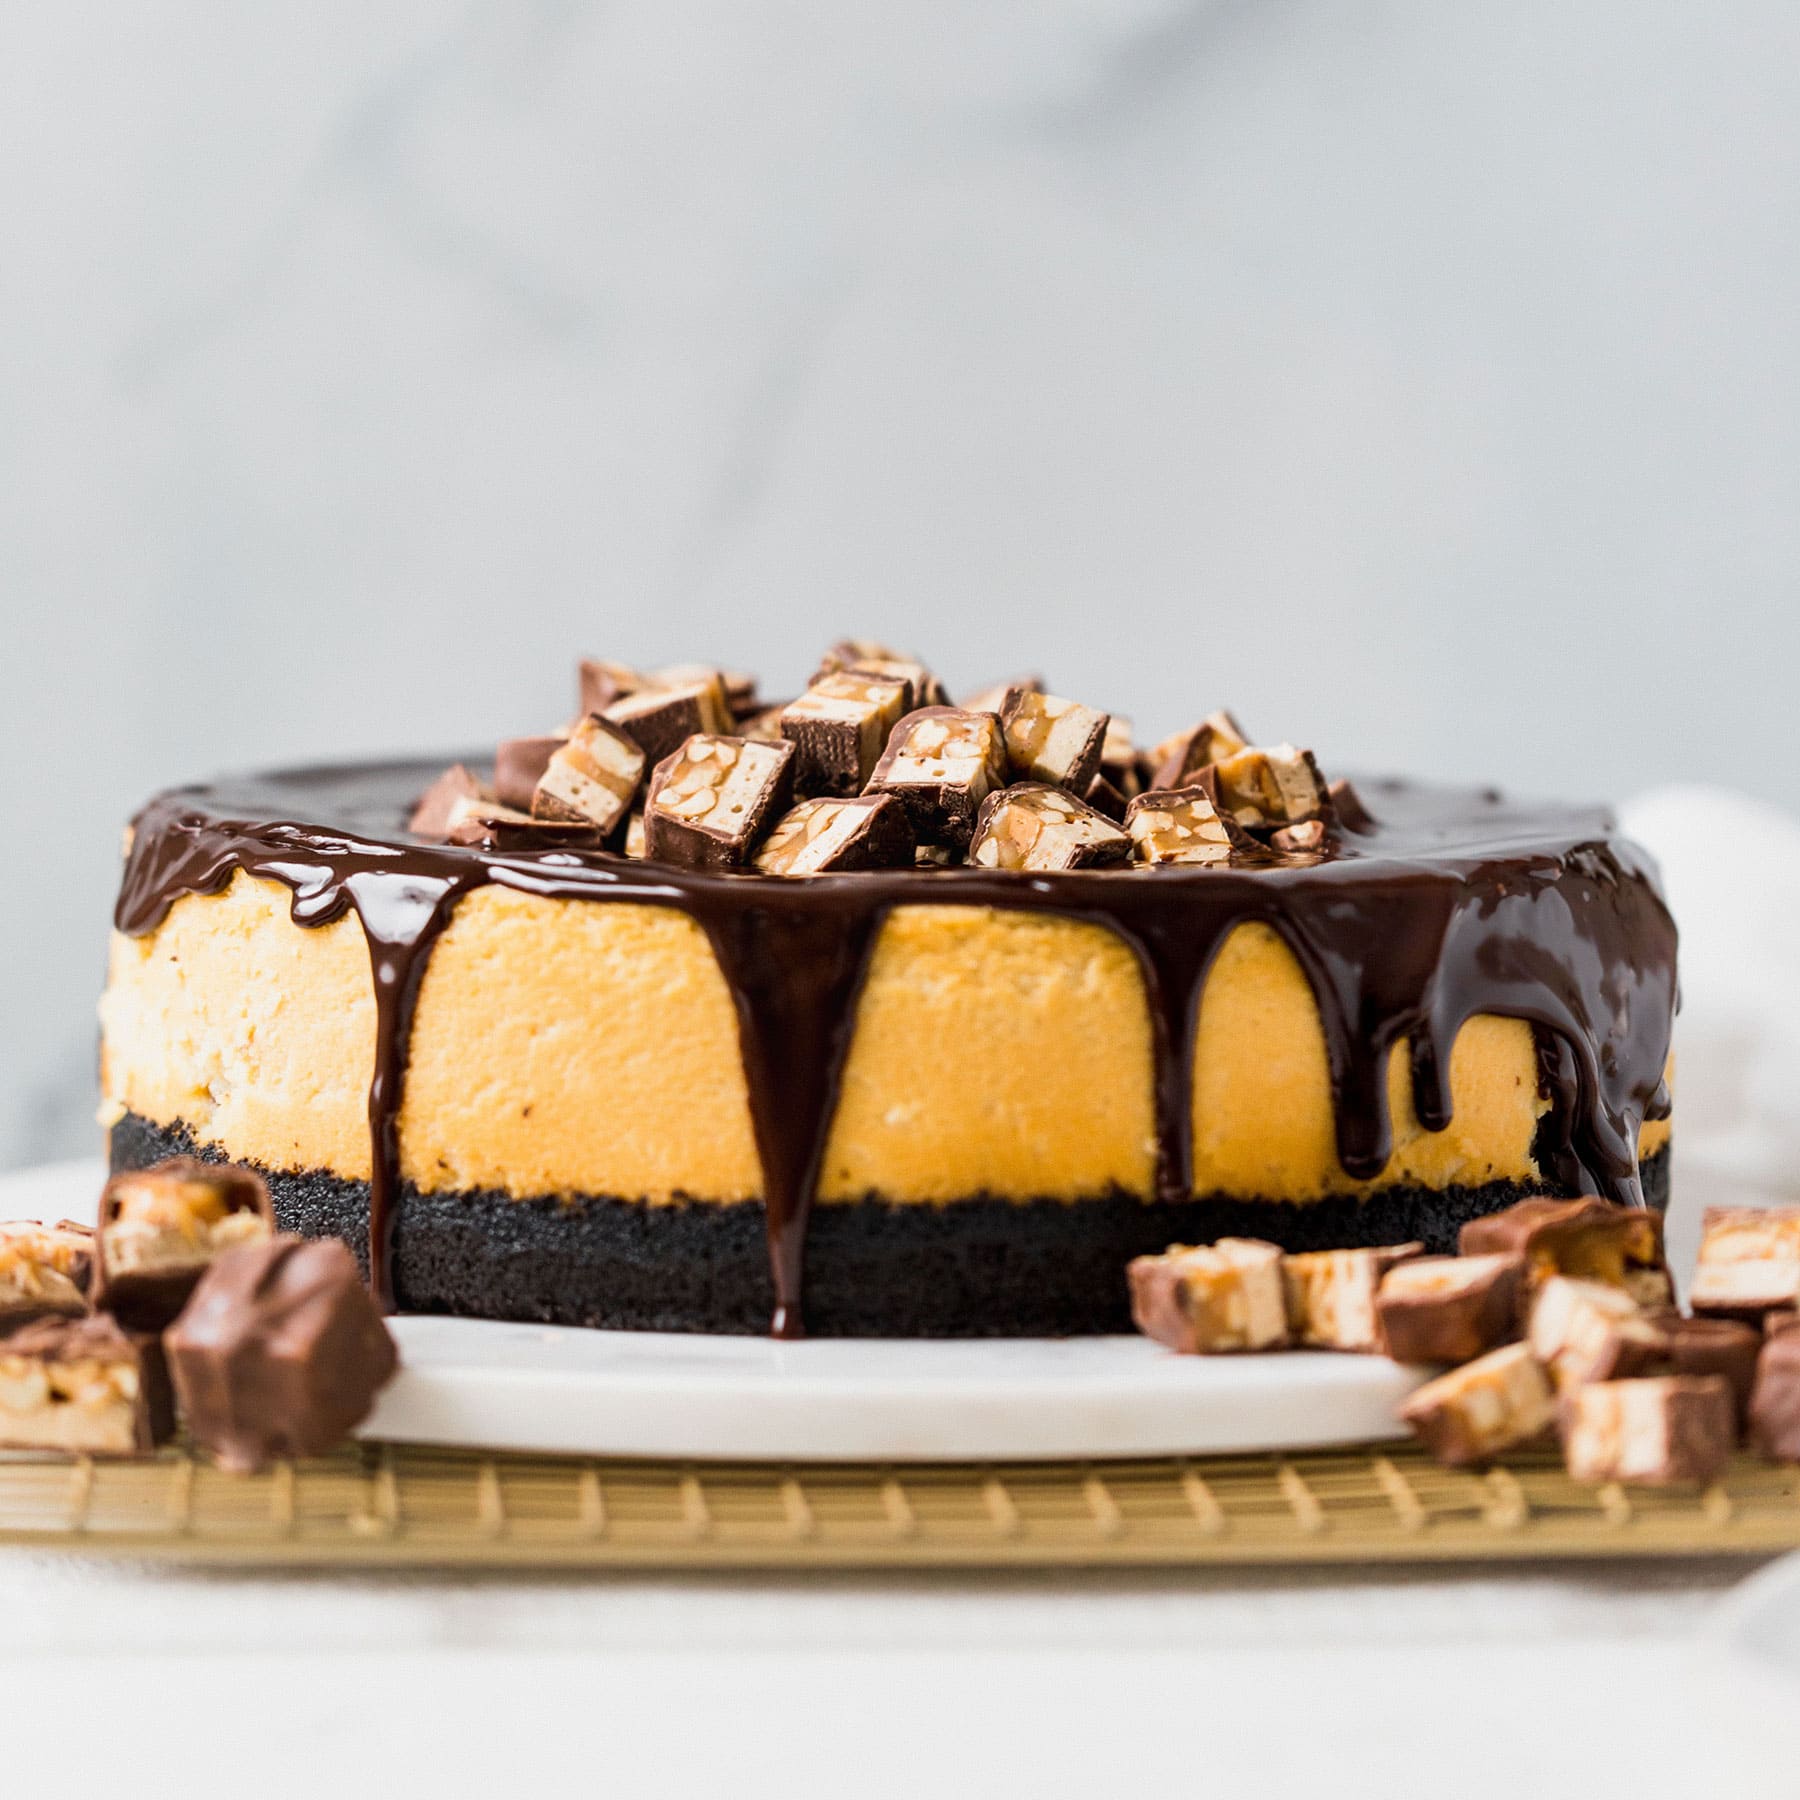
I love chocolate. I love s’mores. I love cheesecake. Put it all together, and you have my easy No-Bake S’mores Mini Cheesecakes!
Living in Arizona, no-bake recipes are a must during the summer. Any recipe that skips turning on my oven when it’s already 100°F+ outside is a winner.
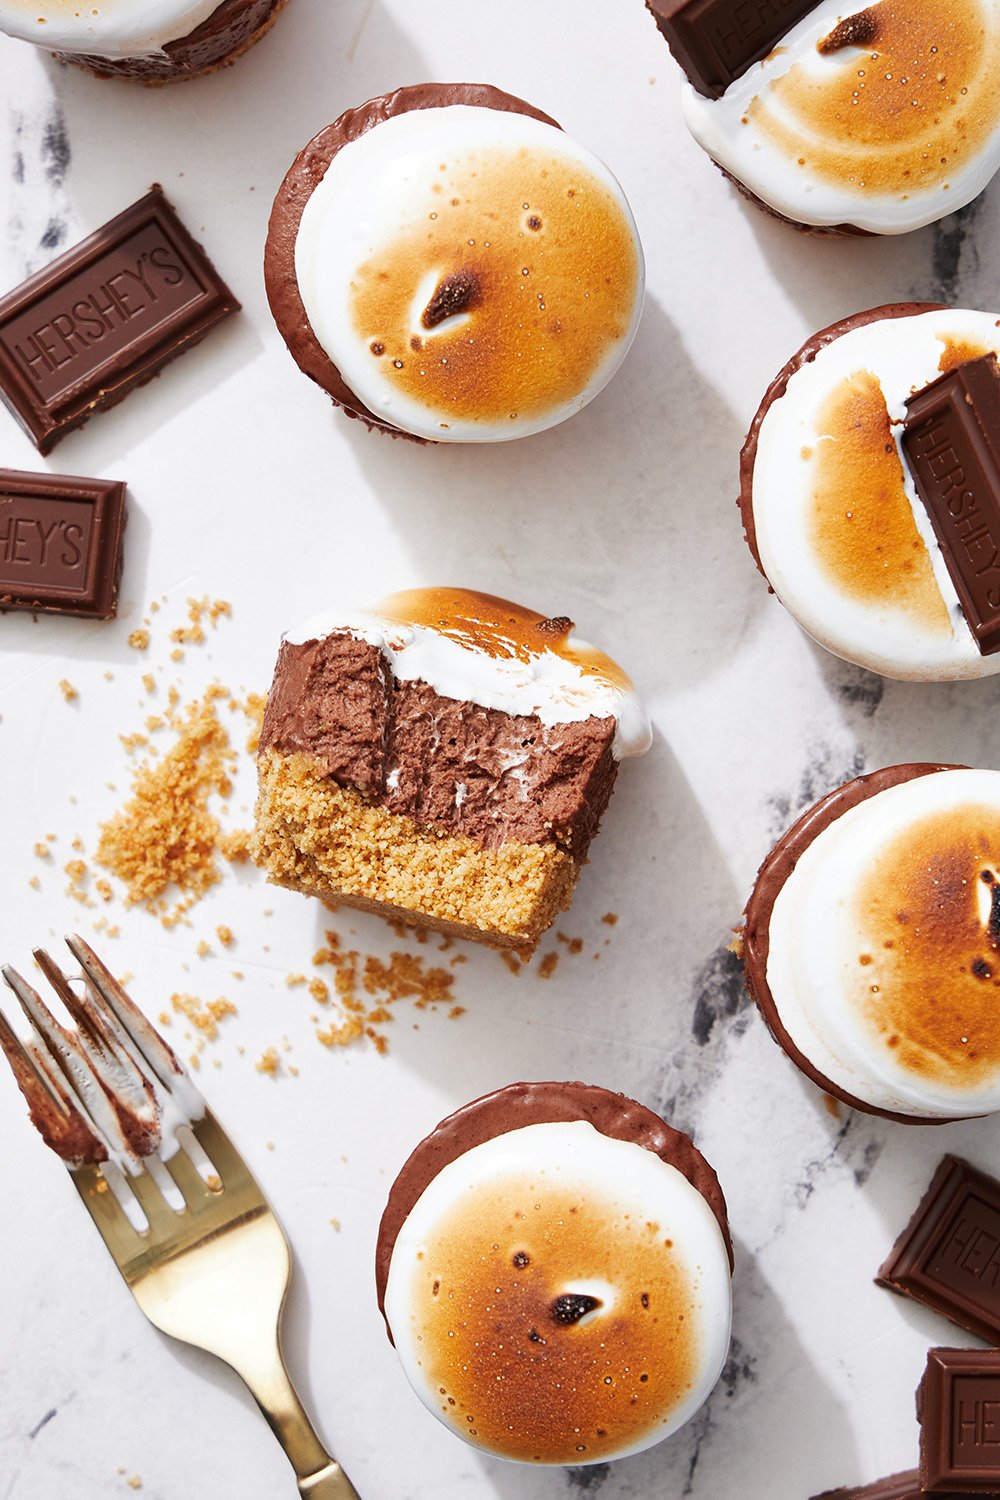
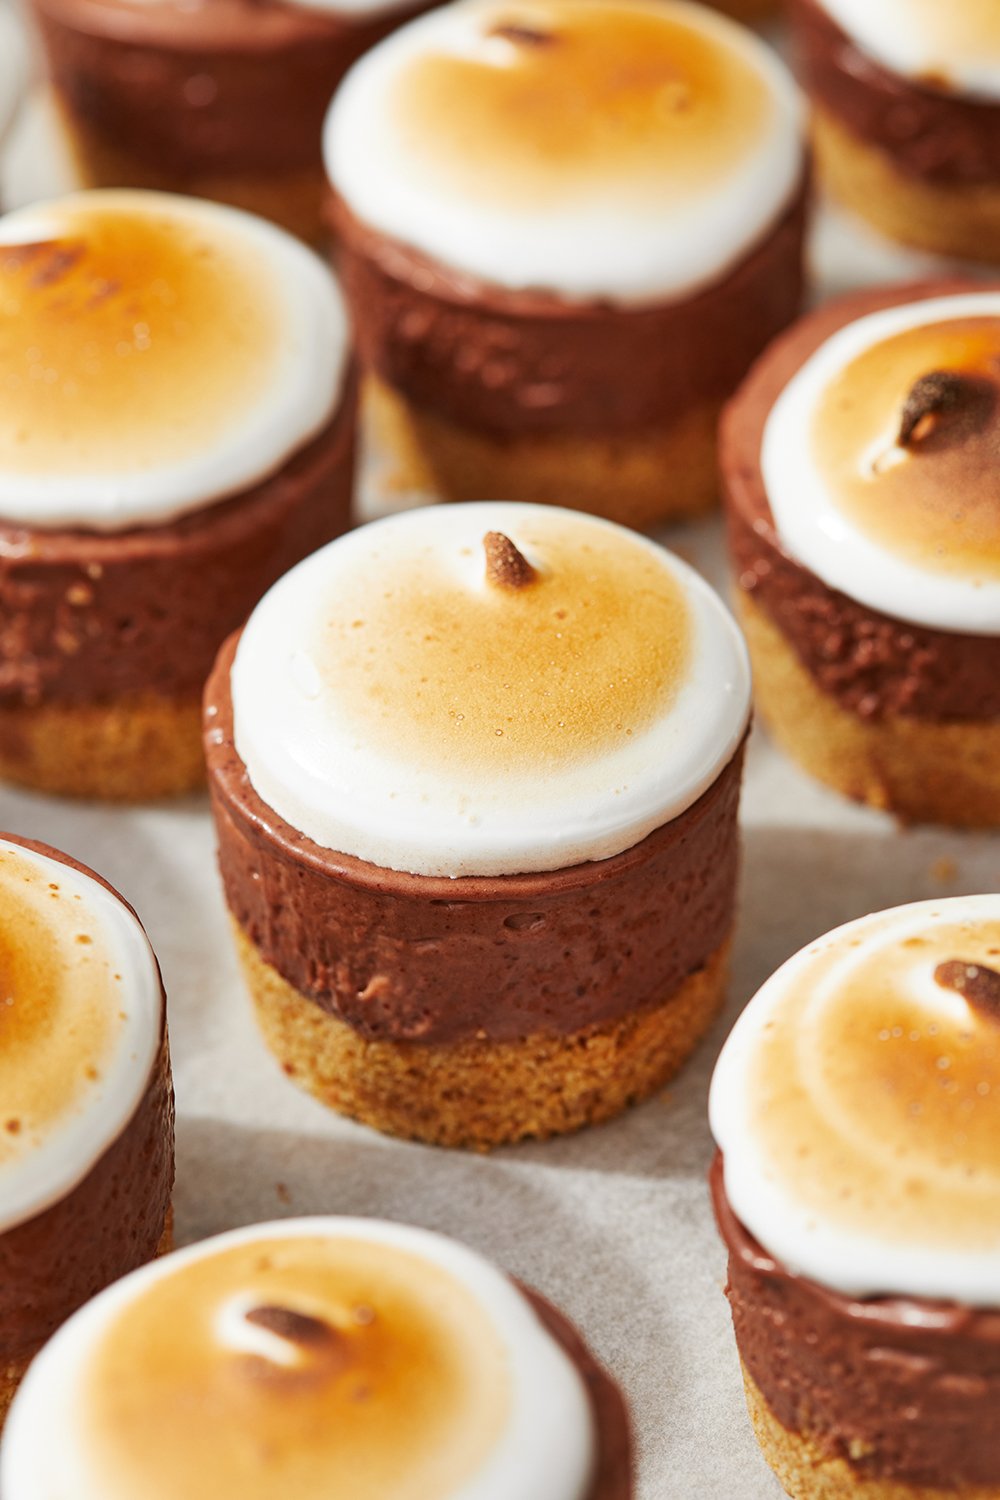
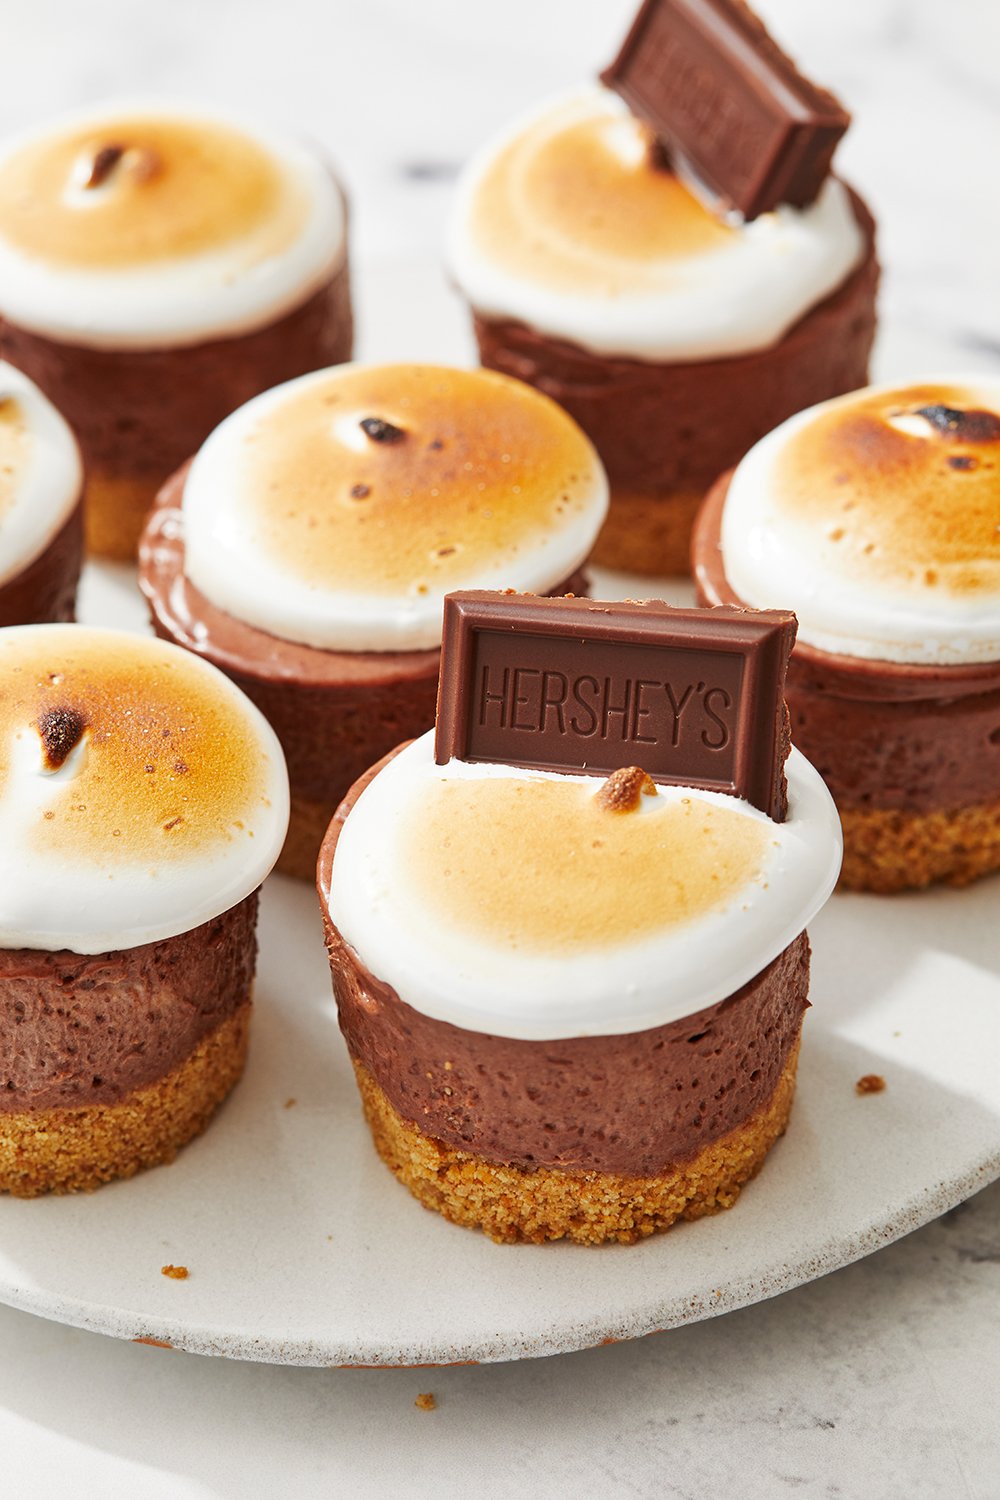
These mini cheesecakes pack all the nostalgic flavors of a s’more right into a delicious no-bake cheesecake form. Not to mention, they’re downright adorable.
The best part about these mini cheesecakes is that they look super fancy. Everyone will think you spent a lot of money at a high-end bakery. No one needs to know they’re SO easy to make. Even the marshmallow topping is simple and fast!
Plus, any recipe that gives you a reason to pull out your kitchen torch is a fun one to me. Though torching the marshmallow is totally optional.
How to Make No-Bake S’mores Mini Cheesecakes
Ingredients for No-Bake S’mores Mini Cheesecakes:
- Graham crackers – The base layer for our cheesecakes! More on this below if you’d prefer to use a different cracker/cookie/biscuit here.
- Butter – The ‘glue’ that holds our graham cracker crust together. I prefer to use unsalted butter in all my baking – read why here.
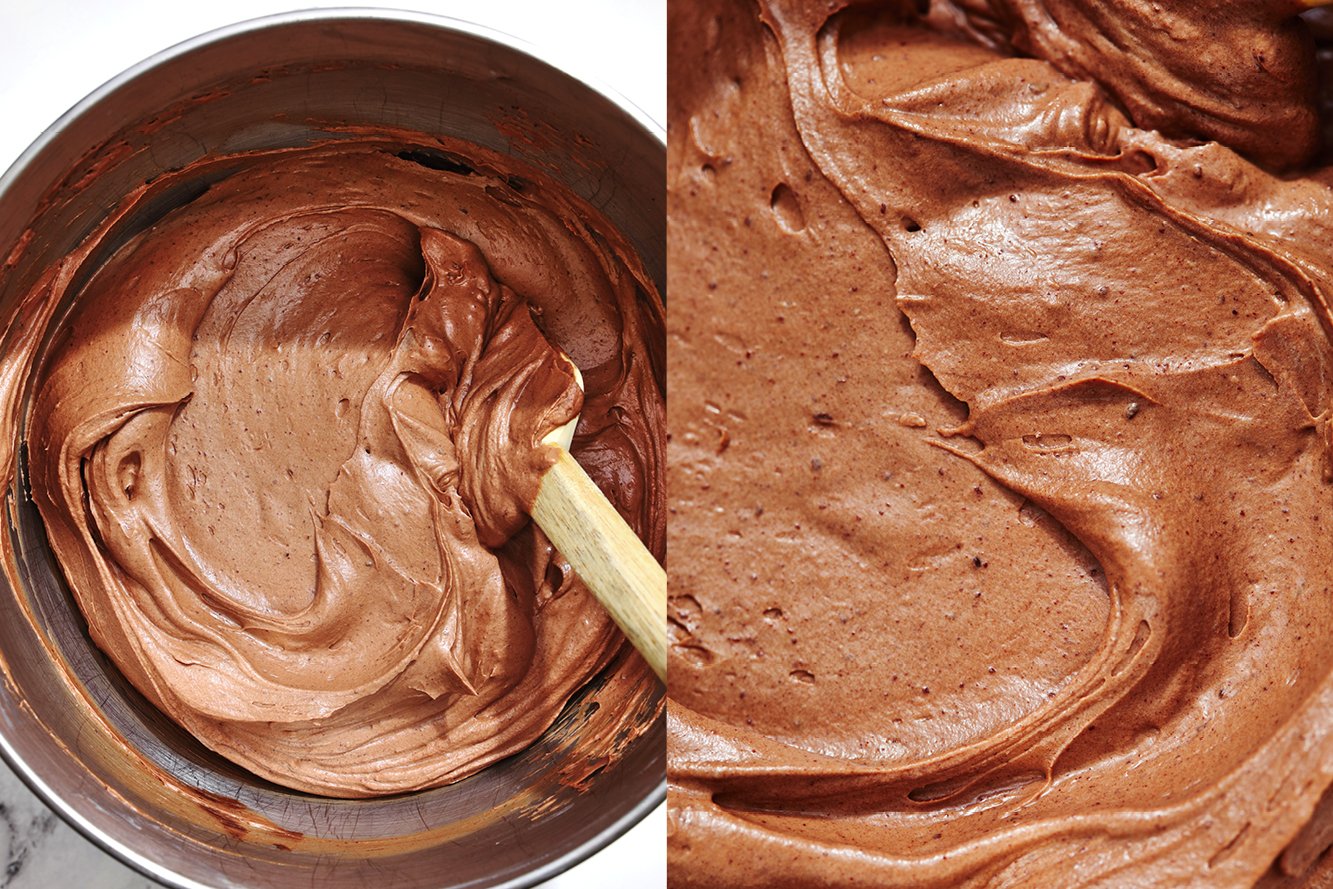
- Semisweet chocolate – You can use dark chocolate or milk chocolate here depending on your preferred level of sweetness. I prefer to use a chopped baking chocolate bar rather than chocolate chips as chips contain ingredients that prevent them from melting smoothly. We don’t want any lumps in the filling!
- Cream cheese – Be sure to use a full-fat brick of cream cheese, such as Philadelphia brand, and never the type in tubs meant for smearing on a bagel. Ensure it’s completely at room temperature before beginning for a perfectly smooth cheesecake.
- Sugar – Just enough to sweeten our cheesecake without making it cloyingly sweet.
- Vanilla extract – For flavor.
- Heavy cream – Also at room temperature. The heavy cream helps create a silky-smooth, perfectly-set no-bake cheesecake.
- Large egg whites – At room temperature. These are the base of our marshmallow topping.
- Sugar – More sugar is a necessary component for the marshmallow, don’t reduce it.
- Cream of tartar – To help stabilize the marshmallow meringue, don’t skip it.
- More vanilla extract – Essential for flavor.
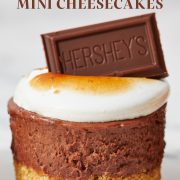
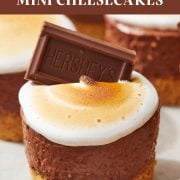
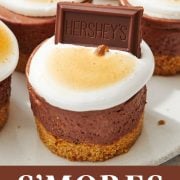
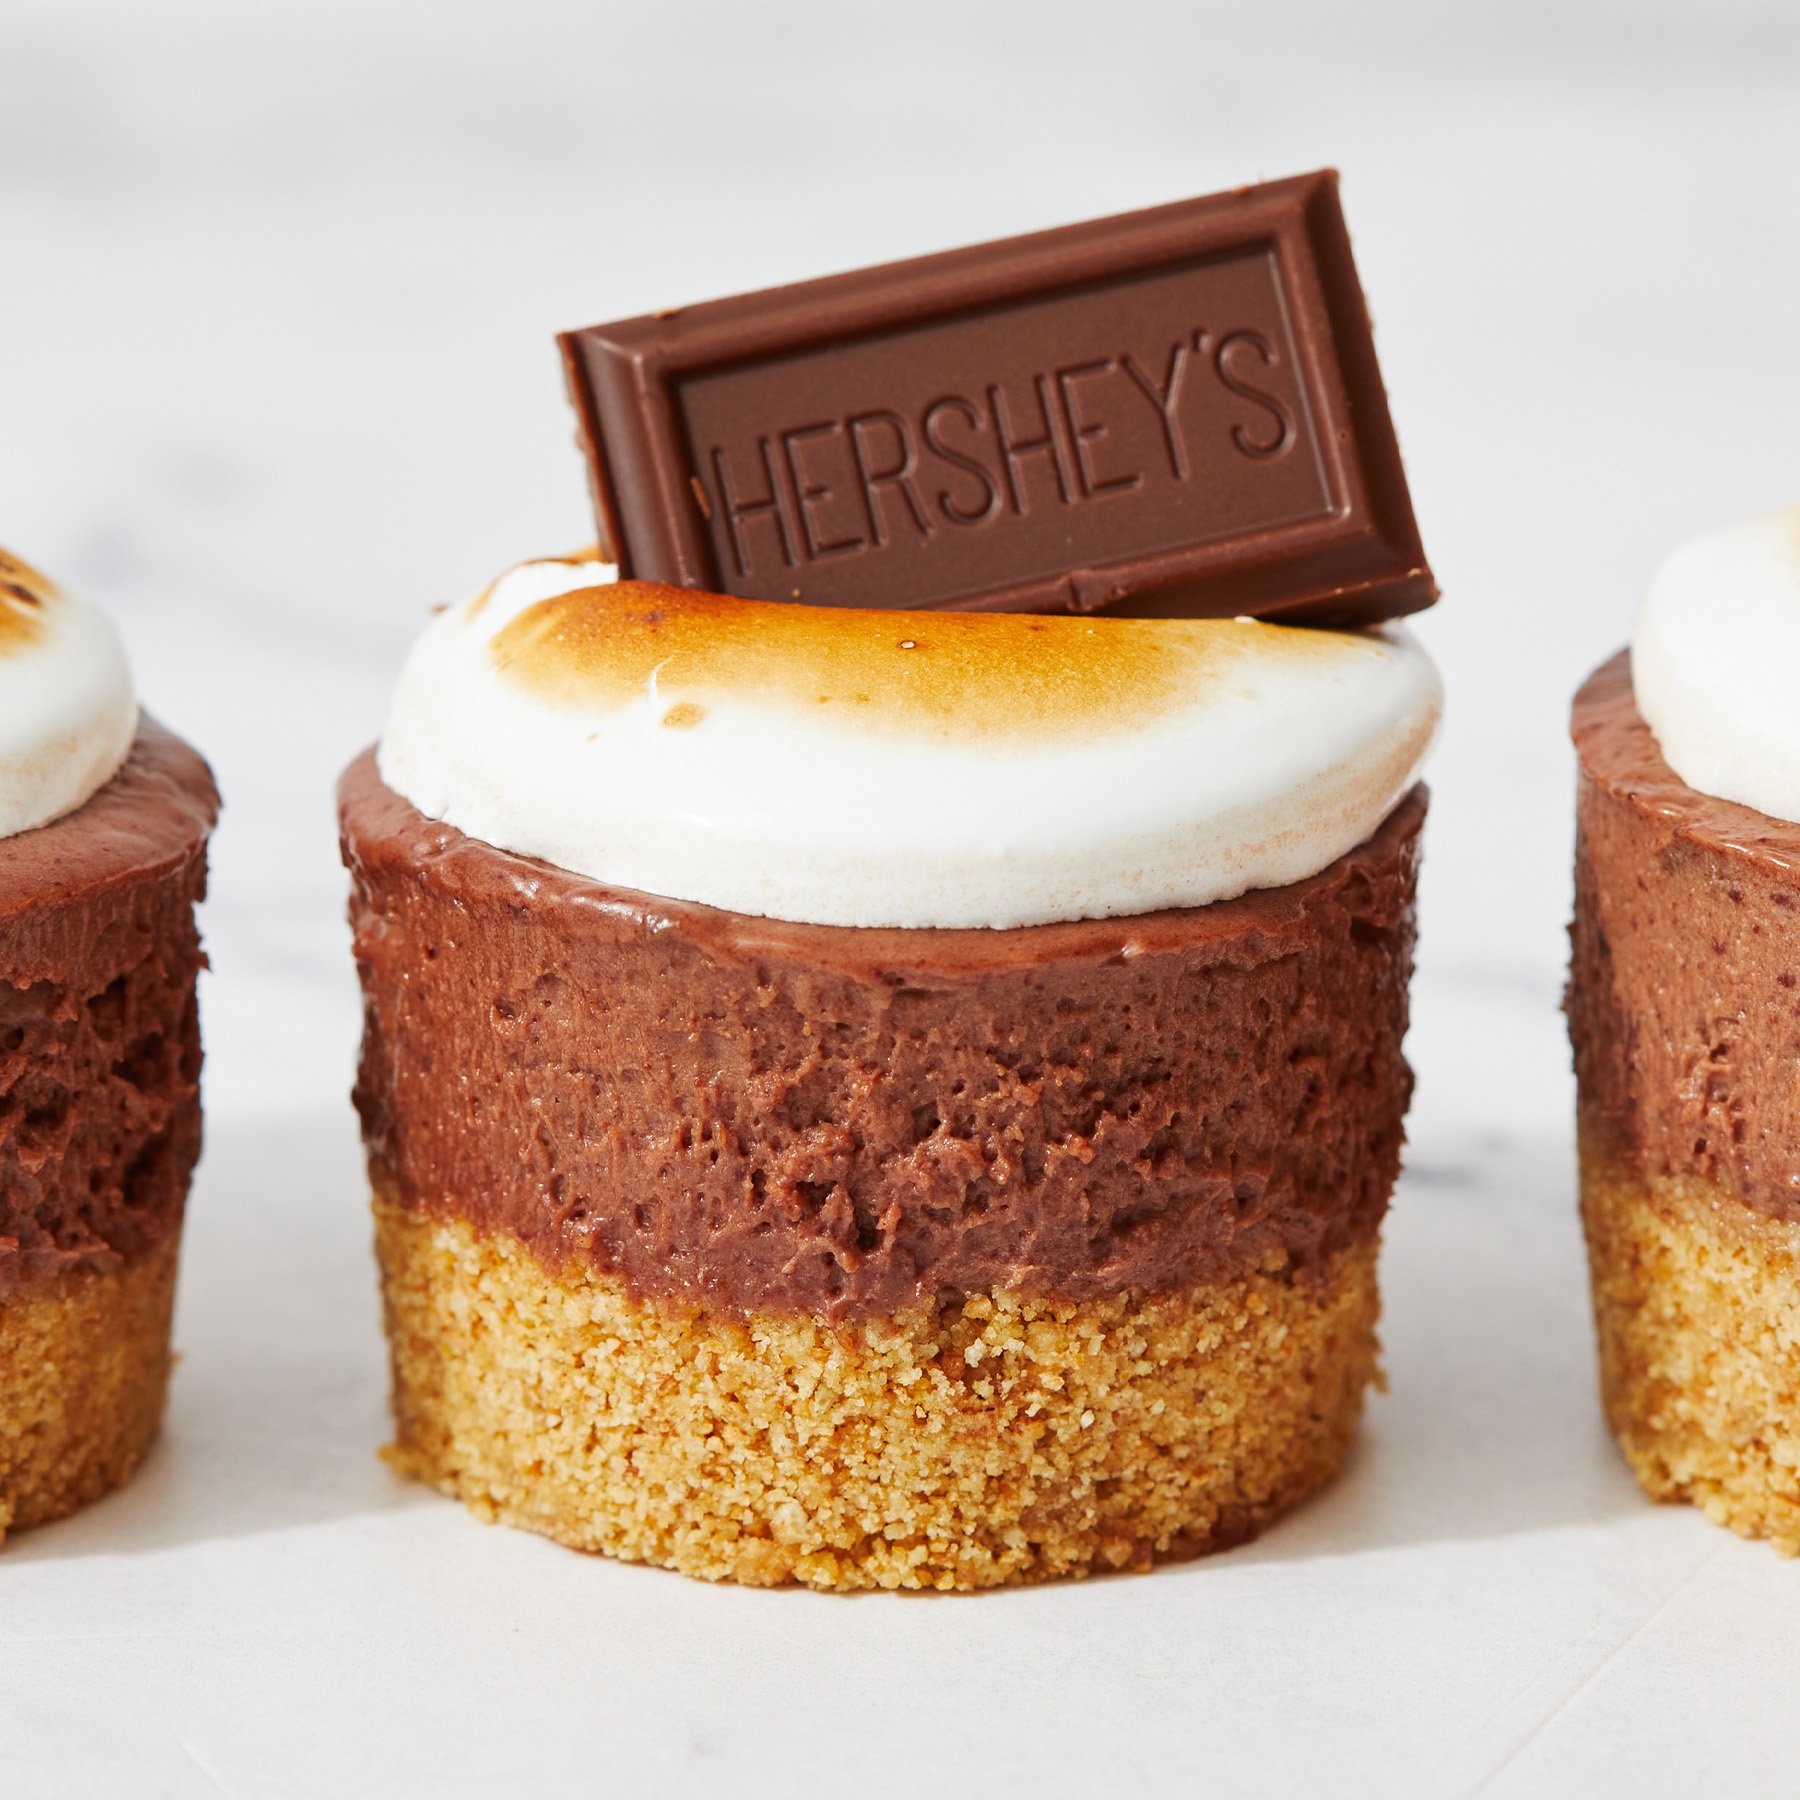
- Chocolate bar, for decoration – Traditionally, this would always be a piece of a Hershey’s bar – but you can use any chocolate bar you like. Just chop it into large, even pieces and place them on top of the torched meringue as a pretty finishing touch.
Overview of Instructions – How to Make Mini S’mores Cheesecakes:
- Melt the chocolate. In a small heat-proof bowl, microwave the chocolate in 30-second increments until melted. Stir until smooth, then set aside to cool until just warm.
- Prepare the pan. Spray the bottom and sides of a mini cheesecake pan with nonstick cooking spray. This is the pan used in the photographs but it’s currently out of stock, so here is an alternative! More on alternate pan options below.
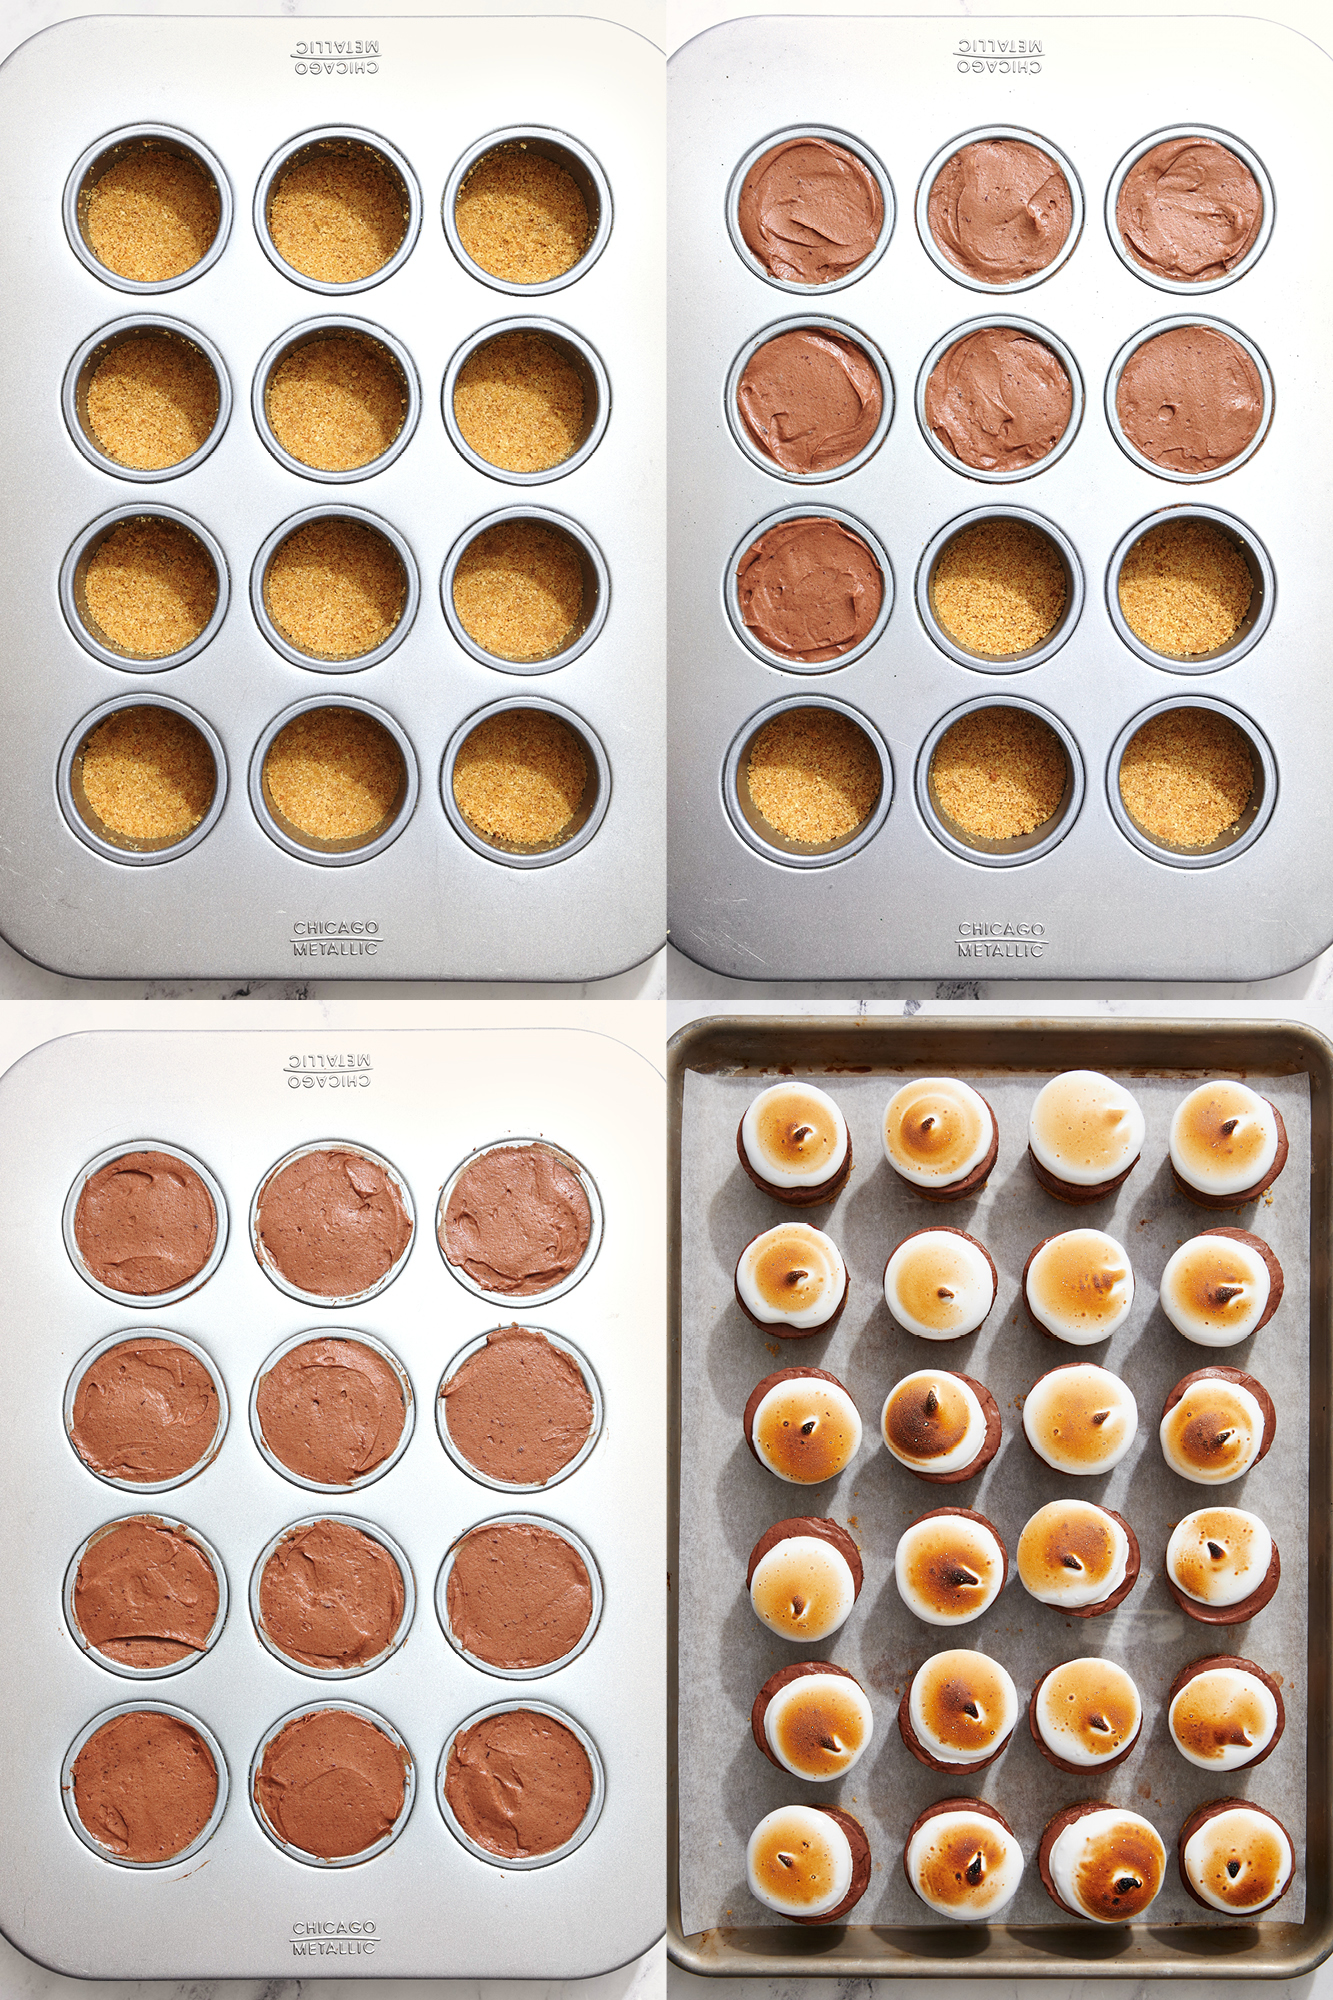
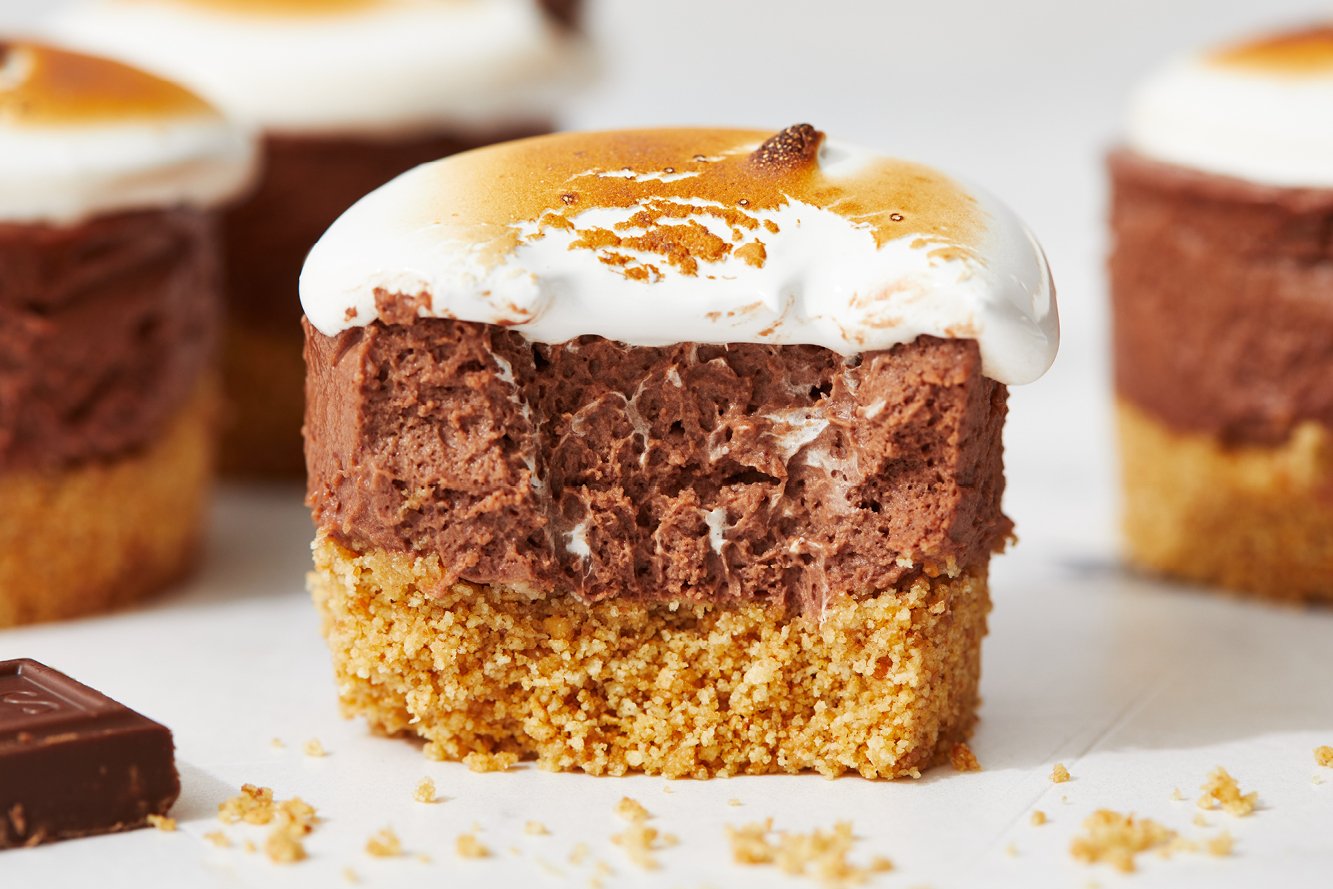
- Make the crust. Place the graham crackers in the bowl of a food processor and pulse until finely ground. Add in the melted butter and pulse until moistened.
- Divide the crust. Divide the mixture among the cavities of the cheesecake pan, about 1 ½ tablespoons in each. Firmly press into the bottom of each cavity. Set aside.
- Make the cheesecake batter. In the bowl of an electric mixer fitted with the paddle attachment, beat the cream cheese and sugar on medium-high speed until light and creamy, about 2 minutes. Scrape down the sides and bottom of the bowl. Add in the vanilla and heavy cream, beating on low until combined, then increase speed to medium-high until thickened. Pour in the cooled melted chocolate and mix on low until fully combined.
- Divide cheesecake evenly. Fill each cavity evenly. Lightly tap the pan on the countertop a few times to release any air bubbles. Using an offset spatula, smooth the tops of the cheesecakes.
- Chill. Cover with plastic wrap and place in the fridge until firm, at least 4 hours or overnight.
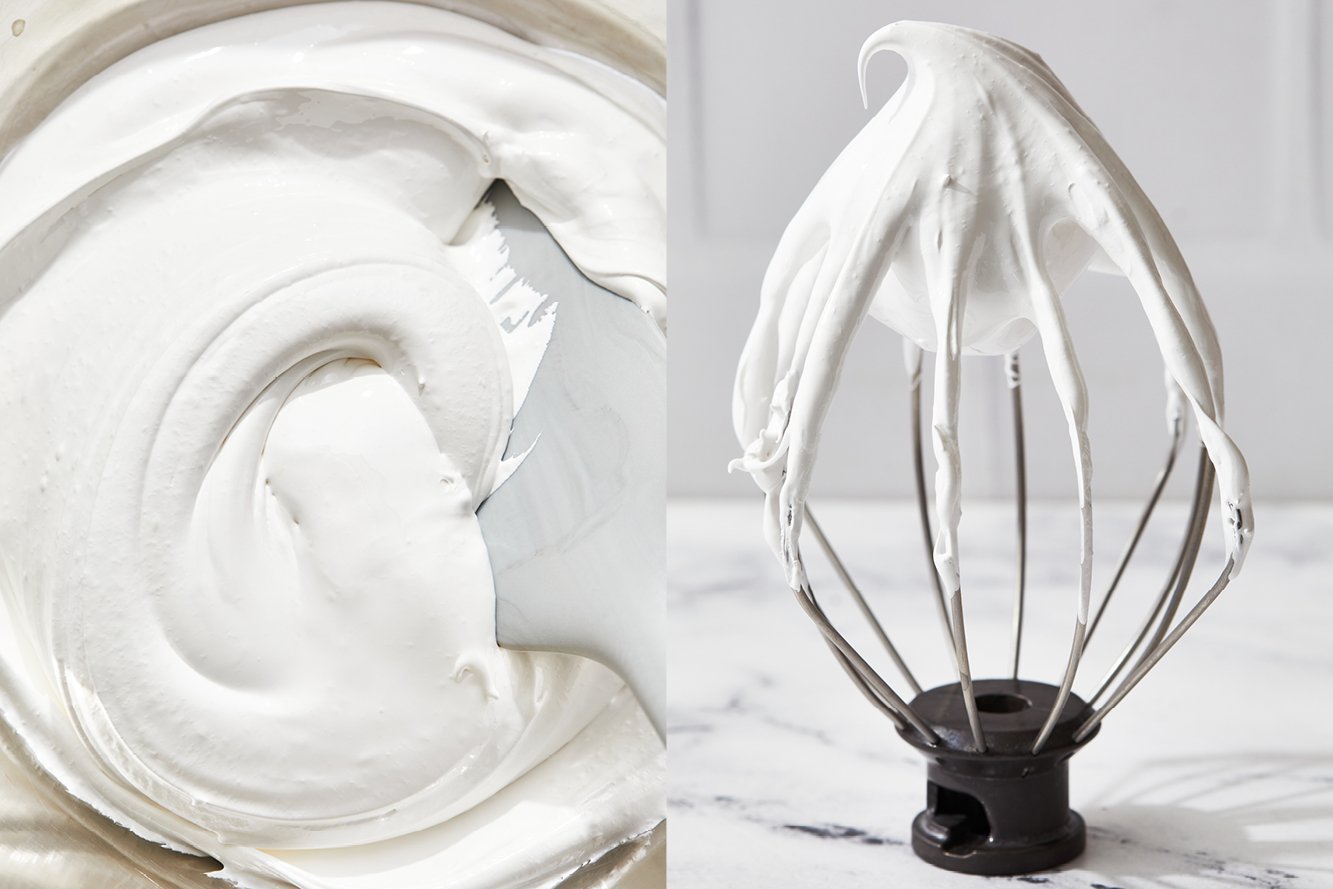
- Make the meringue topping. In a small heat-proof bowl, add the egg whites, sugar, and cream of tartar. Set over a small saucepan of simmering water and whisk constantly over medium heat until the sugar is dissolved, 2-3 minutes.
- Move to mixer and whip. Transfer to an electric mixer fitted with the whisk attachment. Start beating on low speed then gradually increase to high, beating until stiff, glossy peaks form, about 5 to 7 minutes. Add in the vanilla and beat until combined.
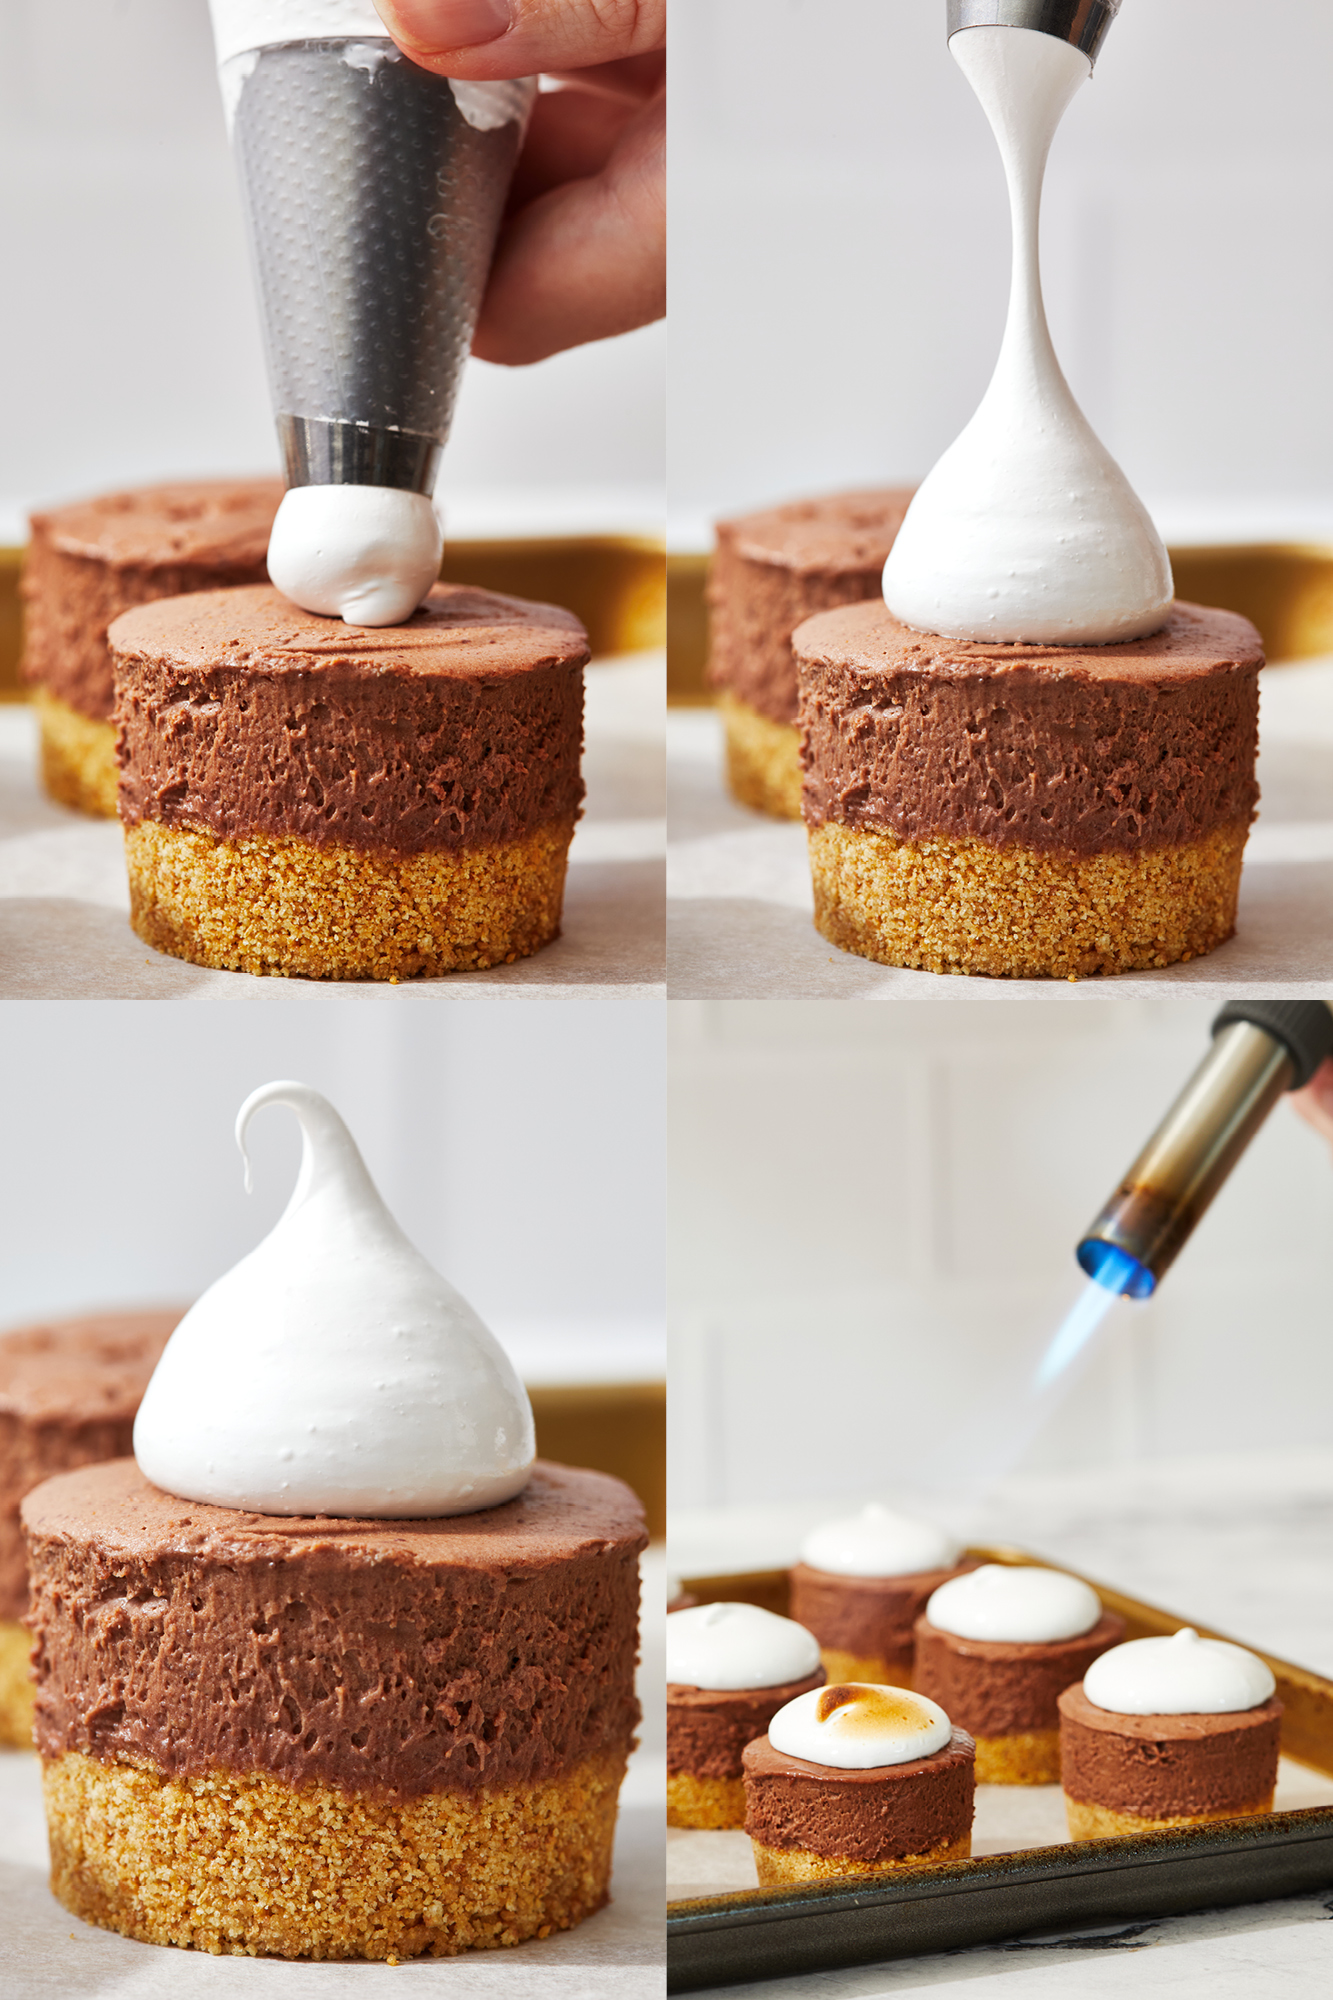
- Pipe meringue on top of set cheesecakes. Remove to a piping bag fitted with a plain open tip, such as the Ateco #808. Pipe a dollop onto chilled cheesecakes.
- Torch meringue. If desired, use a kitchen torch to lightly toast the marshmallow topping.
- Finish with chocolate. Garnish with a piece of Hershey’s bar.
- Serve! Return to the fridge until ready to serve.
How to Make the Best No-Bake Graham Cracker Crust
I’ve found in the past that no-bake graham cracker crusts can be super crumbly. This ratio of butter to graham crackers is perfect. The butter will solidify when chilled, holding the graham cracker together. Ensure your crust is firmly packed into each cavity of your mini cheesecake or muffin pan. The tighter the crust is, the less likely it is to crumble. A small object like a shot glass or tart tamper makes easy work of this.
You can also use pre-ground graham cracker crumbs – just mix well with the melted butter and proceed with the recipe.
Do I Have to Use Graham Crackers?
Graham crackers are the quintessentially American s’more cookie of choice, but alternatives will work just fine. You can use the same amount by weight of Teddy Grahams, digestive biscuits, vanilla wafers, Biscoff cookies, or any crunchy cookie you’d like! Biscoff cookies are a little richer than graham crackers (which are dryer), so add just enough butter until it holds together when pressed.
Tips for Making the Meringue Topping
The finishing touch for our Mini No-Bake S’mores Cheesecakes! I know asking you to make a meringue might seem intimidating, but I promise it’s super easy. Previously, readers tried using marshmallow fluff instead, and they said it just doesn’t look or taste as nice.
- We are making a ‘Swiss meringue’. This means we’re heating the egg whites and sugar over a bain-marie (a heat-proof bowl placed over a pot of simmering water). This process slowly dissolves the sugar without scrambling the egg.
- How to know when it’s heated enough. After a few minutes, carefully test the mixture by rubbing a little between your fingers. The mixture will be just warm to the touch. If you can no longer feel any granules, it’s ready to mix. If there’s a bit of a gritty texture, heat a little longer. Once the sugar has dissolved, move to the bowl of an electric mixer (or a mixing bowl large enough for the mixture to triple in size as it whips).
- Whip it. Whip it good. Start low and slowly increase the speed to medium-high. You will be able to see the egg mixture change in color, texture, and volume as it turns into a beautiful, fluffy meringue. This will take a few minutes, so be patient. Once it’s thick and voluminous, mix in the vanilla.
- How to know when it’s ready to pipe? Pull the whisk out of the mixer and turn it upside down. If the meringue bends to the side, continue mixing. If it stands straight up with a very slight bend on the end, it’s ready to pipe!
Do I Need to Torch the Meringue?
Not unless you want to. Kitchen torches are so fun to use! Torching the meringue is just for showmanship, fun, and prettiness – and a tiny bit of added texture. It also brings the complete s’mores vibe to these cheesecakes.
Is the Meringue Safe to Eat?
Because this Swiss meringue method cooks the eggs first, they are safe to eat – but if you or someone you’re serving is immune-compromised or pregnant, just use an instant-read thermometer to verify that your egg mixture has reached 160°F before removing from the bain-marie and whipping.
Do I Need A Special Pan To Make No-Bake Mini Cheesecakes?
I love my mini cheesecake pan for this recipe. Each cavity in this pan has a removable base, so you can easily pop the mini cheesecakes out of the tin, without the need for muffin liners or any fuss at all. They come out of the tin looking so perfect and beautiful. My Chicago Metallic pan (which you can see in the photos) is currently out of stock, but this alternative pan will work perfectly too.
Are All Mini Cheesecake Pans the Same Size?
During the testing process for this recipe, Team HTH learned that mini cheesecake pans are not one standard size, and most available online don’t do a great job specifying their sizes and capacities.
- My Chicago Metallic mini cheesecake pan’s cavities are almost 2″ wide at the top and hold approximately ⅓ cup liquid.
- That Chicago Metallic pan is currently out of stock, but this alternative pan has the same size cavities.
- If your pan’s cavities are larger (like many are, including some belonging to our team members), I recommend doubling the cheesecake portion of the recipe. The graham cracker base and the meringue topping will still work for either size pan as written.
How to Use Alternate Pans for Mini Cheesecakes
You can alternatively use a regular or mini muffin pan and liners:
- Using a regular-sized muffin pan with liners: This will make approximately 12 cheesecakes. Follow the recipe as written, using quality cupcake liners instead of spraying the pan with non-stick spray. Otherwise, the graham cracker crust might crumble and the cheesecake might stick when you go to remove them.
- Mini muffin tin with liners: This will make about 35 mini cheesecakes. Line the tin with foil or paper liners. Place 1 tablespoon of crust into each cavity, then use the bottom of a 1-teaspoon cookie scoop to firmly press the crust into the pan. Use the same scoop to scoop a heaping teaspoon of cheesecake filling into the cavities. You’ll need 3 Hershey’s chocolate bars for topping.
Can I Make One Large No-Bake Cheesecake Instead of Minis?
We haven’t tested this, so I can’t say for sure what size springform pan this would best work in. Instead, I highly recommend my ultra-indulgent Death by Chocolate Cheesecake recipe.
How to Store No-Bake S’mores Mini Cheesecakes
Store in an airtight container in the fridge for up to 2 days. Be sure to store flat, as the meringue topping will slide off if stored at an angle.
Can You Freeze No-Bake S’mores Mini Cheesecakes?
While we haven’t tried that, it should work just fine to freeze these un-topped mini cheesecakes. Place individual cheesecakes on a baking tray and freeze until solid, then move to an airtight container for up to 3 months. To thaw, place in the fridge overnight. Add the meringue topping once thawed.


Great recipe. Easy to follow. Tastes amazing. But no matter how many times I make this, the cheesecake does not set. And yes I use full fat cream cheese and cream.
Sorry to hear you’ve experienced issues! Was your melted semisweet chocolate completely cooled before it was added to the other ingredients? If not, that can also cause issues with the cheesecake not setting properly.
These mini cheesecakes are absolutely delicious. I have made them twice now, but each time I am finding that my cheesecake is not setting. I made sure to follow the directions very carefully this time, but had the same result. Would whipping the cream prior to adding it to the cream cheese mixture help with this? Any advice would be very much appreciated. I love so many of your recipes.
Hi Alaina! I’m sorry to hear that your cheesecakes aren’t setting as they should! Are you using full-fat cream cheese and heavy cream? Lower fat products can prevent these from setting. You also need to make sure they’re totally chilled (overnight if possible) before unmolding. We haven’t tried whipping the cream beforehand, and while that may thicken the cheesecakes more, it likely won’t help them set either. I recommend trying a different brand of cream cheese and possibly even a different brand of heavy cream, and hopefully this will fix your issue! You can also try freezing the cheesecakes for 30-60 minutes before unmolding, to see if that will help! Good luck and happy baking 🙂
Just wondering how many Graham Cracker crumbs one package comes out to? Is it 2 cups? Or is there a gram measurement? Packages vary and would love another measurement if possible.
Thanks!
Melissa
Each sleeve is about 1 cup, but I haven’t weighed them so I can’t say gram measurement for sure! That’s coming from the 14.4 oz package of Honey Maid Graham Crackers. Hope this helps!
If you could also include measurements in metric system for accurate, it would be a lot easier for someone like me, who isn’t familiar with cup measurement.
And i really appreciate your hard works.You bring new items and its all free. I have learned many small details that are crucial for baking than i do from classes. Lastly, sorry for extra work but if it’s too much work plz don’t mind me. Thank you & good days to u.
#from Nepal
Please post gram weight of graham cookies because in my country different size and packets are available so I’m not sure what size or packet I’ll use.
Thanks love from Pakistan
Oh these s’mores mini cheese cakes look awesome! Just wondering ….what kind of cheesecake pan do you use? Mini muffin pan they wouldn’t come out so nice.
Could you show me a pic of mini cheesecake pans and does it need to be greased?
Hi Tessa! these is a press request from the german food magazine: SWEET DREAMS . Please have a look to your mails and send a little reply if we can use your picture. you only need to say: YES !! thanks in advance. i love your sweets. yours: Andrea : photo editor
When your recipe calls for heavy cream, what kind do you use and what % fat
You have a wonderful website and have quickly become my go to for mini cheesecakes, my family has loved all of the recipes I have tried. One comment on this recipe, I tried to cheat the first time, and used the jar of marshmallow cream, it didn’t pipe on as well, was not aesthetically pleasing, and the marshmallow was a little heavier and sweeter. It is worth the time and effort to make the recipe provided.
That will be helpful to others who are thinking about trying that, thanks for sharing!
Could you use marshmallow fluff for the topping? TIA 🙂
Can i get a PDF of the cheesecake recipe
If I were going to make these in mason jar lids, instead of a mini cheesecake pan, how would you adjust the recipe?
Hi! These look so delicious! would it be possible to make these ahead and freeze them?
The cheesecakes themselves should freeze just fine, but I’d hold off on freezing them with the marshmallow topping because that won’t freeze well.
Possible to substitute Nutella for the chocolate?
Hi Victoria! We haven’t tried that, so we can’t say for sure! Nutella has additional ingredients that may change the texture of these cheesecakes, and will definitely make them sweeter, but if you’re up for a little experimentation, then go for it! Let us know how it goes 🙂
Excelen
They’re so cute!! Could you use jarred marshmallow crème?
If I’m making ahead (Wednesday night – make, Friday night -serve) should I just make the cake tonight and do the frosting on Friday? Wondering the best way to get ahead of the dessert prep. Thanks!
Yes! That would work best.
I tried this recipe, and although it was easy and tasty, mine didn’t set firm, even overnight. Do you think that substituting half&half for the heavy cream would’ve caused this? I was hoping to cut down on the calories and heavy cream is expensive in my town.
Yes, it’s very likely the half & half caused it to be more watery 🙁
Wow! These looks really amazing! A view of heaven! I love it! It’s tasty and it’s no bake! They are just so mouthwatering!
These looks so tasty and easy. I have been looking for a no bake cheese cake. Also this looks so perfect for summer. I can`t wait to make these.
These wouldn’t last 5 minutes in my house!!!
These are so adorable, and they look so yummy! 🙂 I live in Phoenix too, and can definitely sympathize with not wanting to heat up the oven during the summer! These are the perfect solution! Pinned!
I dutifully raise my hand for no-bake cheesecake, Tessa.. I love them and they are just so easy to put together…Loved ur cute cheesecakes.. thanks for sharing
Hi, I don’t have cream of tartar here in Brazil. CAN I substitue it? This looks delicious!
Love how you made s’mores into a cheesecake! Perfect for summer days where you want a treat but don’t want to turn o the oven!
This looks SO delicious! Definitely have to give this a shot sometime this summer! Sounds like the perfect dessert for July 4th to me.
Yes, please post more no bake recipes! Any idea how this would work in a full size pan?
oh em gee…… seriously adorable! I can so relate to no oven in the heat! LOVE!!
These look seriously, ridiculously, AMAZING!
These are so cute! I love that dollop of marshmallow on top!
What adorable little cheesecakes! These sound delicious, love how easy they are too 🙂