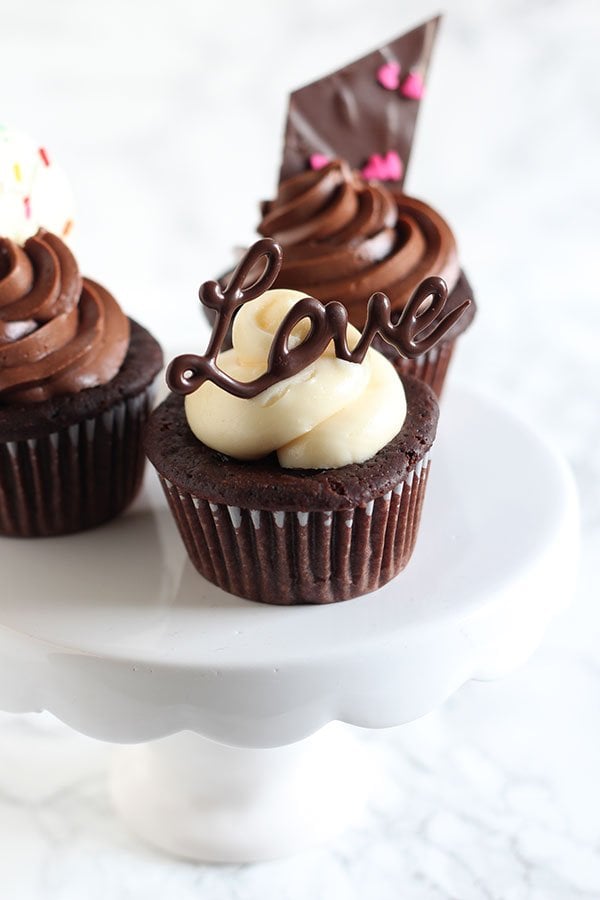
Easy Chocolate Cupcake Decorating with a full step-by-step video tutorial showing you how to make beautiful, elegant, and gourmet chocolate cupcake toppers with NO special equipment or skill required. Free tracing template too!
To be perfectly honest, going to culinary school really demystified a lot of things that seemed so incredibly complicated and impressive. A lot of what you see at restaurants and bakeries that looks so elegant and beautiful really isn’t all that difficult to achieve once you see someone else do it. Then it’s no big deal.
That’s exactly how I felt when I learned how bakers make those beautiful chocolate cupcake toppers. So, I thought it would be a super fun video to create especially since Valentine’s Day is just around the corner. These methods will work for ANY holiday or celebration and your creativity is your only limit here.
Tempered chocolate will give you the best taste, but is the most difficult. Lucky for you I have a full video tutorial just on tempering chocolate!
If you don’t want to go through the hassle of tempering chocolate, you can use melting, dipping, or decorating chocolate. If you’re not sure if the chocolate you have is suitable, take a look at the ingredients. There should be NO cocoa butter, that’s how you know the chocolate will set up and firm nicely. I like the Ghirardelli Chocolate Melting Wafers.
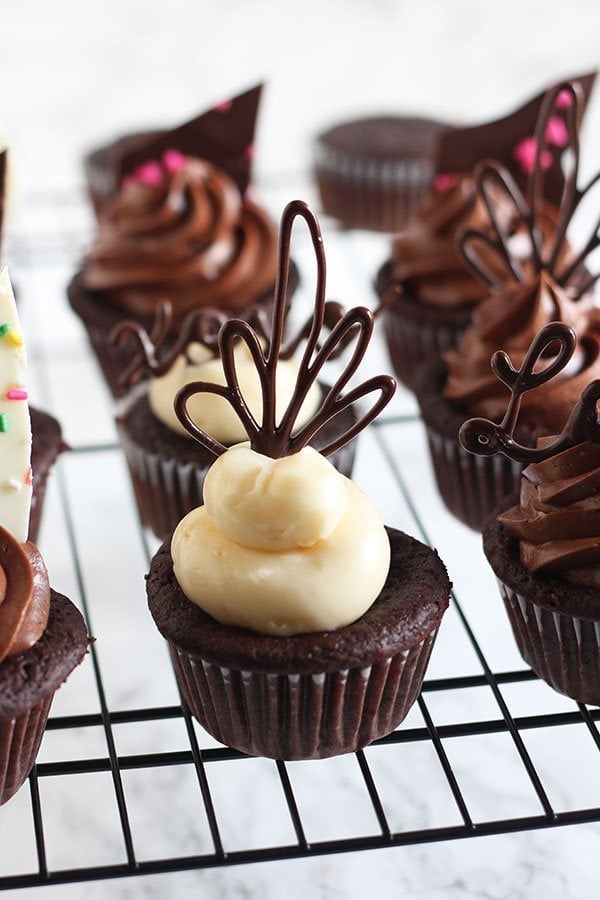
For making delicate decorations and words, I really prefer to use a squeeze bottle. I find it much easier to manage and hold than a bag, but either will work. If you want to use the template seen in the video, just click here!
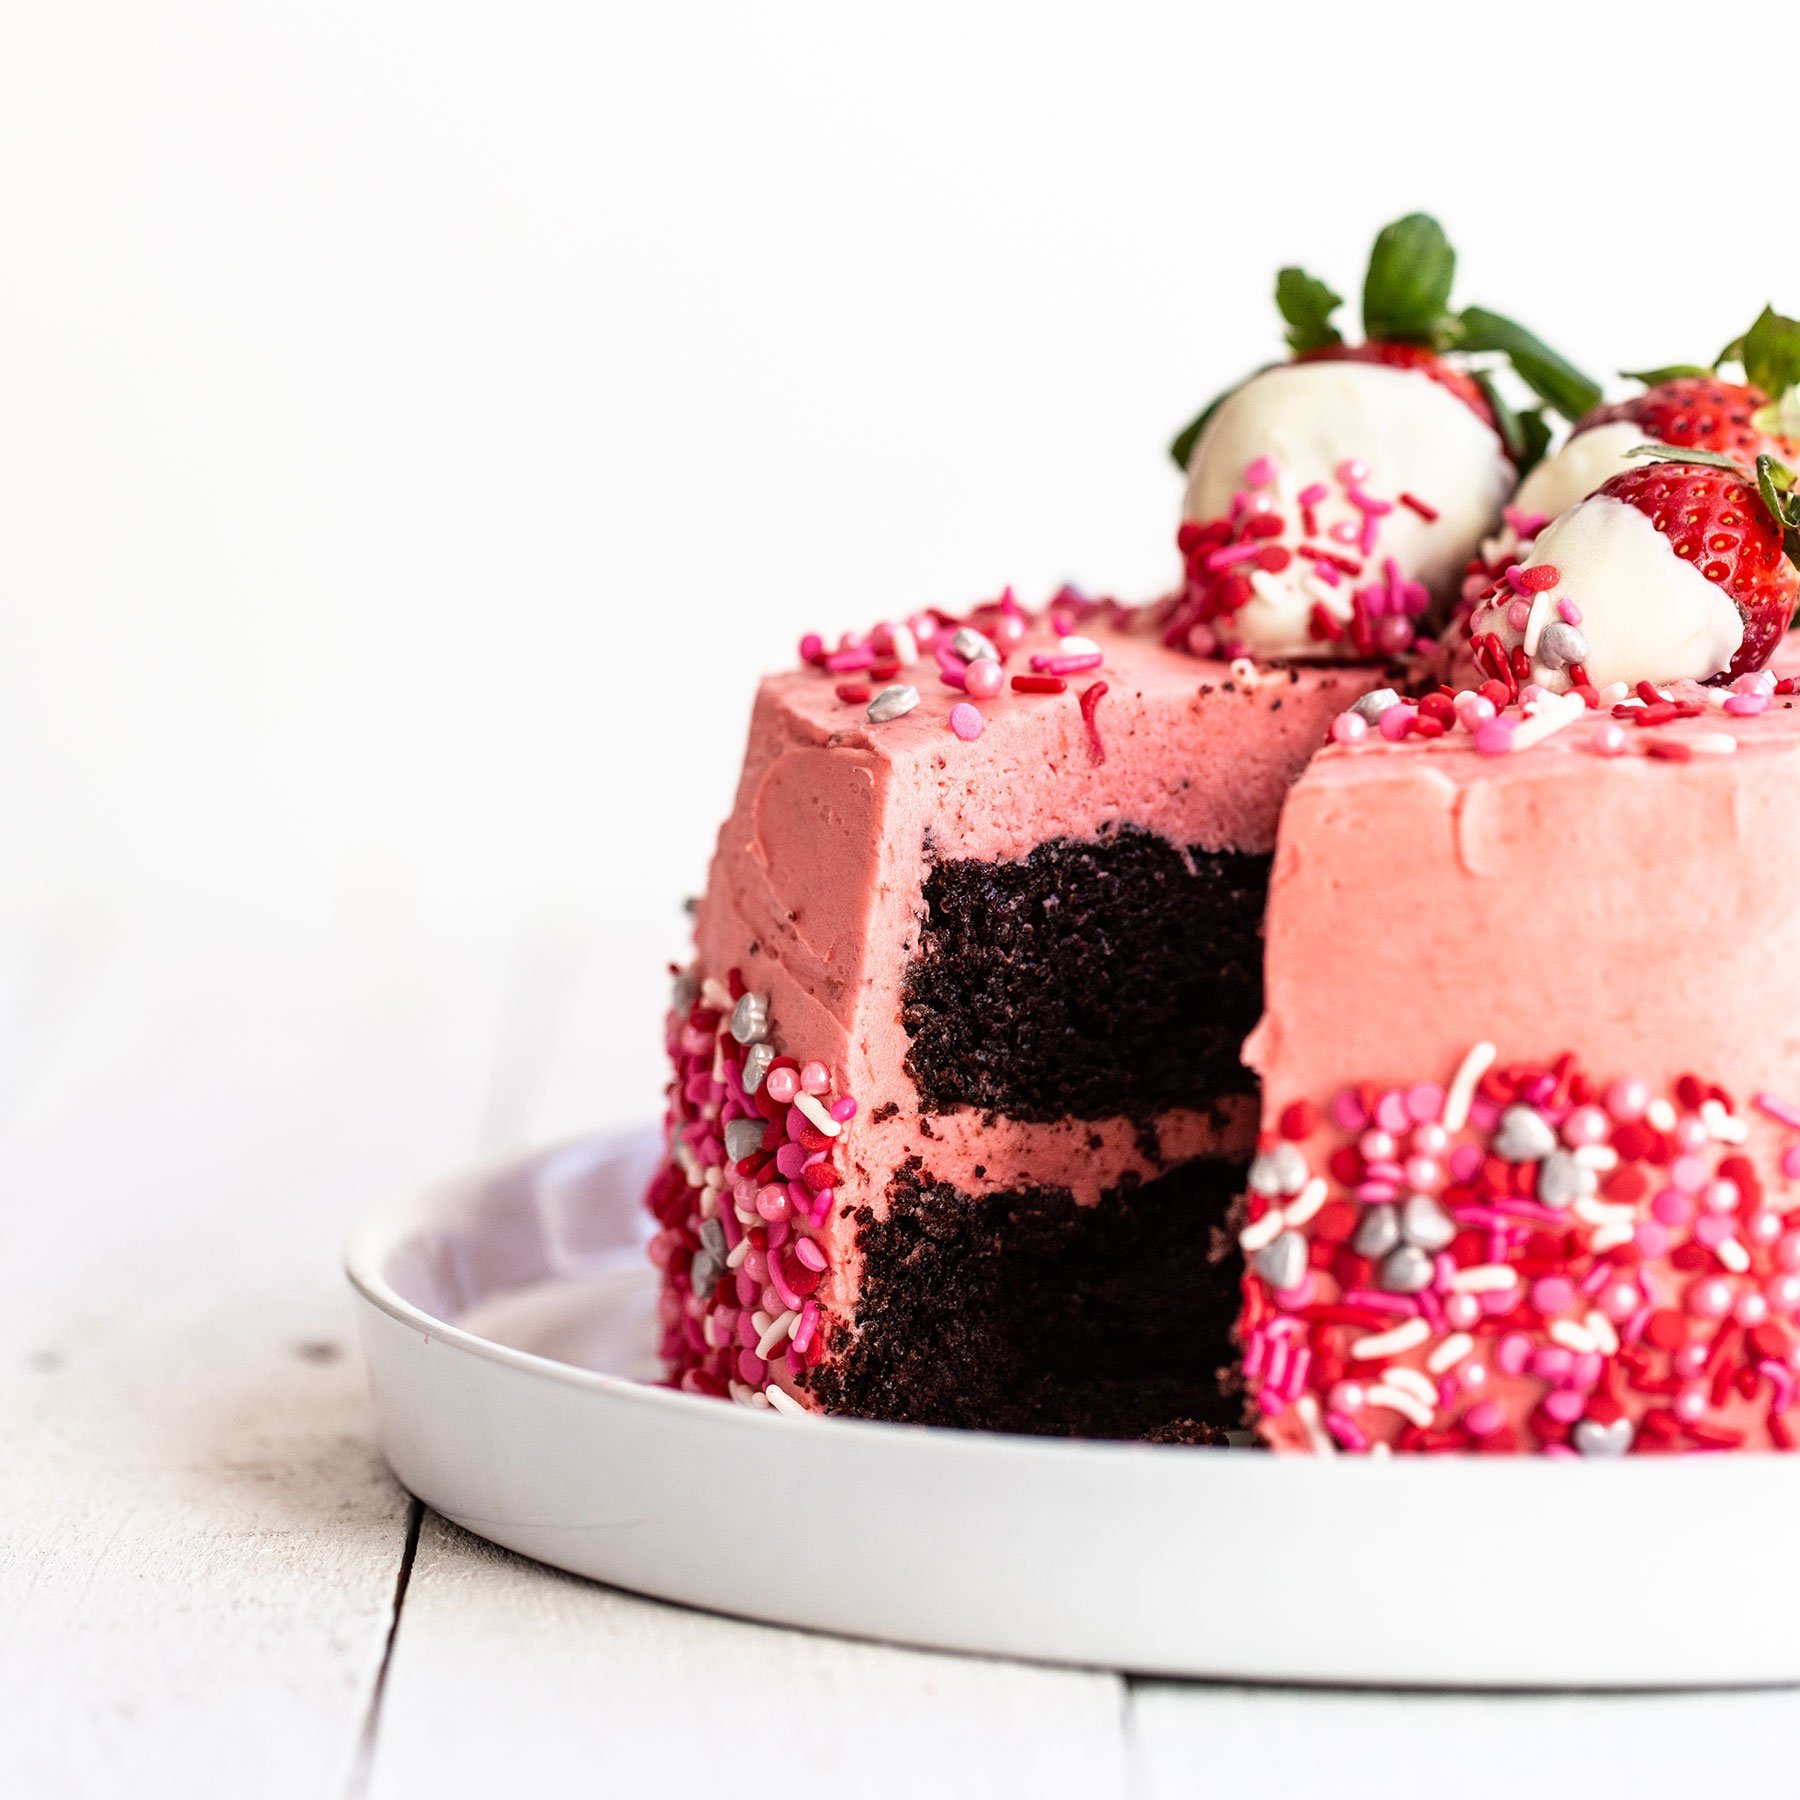
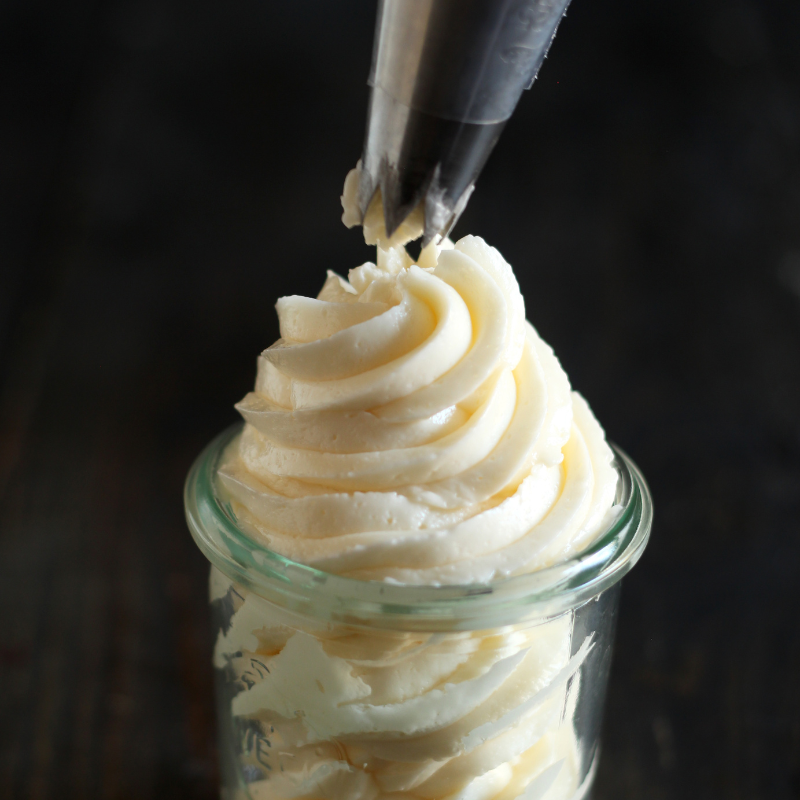
PS – here is the exact double Chocolate Cupcake recipe I used to make the cupcakes you see in these photos. It’s the BEST. I also have a detailed tutorial on making Swiss Buttercream (which is what I used here) and American Buttercream. I got ya covered!!
5 from 3 votes
How to make
Easy Chocolate Cupcake Decorating
Prep Time:25 minutesminutes
Total Time:25 minutesminutes
Easy Chocolate Cupcake Decorating with a full step-by-step video tutorial showing you how to make beautiful, elegant, and gourmet chocolate cupcake toppers with NO special equipment or skill required. Free tracing template too!
Melting, decorating, or dipping chocolate, melted (should contain NO cocoa butter)
Directions
For piped designed:
Use a printable guide inserted into a sheet protector or placed under semi-translucent parchment or wax paper to get started, if desired.
Transfer the tempered chocolate to a squeeze bottle or small piping or ziptop bag with a small hole snipped in one corner. Hold bag about 1-inch above the sheet then gently squeeze, tracing the designers. Squeeze with even pressure but stop before you think you should as the chocolate will continue flowing.
Fill any gaps with the tip of a toothpick. Allow the chocolate to set completely in the fridge, about 15 minutes, before carefully peeling and placing on your cupcakes.
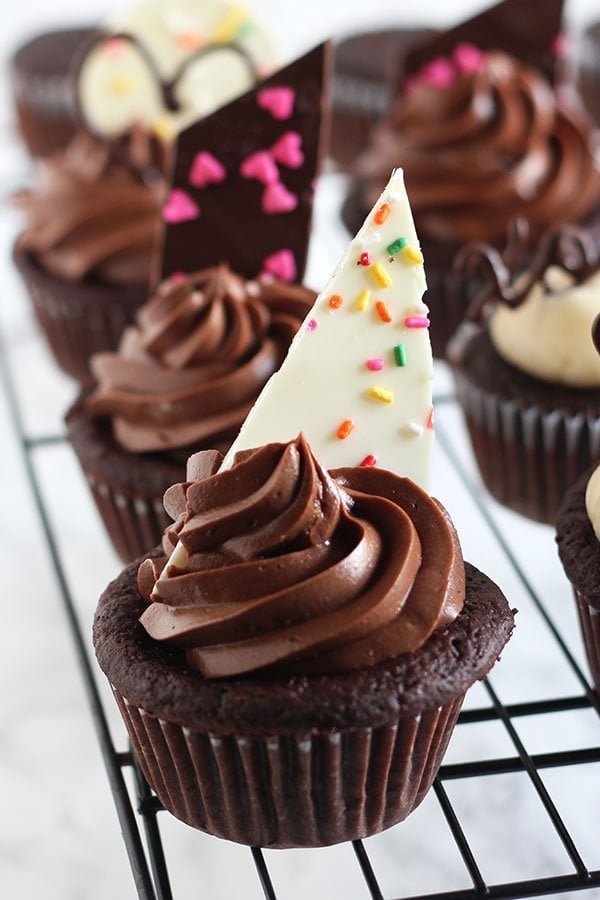
For shard or shaped designs
Scoop chocolate onto a small sheet of parchment paper and spread out evenly with an offset spatula, keeping about a 1-inch border on all edges. Pick up and gently drop the parchment on the counter a few times to spread out evenly and release any air bubbles. Sprinkle with sprinkles, decorations, or finely chopped candy.
Allow the chocolate to set just until it’s dry to the touch but still flexible. Use a knife to square off all the edges. Make cuts into the chocolate into shapes you desire. Alternatively, you could also use a cookie cutter to cut shapes. If the cookie cutter is sticking, allow the chocolate to set and harden for a few more minutes before continuing with the shapes.
Allow the chocolate to set completely in the fridge, about 15 minutes, before carefully peeling and placing on your cupcakes.
I share trusted baking recipes your friends will LOVE alongside insights into the science of sweets. I'm a professionally trained chef, cookbook author, and cookie queen. I love to write about all things sweet, carb-y, and homemade. I live in Phoenix, Arizona (hence the blog name!)
About Tessa...
I share trusted baking recipes your friends will LOVE alongside insights into the science of sweets. I'm a professionally trained chef, cookbook author, and cookie queen. I love to write about all things sweet, carb-y, and homemade. I live in Phoenix, Arizona (hence the blog name!)
Hi Jane! We included a link to the template used in the video in the text above the recipe, but I’ll include it HERE as well 🙂 Can’t wait to see your cupcakes! Be sure to tag us on SM using #handletheheat so Tessa can see your beautifully decorated cupcakes!
Can you send the template you used please – I want to do a happy birthday (name) sign.
What’s the best way to stick this on a cake tray where can I get the sticks from? How do I get the chocolate to stay on, do I let this set in the fridge with the chocolate?
hi tessa!
just wondering if you could just use normal baking chocolate for this recipe, and whether decorating chocolate is any different and why? And if it can be found at local supermarket?
thankyou
Hi Tessa! I think your decorations are awesome! I’m going to try them out today 🙂
Regarding the chocolate cupcake recipes that i have used in the past, I have always found that when the cupcakes were cooling the paper patty pan comes away from the cake itself (I have only ever encountered this with chocolate flavoured cupcakes). Would you be able to refer me to a chocolate cupcake recipe that will not have this problem?
Thank you!
Thanks for this article. I’m making cupcakes using buttercream frosting with a melting chocolate initial on top. I was just wondering how it will hold up and for how long? Will the frosting make the chocolate soften and fall? That’s my fear.
As long as it’s not really warm or humid, they should be fine. If you’re worried, refrigerate the cupcakes and take them out about 1 hour before ready to serve or present so they stay nice and solid.
Hi, Tessa. You are my dang hero! I made those chocolate cupcakes w/ the swiss buttercream and people oooh’d and aaaah’d over them! Thank you! Now, I have a quick question. I’m making cupcakes for a bridal shower and not sure if the chocolate design toppers will fit in the carrier on top of the cupcakes I’m making. What do you think would be the best way to safely transport them to their final destination where I can finish decorating them?
That’s wonderful to hear! I think the best way to transport them would be on a parchment lined rimmed baking sheet. If it’s warm at all, make sure they’re nicely refrigerated before transporting too. Good luck!
Thank you! Usually whatever is the best option at the grocery store. Often Ghirardelli. I don’t like to use anything too fancy since I know most of my readers will only use what’s easily available.
As a trained chef and cookbook author, I share trusted baking recipes your friends & family will love alongside insights into the science of sweets. I help take the luck out of baking so you *always* have delicious results! Learn more here.
Over 200 pages with 50+ cookie recipes that'll make
you a COOKIE PRO. Discover how to turn your biggest cookie flops into WINS by mastering the
sweet science of baking. Even learn how to customize your own recipes! Beautiful, hardcopy,
full color, photos of every recipe so you know EXACTLY how your cookies should look. Order
now to have the book delivered to your doorstep!
Do you want a more delicious life?
Instead of digging through cookbooks and magazines and searching the internet for amazing
recipes, subscribe to Handle the Heat to receive new recipe posts delivered straight to your
email inbox. You’ll get all the latest recipes, videos, kitchen tips and tricks AND my
*free* Cookie Customization Guide (because I am the Cookie Queen)!


RE: The butterfly template
I love it but can’t find the one you used in the video. Other templates are too complicated. Please advise.
Thanks.
Jane
Hi Jane! We included a link to the template used in the video in the text above the recipe, but I’ll include it HERE as well 🙂 Can’t wait to see your cupcakes! Be sure to tag us on SM using #handletheheat so Tessa can see your beautifully decorated cupcakes!
I’d like to see birthday designs!!
The shards would be absolutely gorgeous for birthday cupcakes! Maybe someday I’ll revisit this post and update with more ideas 🙂
Amazing
Hi Tessa,
Why do my chocolate decorations melt once they are on the cupcake? What temperature should I keep them in?
Thanks
Sam
Hi,
Can you send the template you used please – I want to do a happy birthday (name) sign.
What’s the best way to stick this on a cake tray where can I get the sticks from? How do I get the chocolate to stay on, do I let this set in the fridge with the chocolate?
I would like the templete emailed to me. Thanks
Didn’t get the template even after subscribing.
Hi Tessa! Can I use your photo? I’ll use it to make a flyer for our baking and decorating activity for girl’s club.
hi tessa!
just wondering if you could just use normal baking chocolate for this recipe, and whether decorating chocolate is any different and why? And if it can be found at local supermarket?
thankyou
Would love the templates! These are beautiful!
Please forward the template. Thank you.
This was a super easy way to make beautiful chocolate decorations. The tutorial was a great help. Thank you!
Should i use compound chocolate or couverture chocolate for this?
Hi I tried these with and they didn’t last long outside of the refrigerator they melted after 5 mins on top the cupcakes
Thanks in advance!
Hi Tessa! I think your decorations are awesome! I’m going to try them out today 🙂
Regarding the chocolate cupcake recipes that i have used in the past, I have always found that when the cupcakes were cooling the paper patty pan comes away from the cake itself (I have only ever encountered this with chocolate flavoured cupcakes). Would you be able to refer me to a chocolate cupcake recipe that will not have this problem?
Thank you!
Would like template for love letters
I would love the templates-making fairy cupcakes and this would be perfect
Thanks for this article. I’m making cupcakes using buttercream frosting with a melting chocolate initial on top. I was just wondering how it will hold up and for how long? Will the frosting make the chocolate soften and fall? That’s my fear.
As long as it’s not really warm or humid, they should be fine. If you’re worried, refrigerate the cupcakes and take them out about 1 hour before ready to serve or present so they stay nice and solid.
Hi, Tessa. You are my dang hero! I made those chocolate cupcakes w/ the swiss buttercream and people oooh’d and aaaah’d over them! Thank you! Now, I have a quick question. I’m making cupcakes for a bridal shower and not sure if the chocolate design toppers will fit in the carrier on top of the cupcakes I’m making. What do you think would be the best way to safely transport them to their final destination where I can finish decorating them?
Thank you for all the recipes and ideas!
That’s wonderful to hear! I think the best way to transport them would be on a parchment lined rimmed baking sheet. If it’s warm at all, make sure they’re nicely refrigerated before transporting too. Good luck!
Hi, thanks for this! Would bakers chocolate be okay? Also..if I want to make these the night b4 an event will they still be okay?
Is that just regular baking chocolate? If that’s the case then it would need to be tempered: https://handletheheat.com/temper-chocolate/
Love the site Tessa! What is your go to source for chocolate?
Thank you! Usually whatever is the best option at the grocery store. Often Ghirardelli. I don’t like to use anything too fancy since I know most of my readers will only use what’s easily available.
Thanks for the video looks fantastic
So pretty, Tessa!
Thank you, Patty!
Thank you for sharing going to try this coming weekend. Looks amazing and fun to create!
You’re welcome! Have fun 🙂
Thanks for the video. Can’t wait to try my hand at these.
Okay these look so good and make for a perfect touch to any Valentine’s Day! Love love love it!