

5 Tips for How to Bake Picture Perfect Cookies
This post may contain affiliate links. Read our disclosure policy.


Practically every cookie is a good cookie.
That’s the beauty of them. As long as something didn’t go catastrophically wrong, you’re usually in for a delicious bite.
But not every cookie is a pretty and picture perfect cookie.
Whenever I bring a tray of cookies to a party or get-together I’m always asked how I make them look so ‘perfect.’ So in today’s post, I thought I’d share a few tips for making your cookies look just as good as they taste. Like bakery-quality cookies.
Because the idea that we eat with our eyes is totally true!
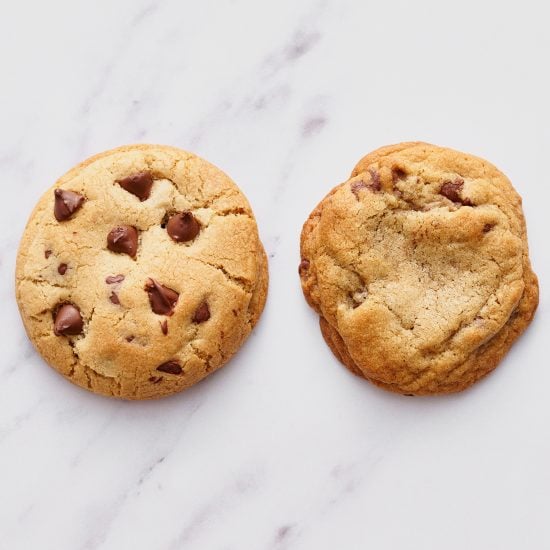
Just take a peek below. The cookie on the left was baked with my cookie baking tips. The cookie on the right was baked without my pretty tips. It takes a few extra minutes but I think the results are worth it for a batch of beautiful cookies!
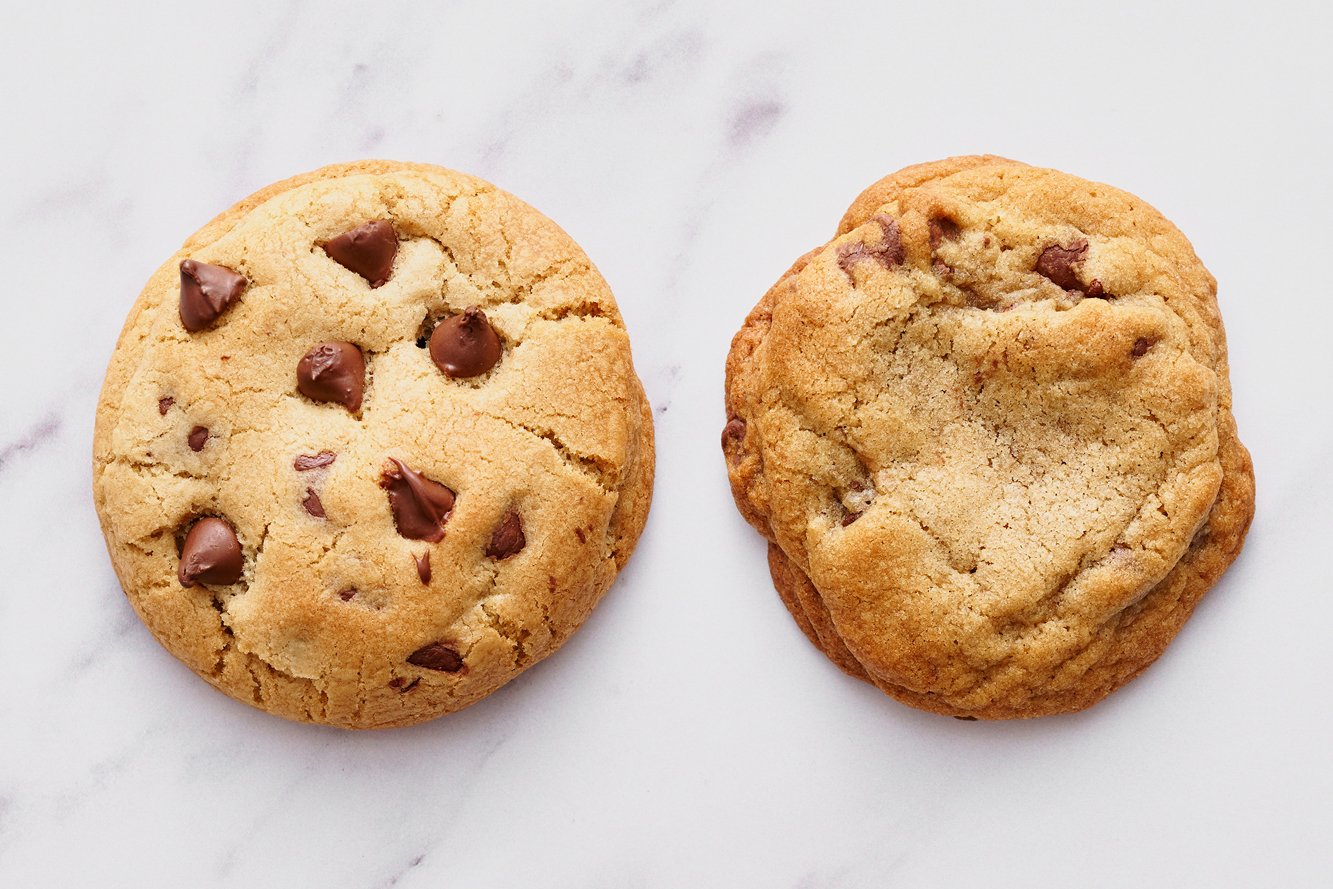
It was actually really hard for me to go against my instincts to make the cookie on the right. So I think the comparison between the two could’ve been even more drastic.
The key is to beautify the balls of dough before they even hit the oven, and then to reshape the cookies the moment they exit the oven.
See the steps below! They apply to basically any drop-style cookie.
1. Use a spring-loaded scoop
This is KEY to beautiful, evenly shaped cookies. A spring-loaded scoop saves you *so much time* in forming the balls of dough. When using a scoop, you ensure each ball is evenly shaped so the cookies bake evenly. Meaning you don’t have any small overbaked cookies or large underbaked cookies from uneven baking. The resulting cookies will all be very similar in size, so no fighting over the bigger cookie – AND there’s less chance for weird misshapen cookies.
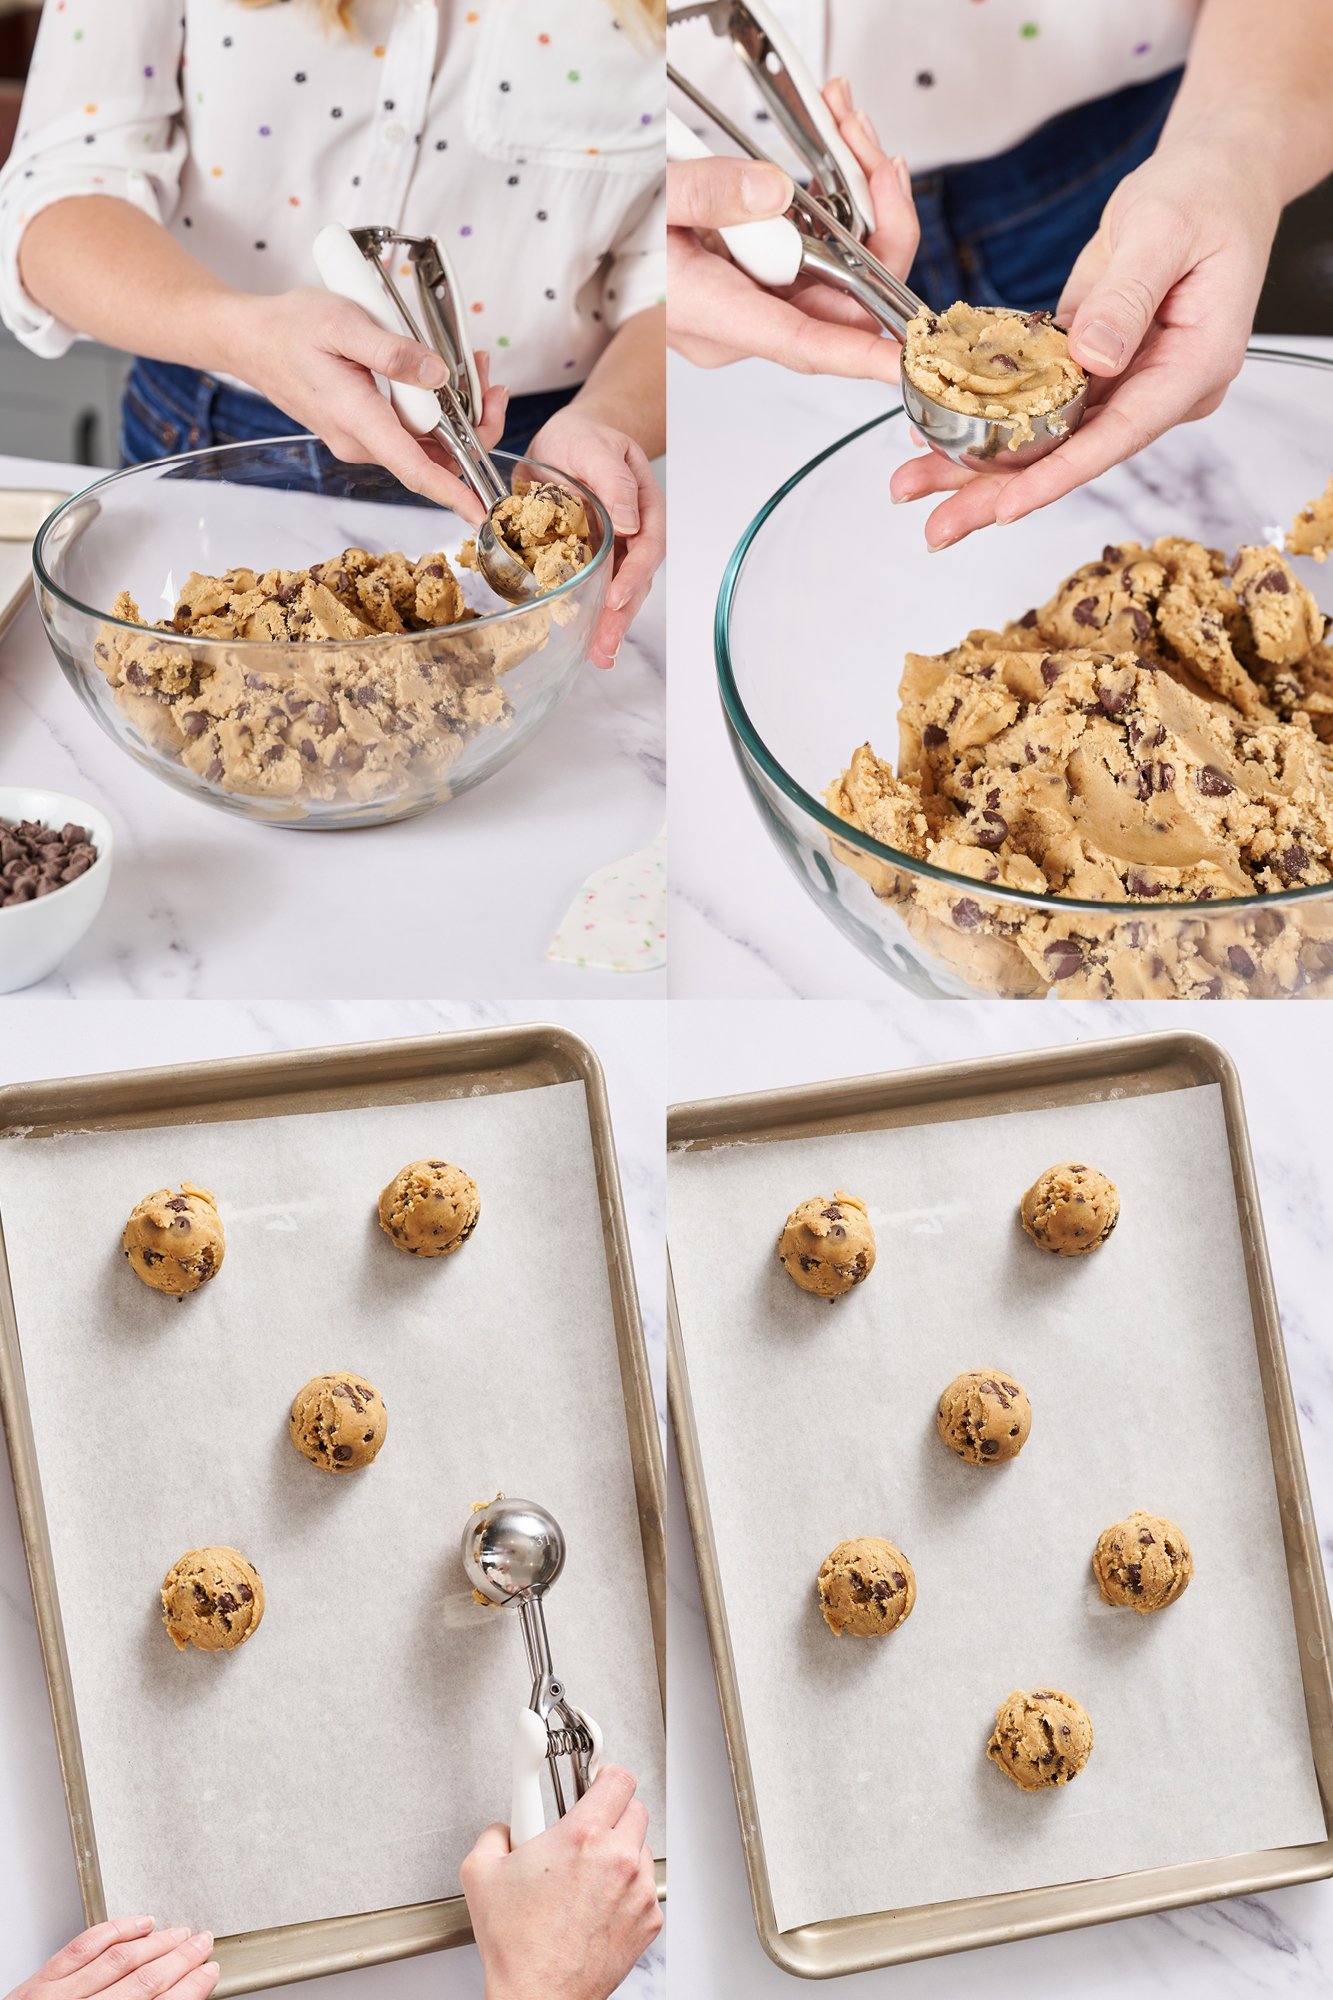
To use a scoop, press it into your bowl of dough and fill up. Use your fingers to press the dough completely into the scoop. Use one finger or the edge of the bowl to smooth off the top for an even scoop.
TIP: To preserve your scoop’s spring mechanism, avoid allowing it to soak in water for an extended period of time.
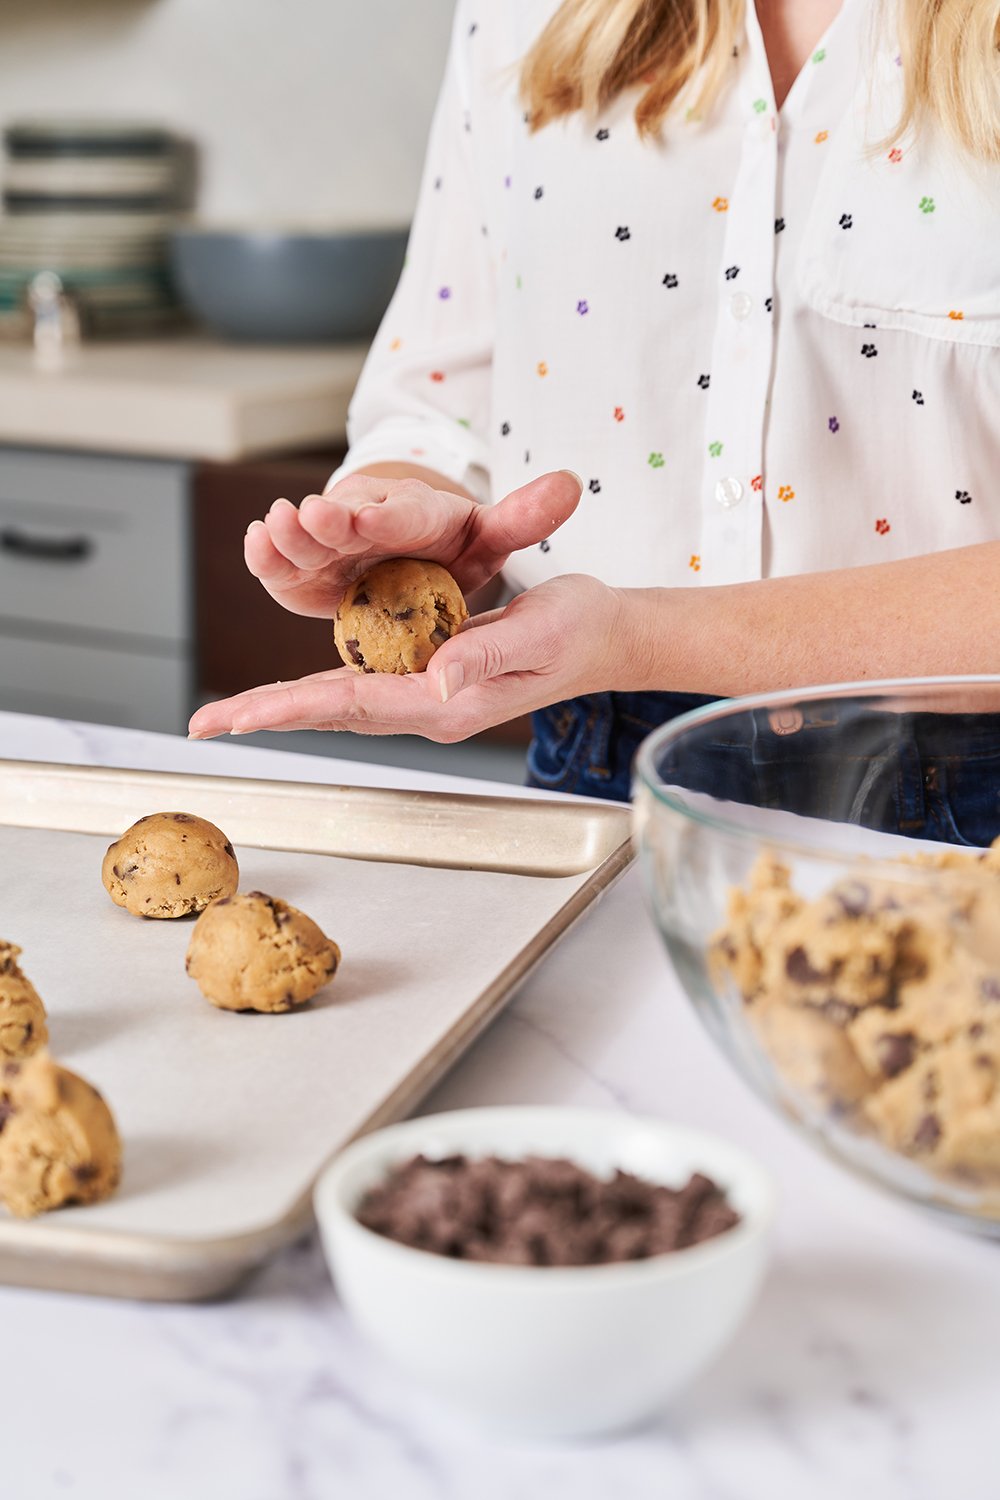
2. Roll the balls of cookie dough between your palms
After you’ve used your scoop to form all your balls of dough, take each ball and smooth it out by rolling it between the palms of your hands. This ensures you don’t end up with any craggly cookies.
However, sometimes you want that craggly look for certain recipes, so avoid rolling in those instances. Or in other recipes, the dough’s texture is too sticky to roll. But for chocolate chip cookies and the like, I prefer to roll between my palms!
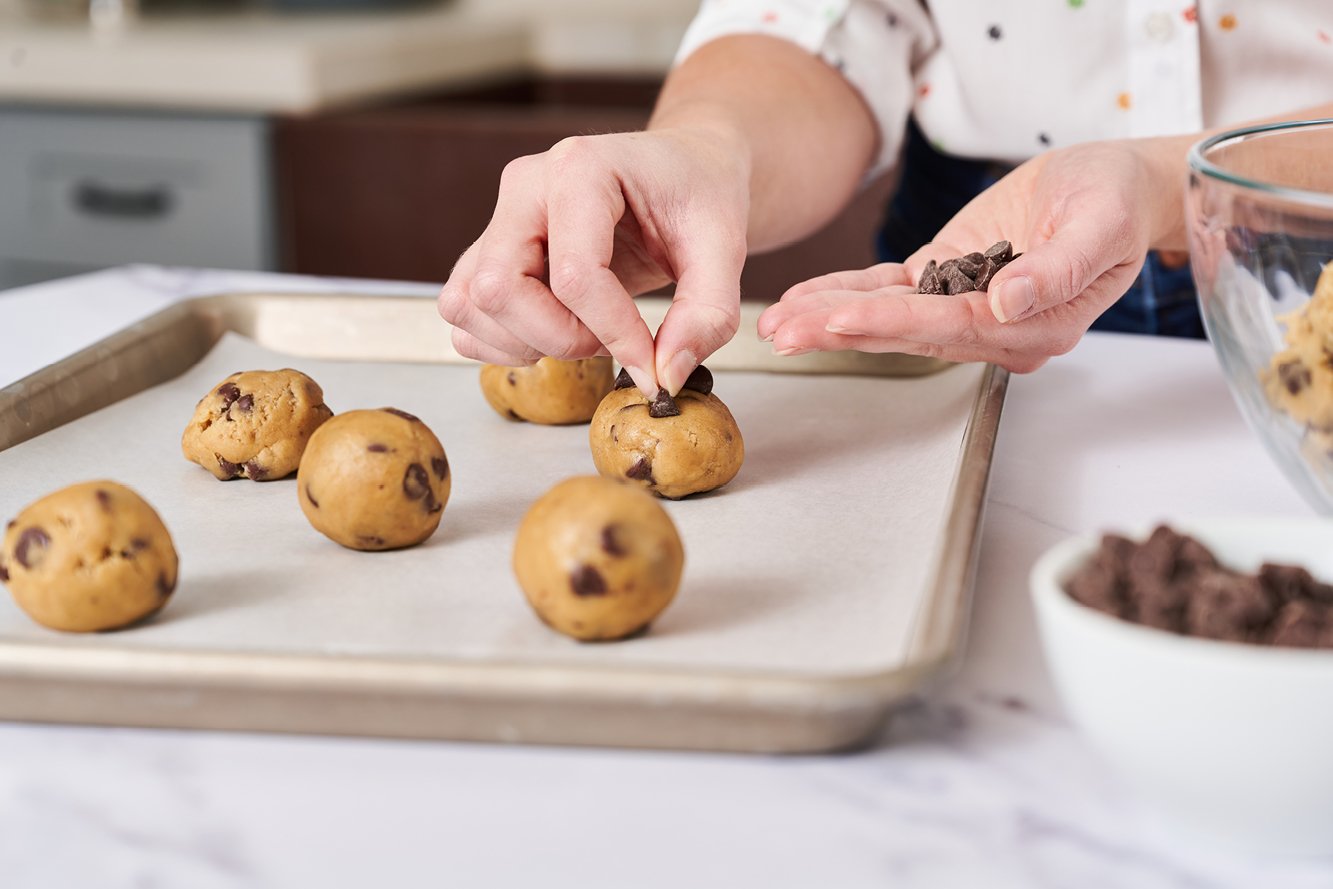
3. Garnish each cookie dough ball
Dotting each ball with more chips, nuts, or whatever is on the inside makes more beautiful and perfect looking cookies. When doing this with chips or nuts, press them into the top of the ball of dough closer together than you think. They’ll spread apart as the cookie bakes and spreads.
If you’re making snickerdoodles, sprinkle a little extra of the cinnamon sugar right on top of the balls of dough before baking. If you’re making Lemon Poppyseed Cookies, sprinkle extra lemon zest and poppy seeds right on top. It’s this little extra step that makes your cookies look super professional!
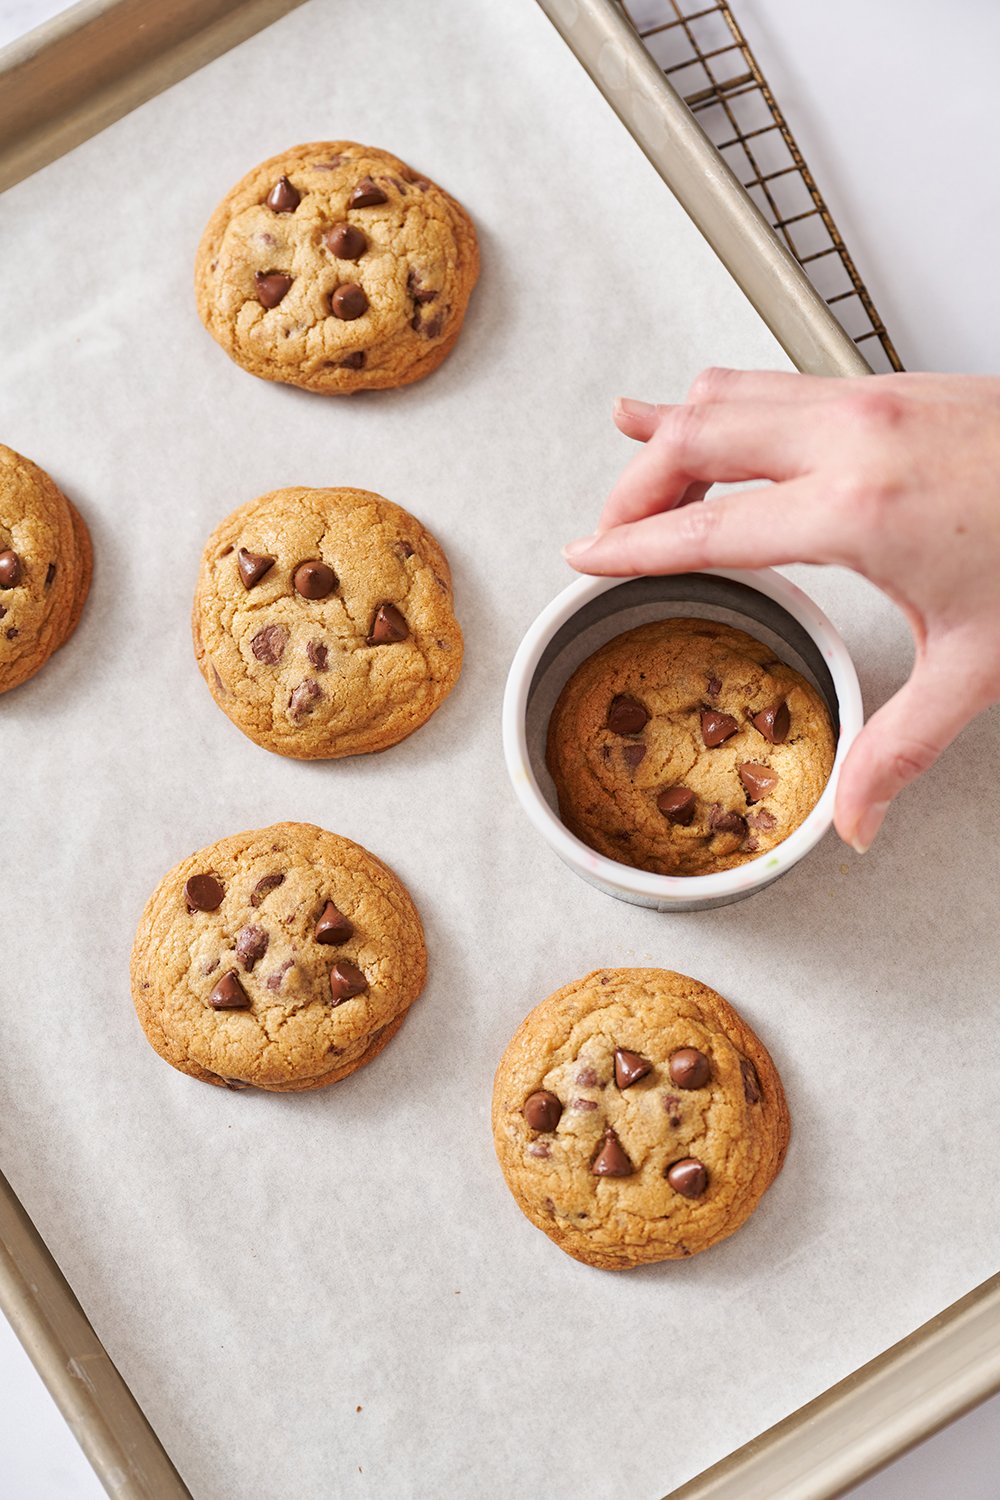
4. Reshape with cookie cutters
Once cookies are removed from the oven, using a round biscuit or cookie cutter to reshape into perfect circles fixes any misshapen cookies. Watch this video to see what I mean.
The key is to use a cutter just slightly larger in diameter than the baked cookies. Do this immediately after removing the cookies from the oven while they’re still hot and pliable, before they set.
BONUS: Forever fresh cookies = frozen dough!
Cookies taste and look their best the day they’re baked. Especially chocolate chip cookies, where you want the chocolate to be a little gooey looking.
Once you’ve shaped your perfect balls of dough, you can freeze those balls and bake cookies off whenever you want. Check out my article here on how to freeze cookie dough and bake from frozen.
If you’ve got any frustrations with your cookies spreading out too thin, check out my instructions on How to Bake Thick Cookies here.
What are your pretty cookie secrets?
More Cookie Science Articles:
- Best Baking Pans
- The BEST Cookie Scoops (Plus How and Why to Use One!)
- How to Cream Butter & Sugar
- How to Freeze Cookie Dough (& bake from frozen)
Cookie Recipes You’ll Love:
- Bakery Style Chocolate Chip Cookies
- Peanut Butter Chocolate Chip Cookies
- Browned Butter Toffee Chocolate Chip Cookies

Author: Tessa Arias
I share trusted baking recipes your friends will LOVE alongside insights into the science of sweets. I'm a professionally trained chef, cookbook author, and cookie queen. I love to write about all things sweet, carb-y, and homemade. I live in Phoenix, Arizona (hence the blog name!)
About Tessa...
I share trusted baking recipes your friends will LOVE alongside insights into the science of sweets. I'm a professionally trained chef, cookbook author, and cookie queen. I love to write about all things sweet, carb-y, and homemade. I live in Phoenix, Arizona (hence the blog name!)
Leave a Comment & Rating
Add a Review or Question
© Handle the Heat - handletheheat.com

As a trained chef and cookbook author, I share trusted baking recipes your friends & family will love alongside insights into the science of sweets. I help take the luck out of baking so you *always* have delicious results! Learn more here.

-
6 Crowd-Pleasing Thanksgiving Recipes


Order your Ultimate Cookie Handbook Hardcopy!

Join the Handle the Heat Community

Instead of digging through cookbooks and magazines and searching the internet for amazing recipes, subscribe to Handle the Heat to receive new recipe posts delivered straight to your email inbox. You’ll get all the latest recipes, videos, kitchen tips and tricks AND my *free* Cookie Customization Guide (because I am the Cookie Queen)!
I made your bakery style cookies and they’re thick, delicious, just like you said it would be, crispy on the outside, soft in the middle. but the exterior was very smooth, are there any tips how i can make them like yours with a slight crackle on top?
Love your tips for the cookies but wondering what you do with the edges the biscuit cutter removes. For me, I would eat it and if you saw me you would know it.
Personally for me, I like a bit of irregularity. I like the tip of adding the drop-in ingredients to the top of cookies. Thx for the ideas
Don’t cut the cookie. You use a cookie cutter that is approximately 1/4″ bigger than the cookie. Place it over the cookie while hey are still hot on the cookie sheet. Move the cutter in a quick circular motion until the cookie has been reshaped. This will take just a few seconds. Viola! A perfect shaped cookie. 🙂
Hi Tessa. For the most part I am a visual learner so I am not sure how to use the bisquit cutter after baking the cookie. I asume that you are not actually cutting the cookie. Are you just nudging the edges into a perfect circle and do you have a video showing this technique?
Your cookies look amazing. 🙂
I firgured it out. What a great tip. Thanks Tessa.