

How to Cream Butter and Sugar
This post may contain affiliate links. Read our disclosure policy.
Have you ever baked a cake that ended up dense and heavy, instead of light and fluffy? Or worst of all… a cake that collapsed as it baked or cooled?
Or what about cookies that spread out into sad flat puddles or deflated on the cooling rack?
So many baking recipes involve a step that most people overlook: creaming the butter and sugar together. It’s surprisingly important, yet easy to misunderstand.
There are a few important factors and critical steps to know when creaming butter and sugar. I’ll show you what under-creamed and over-creamed butter looks like in your mixer and what havoc it can wreak on your baked goods. Once you understand this skill, you’ll be baking like a pro in no time.
I’ve broken it all down for you in this article so that you’ll end up with perfectly-creamed butter and sugar and consistently perfect desserts from here on out!
Why Cream Butter and Sugar?
What Does it Mean to Cream Butter and Sugar?
“Creaming” refers to the process of beating slightly-softened butter and sugar until the butter is malleable enough to:
- Emulsify with other ingredients like eggs,
- Evenly incorporates the sugar into the butter,
- Creates enough air bubbles to help leaven the cake, cupcake, or cookie to the desired light and fluffy texture.
This happens when the abrasive edges of the sugar granules pierce through the fat, and create lots of tiny air bubbles.
Why do You Need to Cream Butter and Sugar for Cookies, Cupcakes, and Cakes?
Baking soda and baking powder are chemical leaveners. They help produce light and fluffy textures in our baked goods by releasing gases that create little air bubbles.
Similarly, the process of creaming also creates little air bubbles in our dough or batter, which is called mechanical leavening. Creaming butter and sugar can mean the difference between a heavy, leaden cake, or a light, tender, and fluffy cake!
- Improving texture: Most cookie recipes and many American-style cake recipes use a combination of creaming (mechanical leavening) and chemical leaveners because they contain so much fat they need both to produce an appealing texture.
- Assisting the chemical leavener: The air bubbles created by creaming actually provide a space for the gas created by baking soda and/or baking powder to release and expand.
- Rise: Baked goods only rise properly when the batter or dough contains enough air bubbles to do so, either through chemical or mechanical leavening. In fact, some cake and bread products are so aerated that as much as 80% of their volume may be empty space!
- Structure: Those air bubbles expand when they encounter the heat of the oven. The final structure of the product sets up around those little pockets of air, producing the desired light and fluffy texture.
- A note on leavening: Some cake recipes call for beating whole eggs, egg whites, or egg yolks to produce different textures, like a tender crumb. Sometimes these recipes don’t use butter or chemical leaveners (such as angel food cake). Other recipes use steam from water content in the mixture to leaven the product while baking (think the flaky layers of pie crust or the hollow interiors of choux pastry, like eclairs). Yeast is also a leavening agent, but a biological one.
What Happens When You Under-Cream or Over-Cream Butter and Sugar?
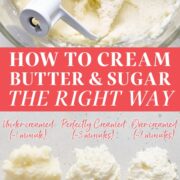
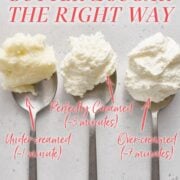
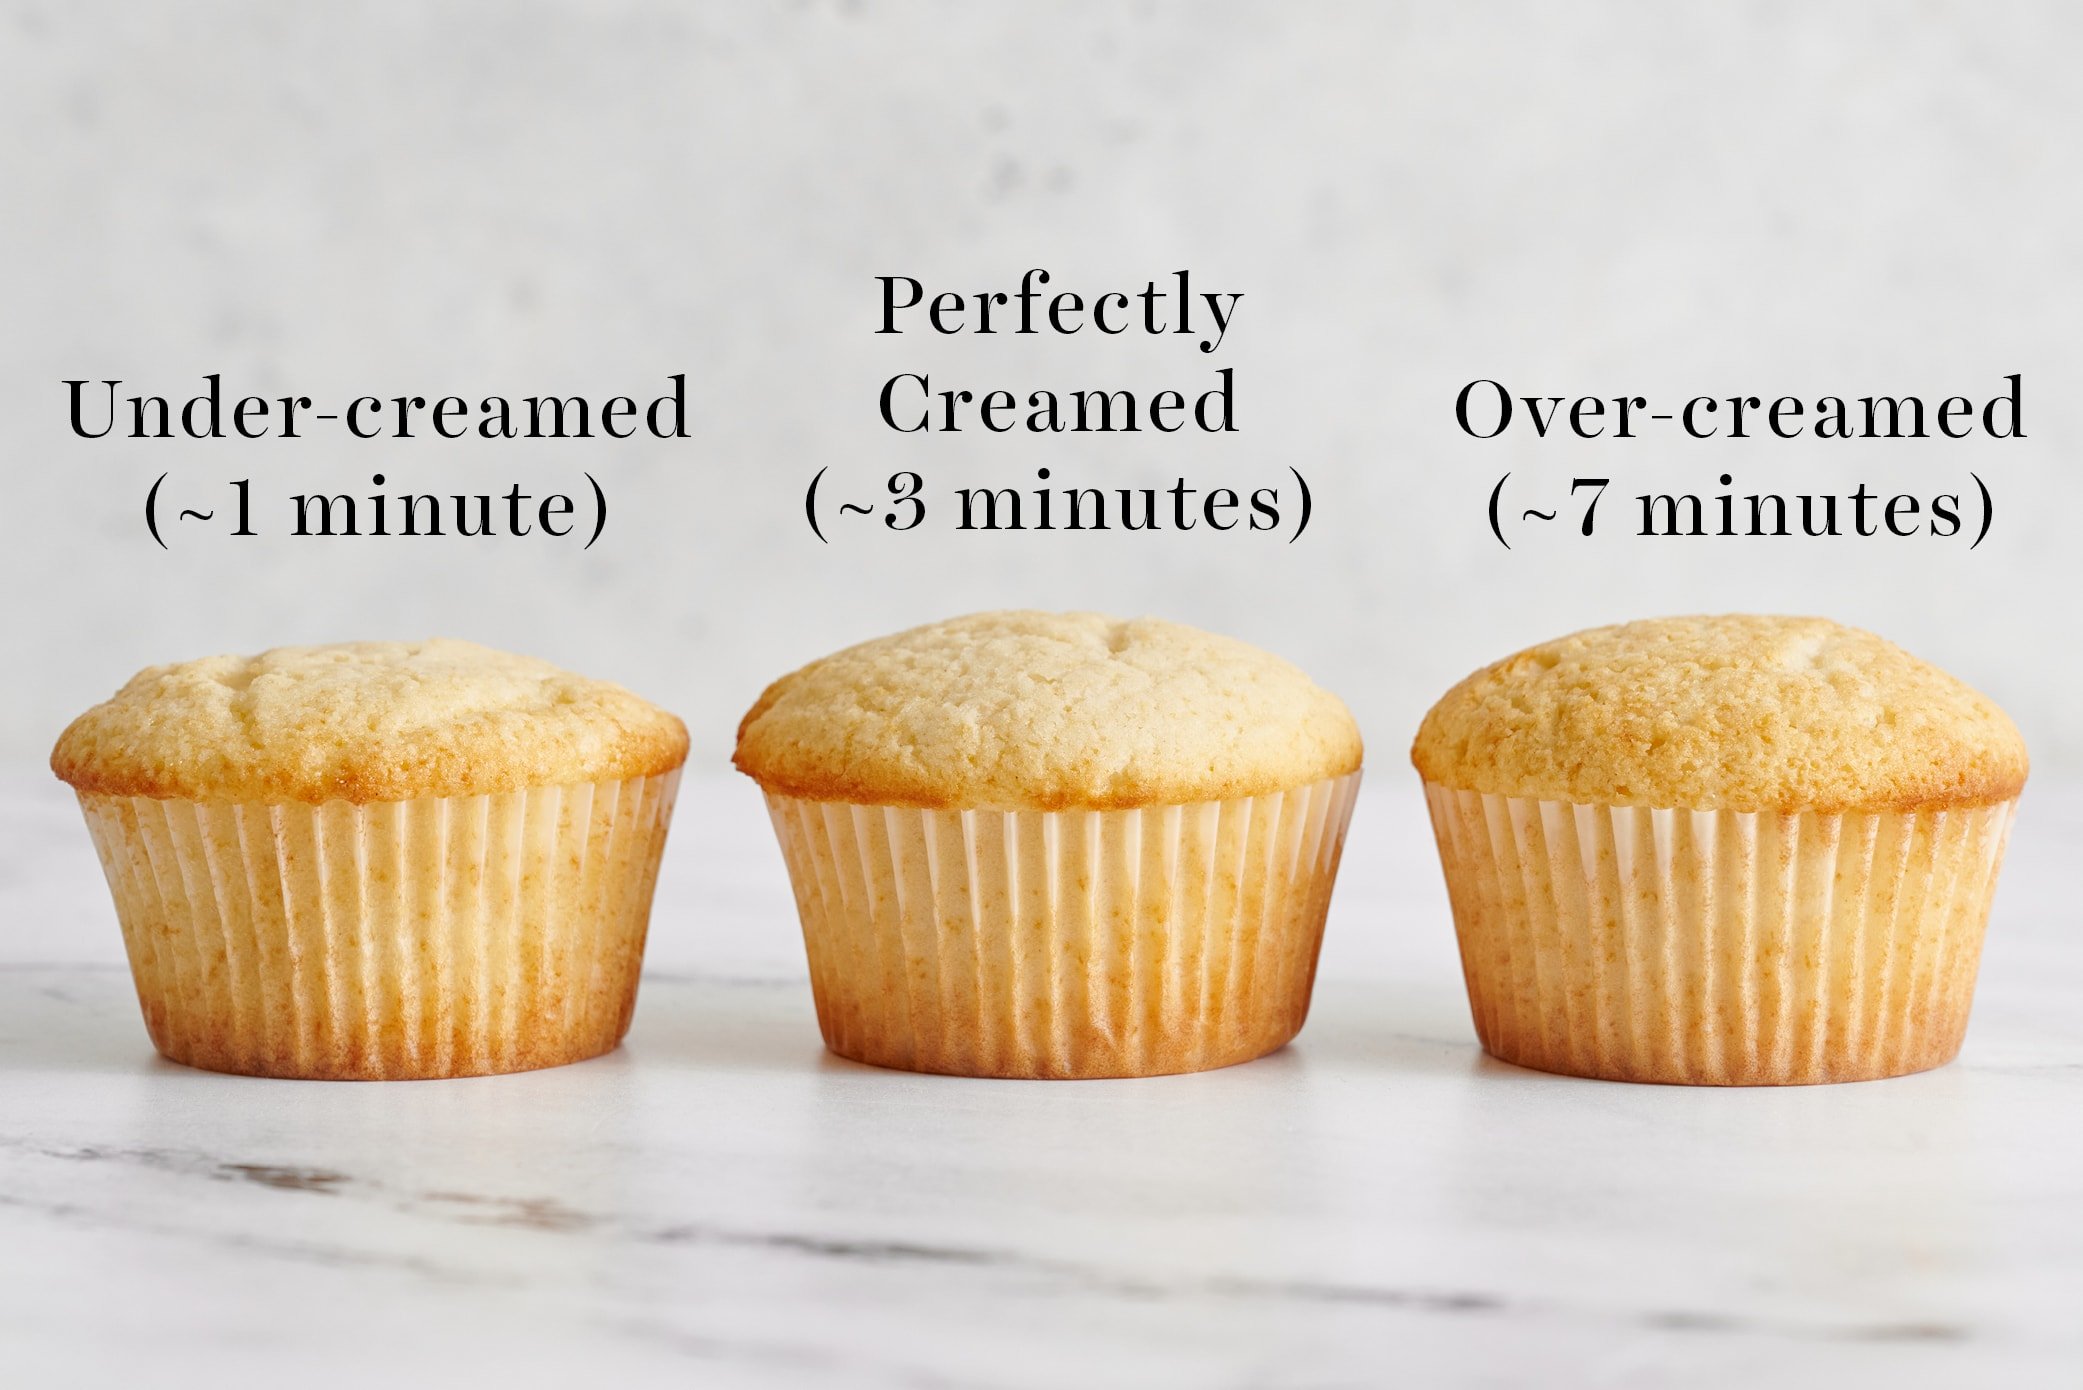
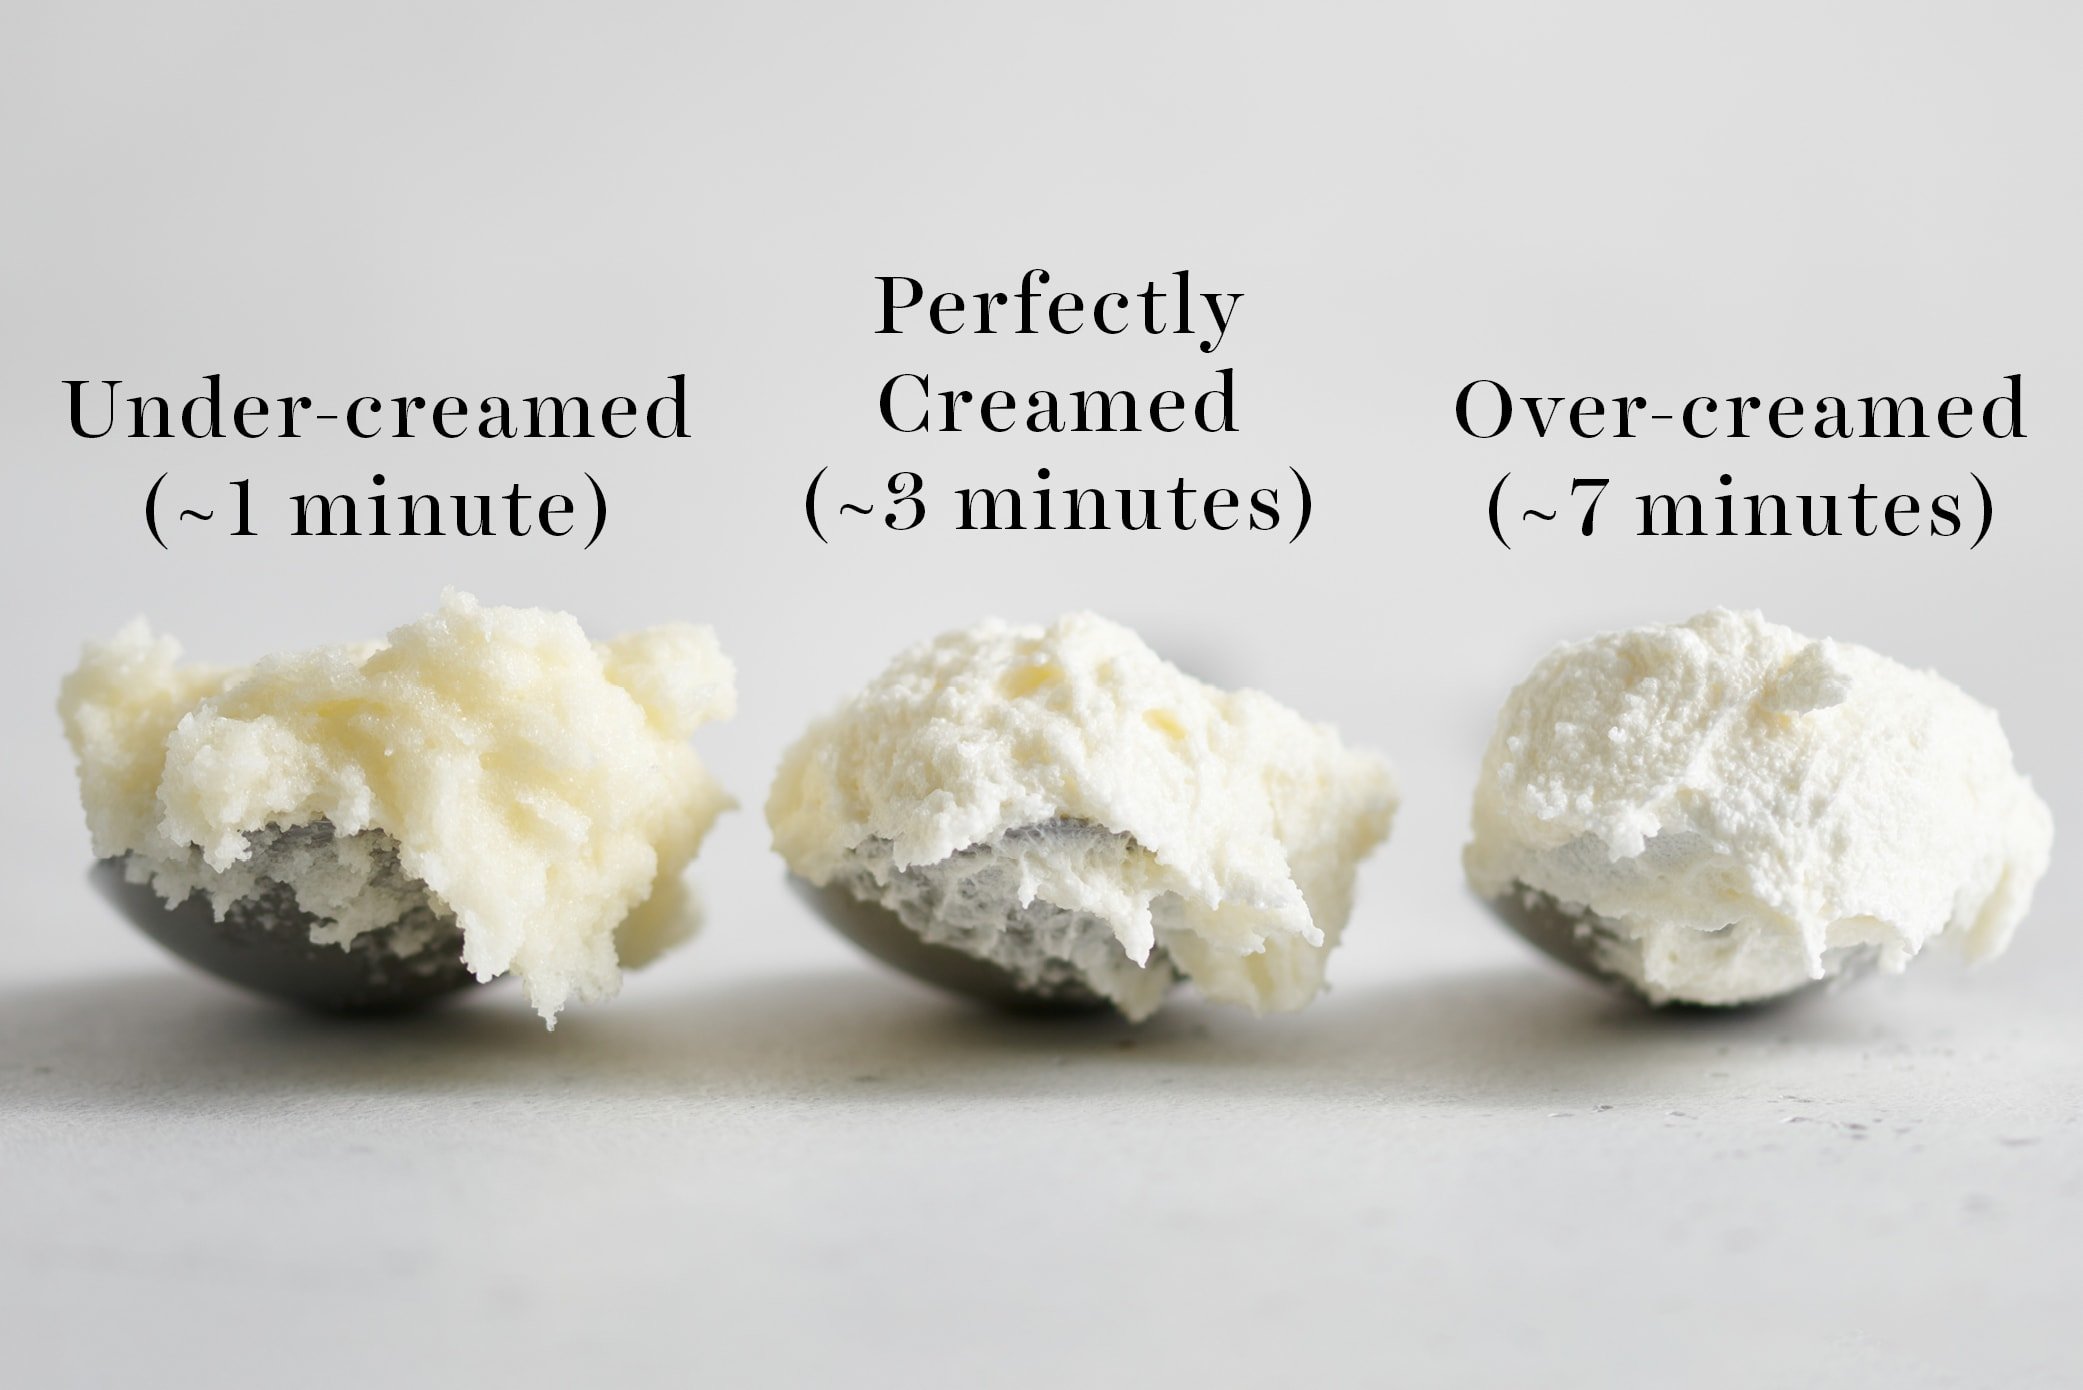
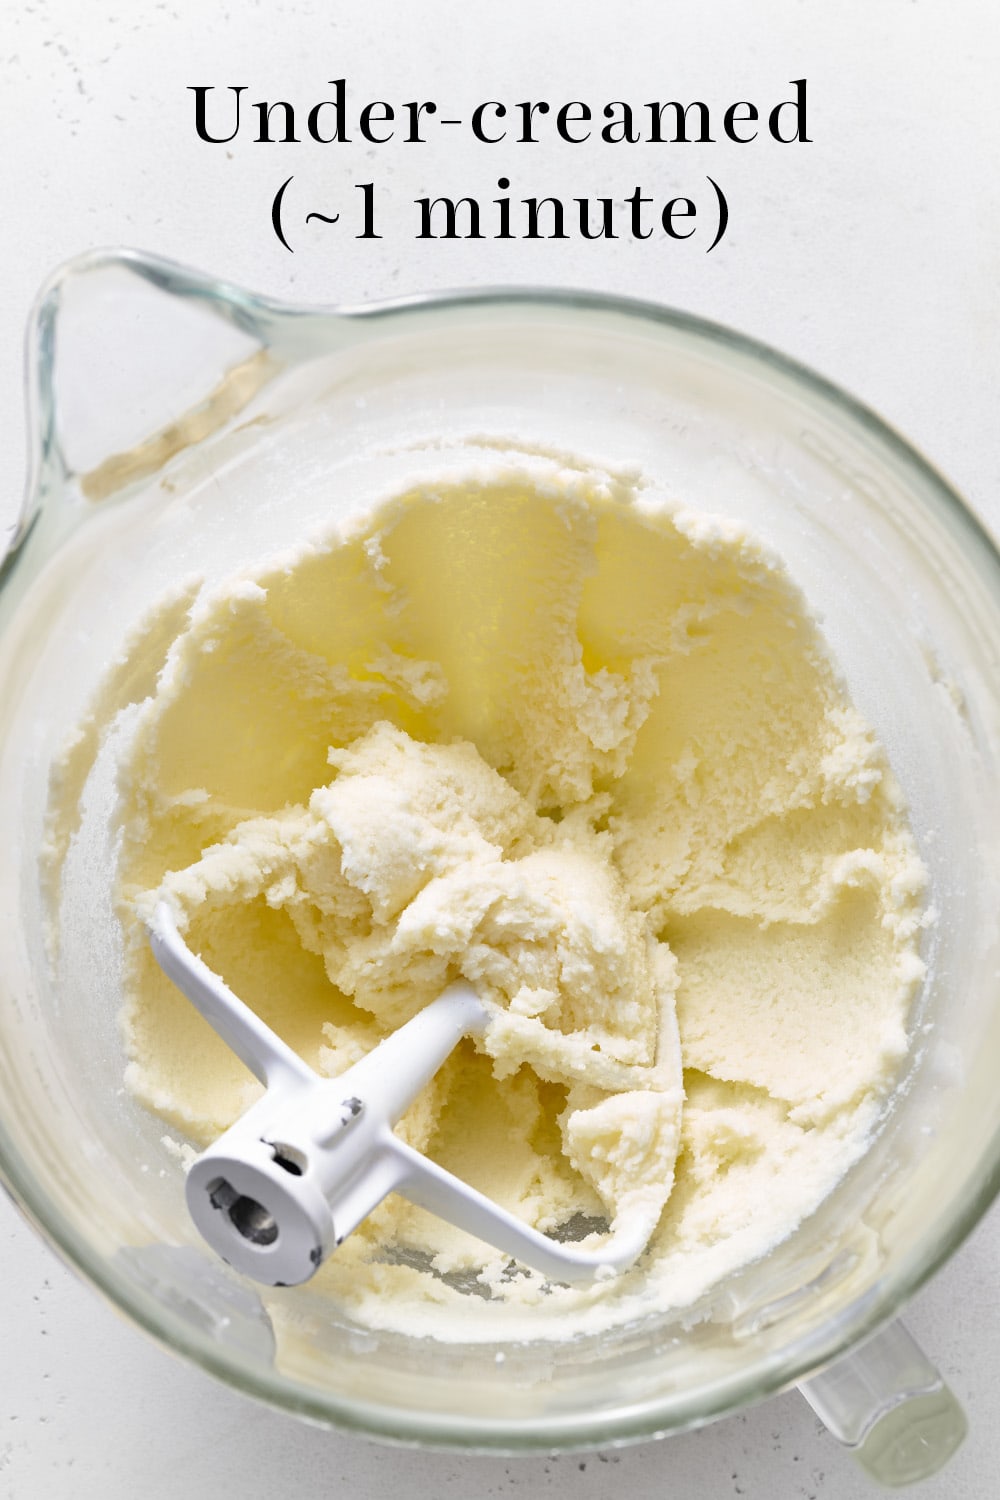
Take a look at the photos below to see how too little or too much creaming can affect your cupcakes.
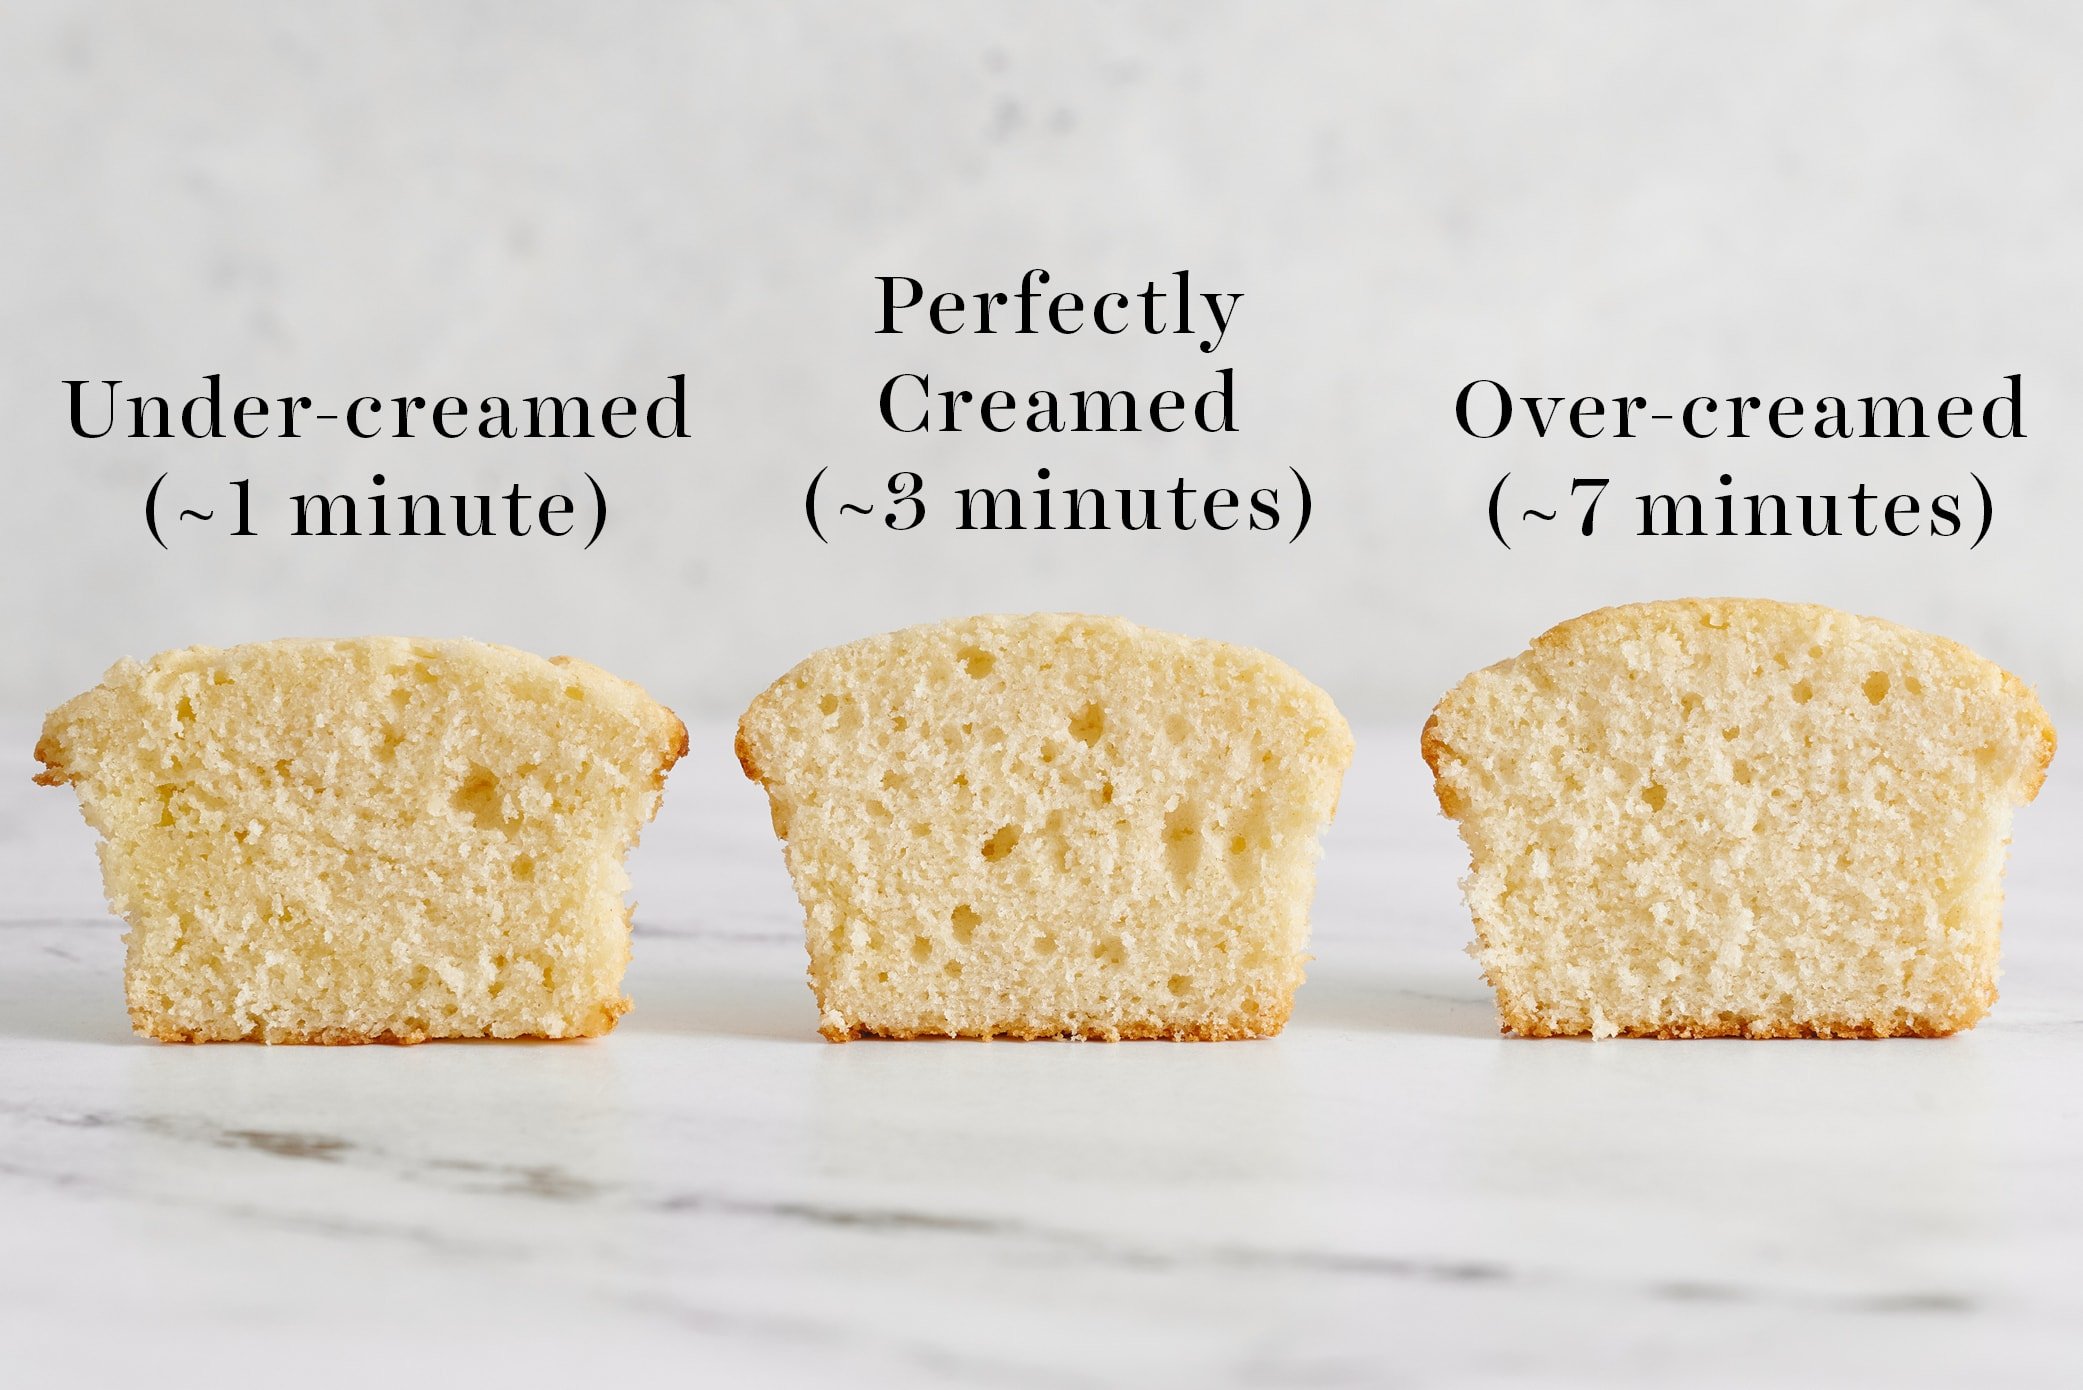
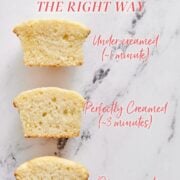
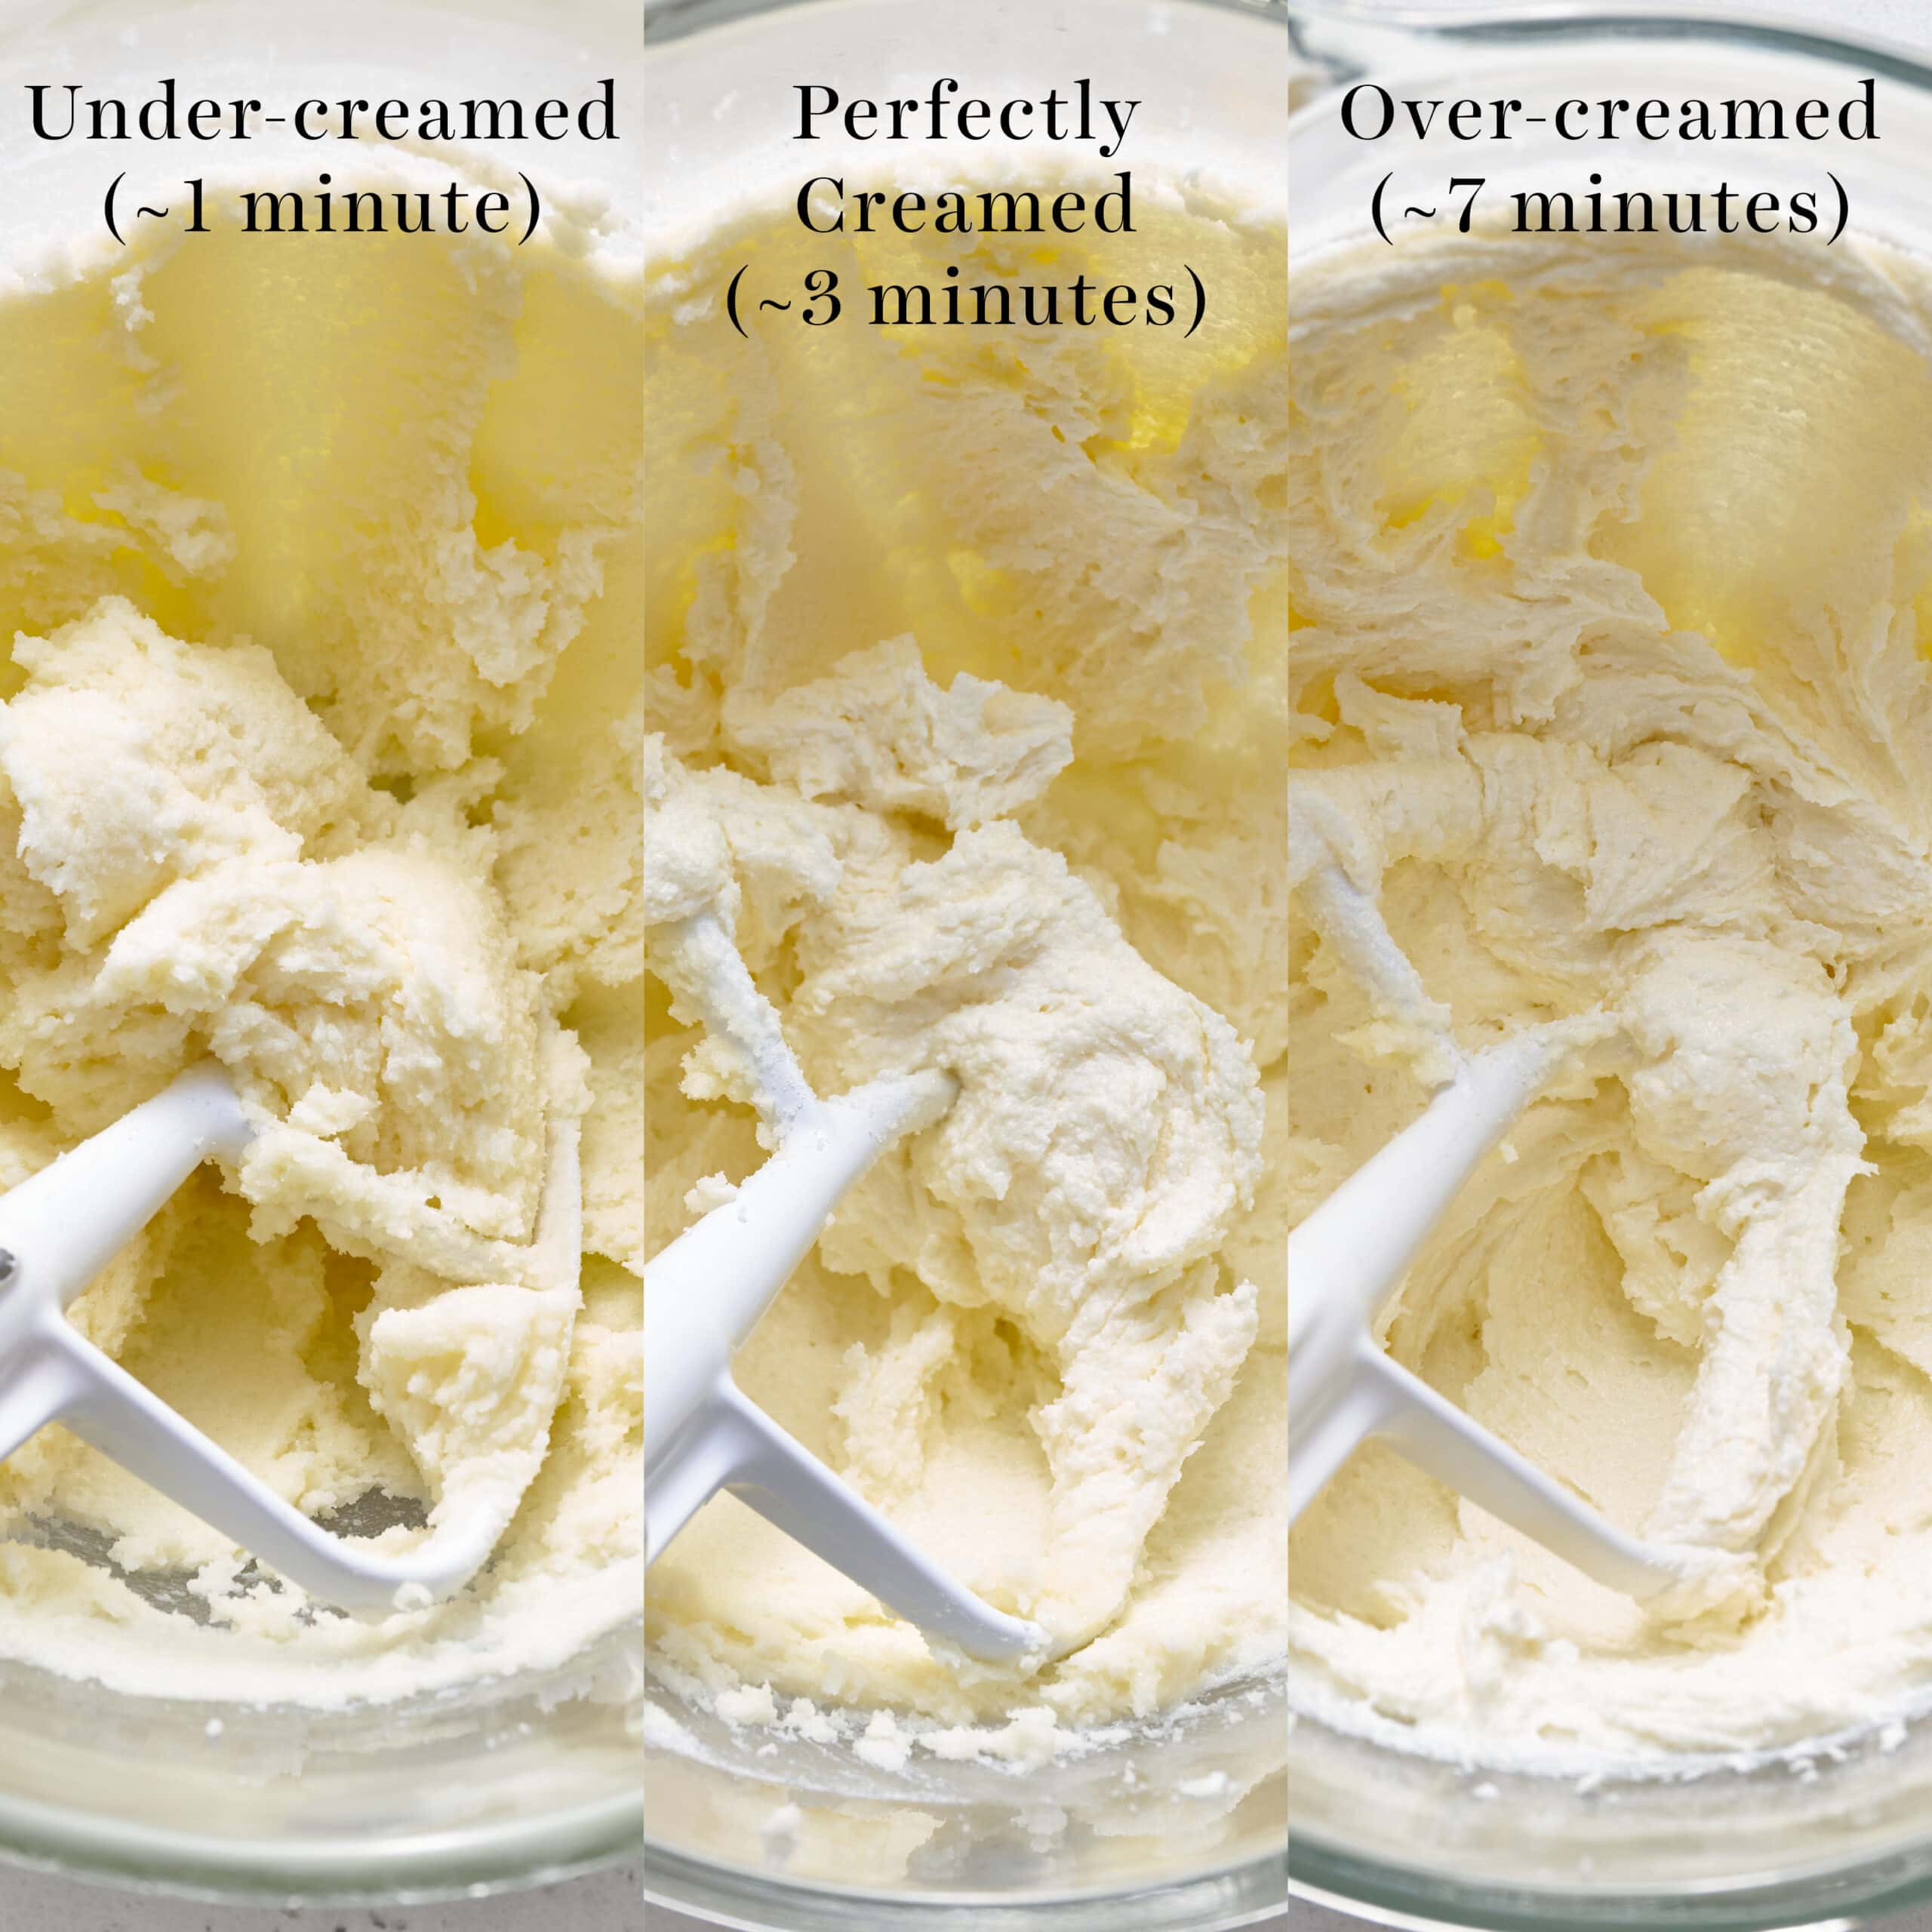
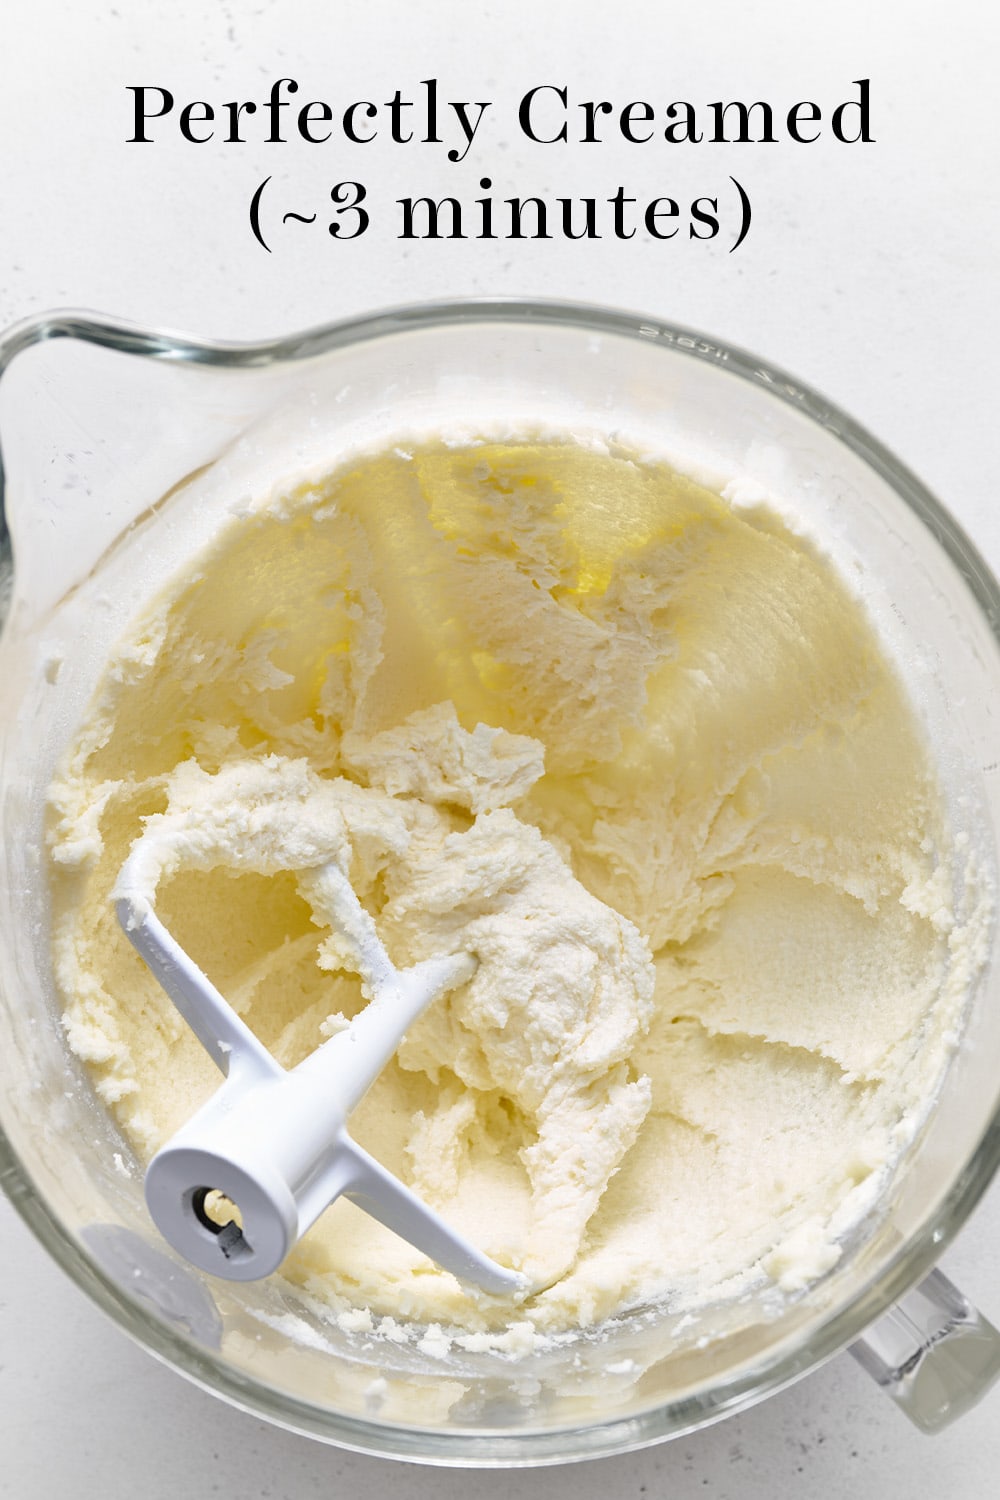
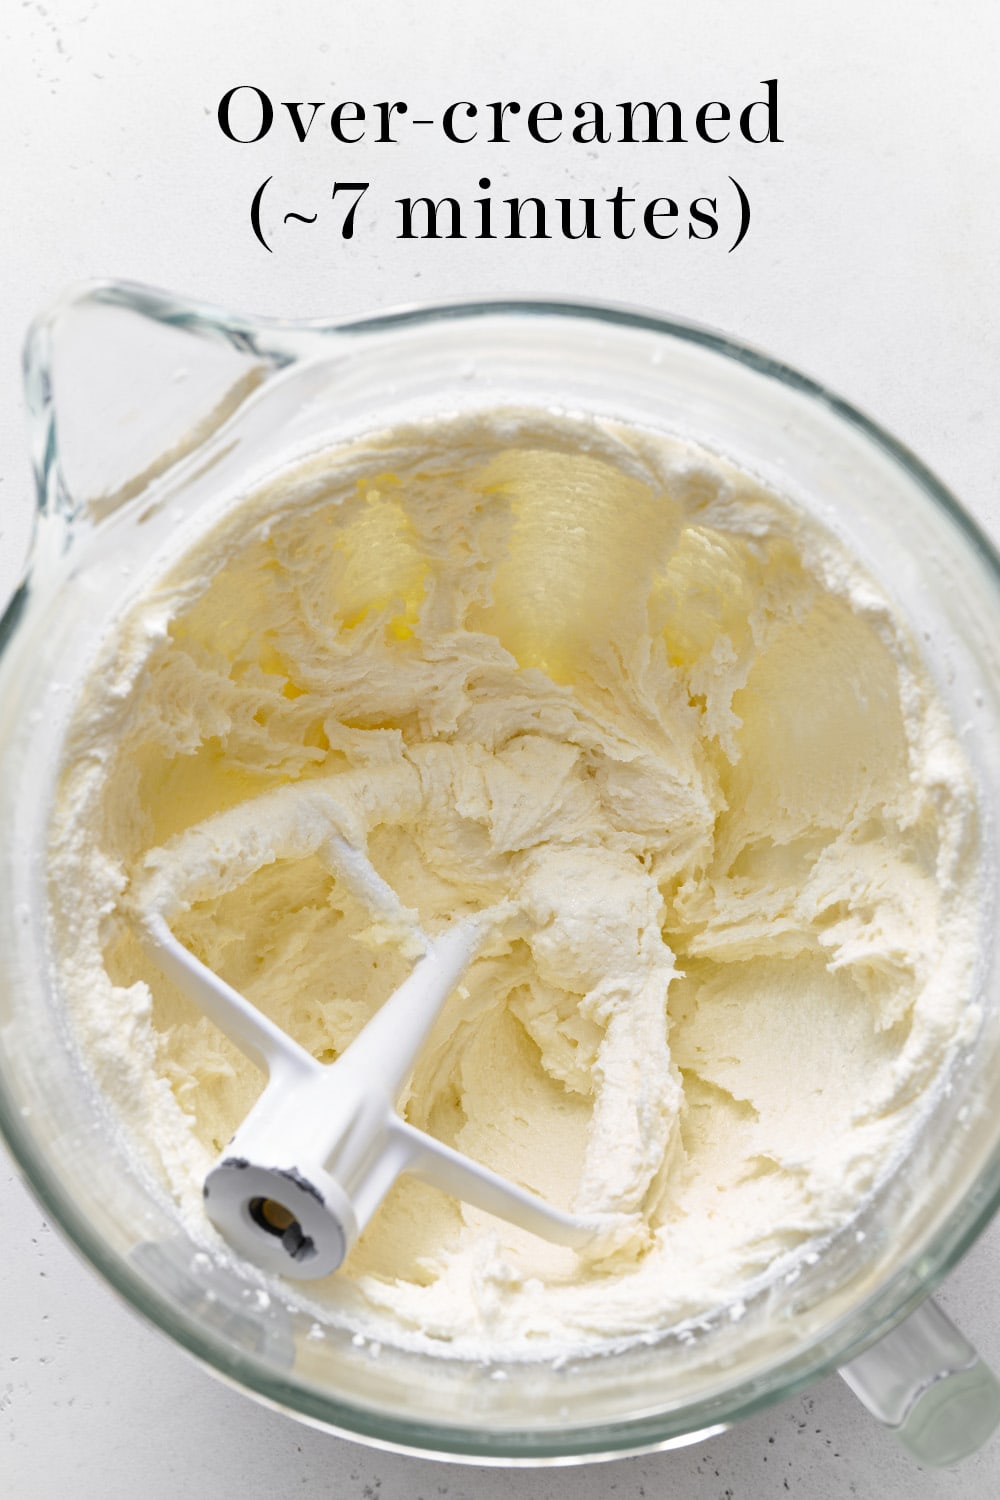
The under-creamed butter and sugar was beaten for just a minute, while the over-creamed butter was beaten for 7 minutes. The perfectly-creamed butter was beaten for 3 minutes. However, don’t take these times to be prescriptions… as you’ll read below, the amount of time it takes to perfectly cream butter in your kitchen will differ.
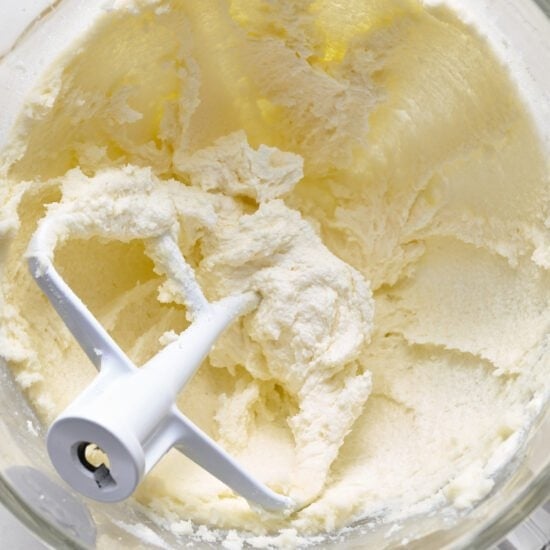
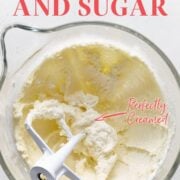
- Perfectly-creamed butter and sugar has lightened in color, and has peaks and valleys in its texture, giving it that ‘fluffy’ appearance. The sugar appears to be dissolved, but when you rub the mixture between your fingers you’ll still feel the sugar granules.
- Under-creamed butter and sugar looks darker in color, with a visible heavy and gritty texture from the unincorporated sugar. It doesn’t allow enough air to become incorporated into your batter or dough. This can lead to a heavy cake that doesn’t properly rise or dense cookies. In our cupcake experiment, under-creaming led to cupcakes that were shorter with a less even crumb. This is a much more common creaming method mistake, so watch out for it.
- Over-creamed butter and sugar adds in too much air and alters the final texture – typically to be more gummy and dense. Sometimes over-creaming can produce cakes, cupcakes, or cookies that collapse upon baking or while cooling if the mixture is well and truly over-creamed (where it looks like curdled milk). Other times, you’ll simply get larger holes and tunneling in the texture of your cakes and cupcakes.
When we made the 7-minute over-creamed cupcakes, we actually had measurably more batter than the other two batches. That’s how much extra air it incorporated! The resulting cupcakes were tall and delicate in texture – too delicate for my preferences.

How to Cream Butter and Sugar
Step 1: Prepare Your Ingredients & Tools
Unsalted Butter at a COOL Room Temperature
- The temperature of your butter is one of the most important factors in properly creaming butter and sugar.
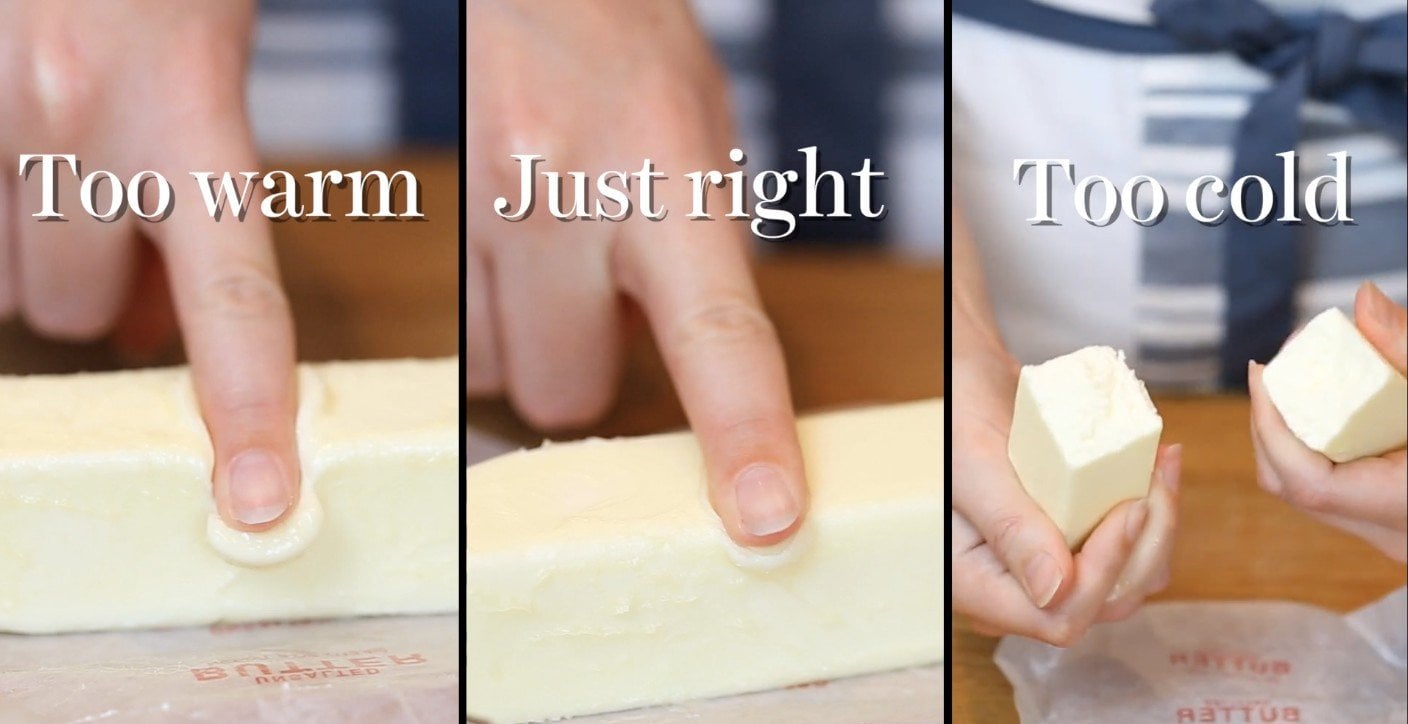
- It must be at a COOL room temperature, about 67°F.
- If your butter is visibly greasy and your finger sinks into the stick when pressed, it’s far too warm. That warmth will prevent the butter from holding onto air bubbles as it creams. In fact, butter itself is an emulsion of fat and water. If at any point it becomes too warm, that emulsion breaks and will not return, leading to problems like sunken cakes or flat puddle cookies.
- Instead, butter at the proper temperature should give just slightly when pressed with a finger and not appear greasy at all.
- It also shouldn’t be so cold that it’s brittle.
The exact right temperature of butter in your kitchen will depend on a few factors:
- The brand and style of butter
European-style butter such as Kerrygold is more pliable than American-style butter. Even different brands of butter can come to temperature at different speeds, depending on something as specific as what kind of feed the dairy cows were given (Google “buttergate 2020” if curious).
- The temperature of your kitchen
This is heavily impacted by the weather and climate outside. Even if the AC is running, if it’s a hot day outside, everything will be warmer to the touch. Same if it’s a cold day outside but the heater or fireplace is on.
- The power of your mixer
Different brands and models of electric mixers have varying wattages. More powerful mixers will create more heat through the friction of beating which will heat up the butter more quickly.
For me living in Arizona, in the summer I start with butter at 60°F. In the winter, I usually start with butter around 65°F. And yes… I go so far as to measure with a digital thermometer when I’m not sure. Do that enough times and you’ll get a feel for what butter should look and feel like at the right starting temperature.
Sugar
Nothing special here, regular granulated sugar or brown sugar work best for creaming. Their granule size is perfect for drilling those tiny air pockets into the butter as described above. This is also why swapping in a liquid sugar like honey or maple syrup, soft powdered sugar, or even a ‘raw’ sugar product (they aren’t actually raw FYI) which has a larger granule size can have unintended consequences to the final texture.
Stand Mixer
I use my KitchenAid stand mixer fitted with the paddle attachment when creaming butter and sugar.
- Don’t use the whisk attachment; the butter will get stuck in the tines and we’re not trying to create whipped butter with so much air that your final cake, cupcake, or cookie product collapses while baking.
- I also prefer to use the standard paddle attachment that came with my mixer, not one that has a band of silicone added to ‘scrape’ the sides of the bowl.
- I’ve tested the self-scraping version side-by-side with my standard paddle and find the standard performs better. More on scraping below.
It’s important to note that even mixers of the same brand and similar models can have very different speeds at the same level.
- For example, my 10-year-old KitchenAid mixer goes much slower at levels one through three respectively than HTH team member Haley’s 2-year-old KitchenAid mixer at those same exact speeds.
- In fact, one of our HTH community members, David, counted the revolutions per minute of his old vs. new mixer and found them to be wildly different from one another.
- For this reason, I don’t give specific speed levels when writing recipe instructions.
- Instead, I’ll instruct a general speed such as ‘medium high’ that you’ll need to match with your own mixer.
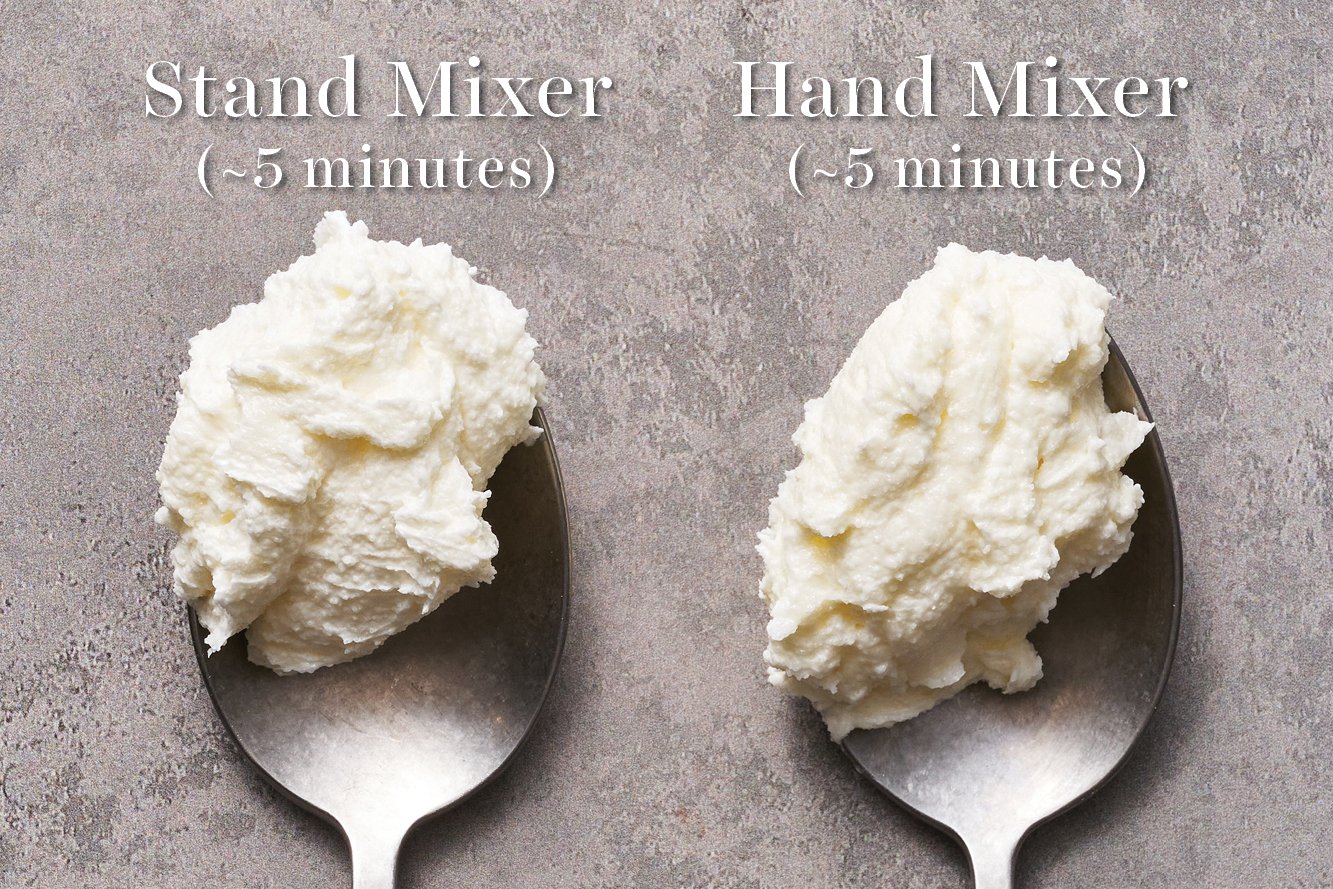
Should You Cream Butter with a Stand Mixer or Hand Mixer?
A stand mixer truly is the best bet for perfectly-creamed butter and sugar. If you need to use a hand-held electric mixer instead, be sure your large mixing bowl is the right size and shape so that the butter and sugar are actually being creamed, not just flung out to the sides of the bowl. Also, be sure to stop and scrape down the sides and bottom of the bowl frequently.
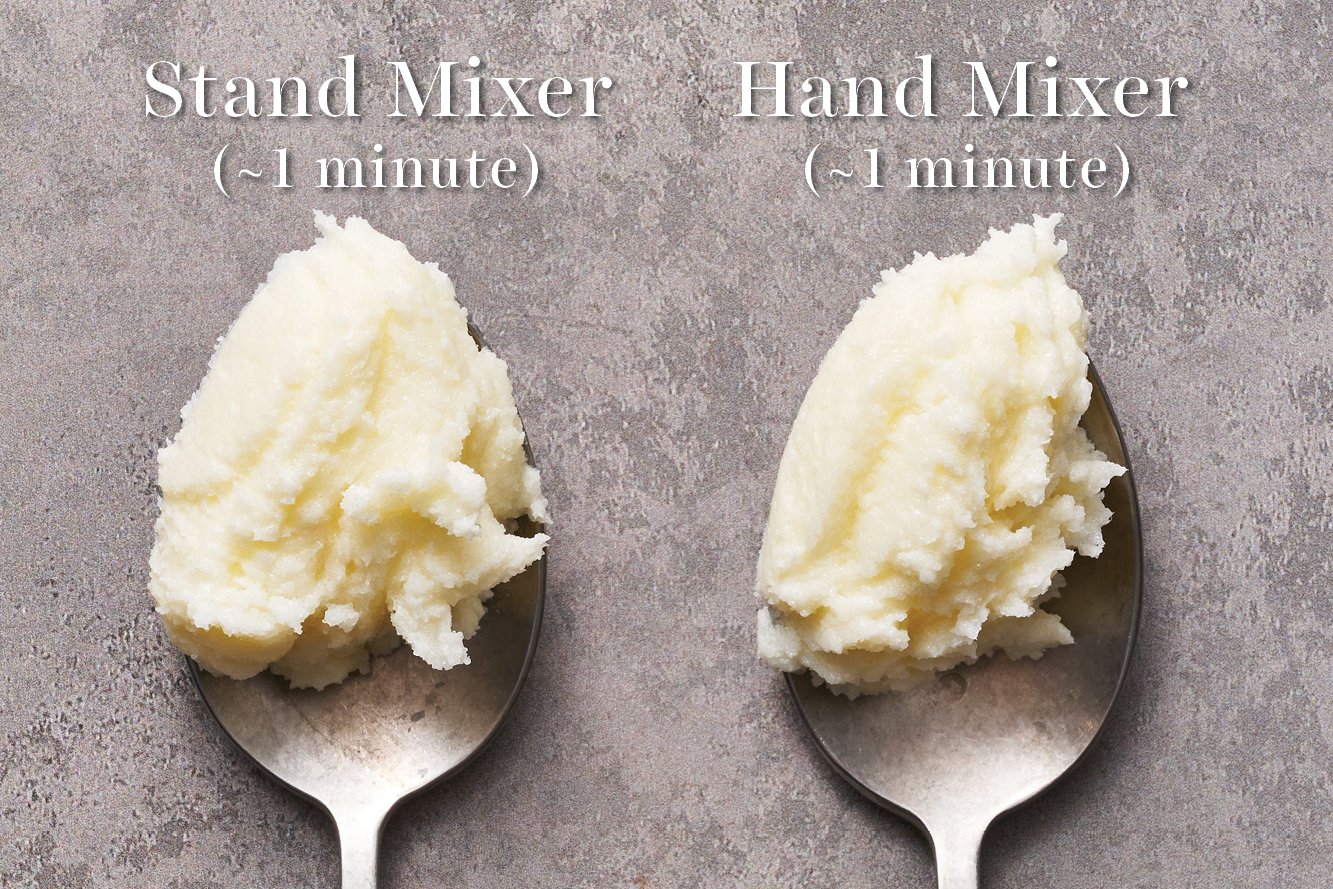
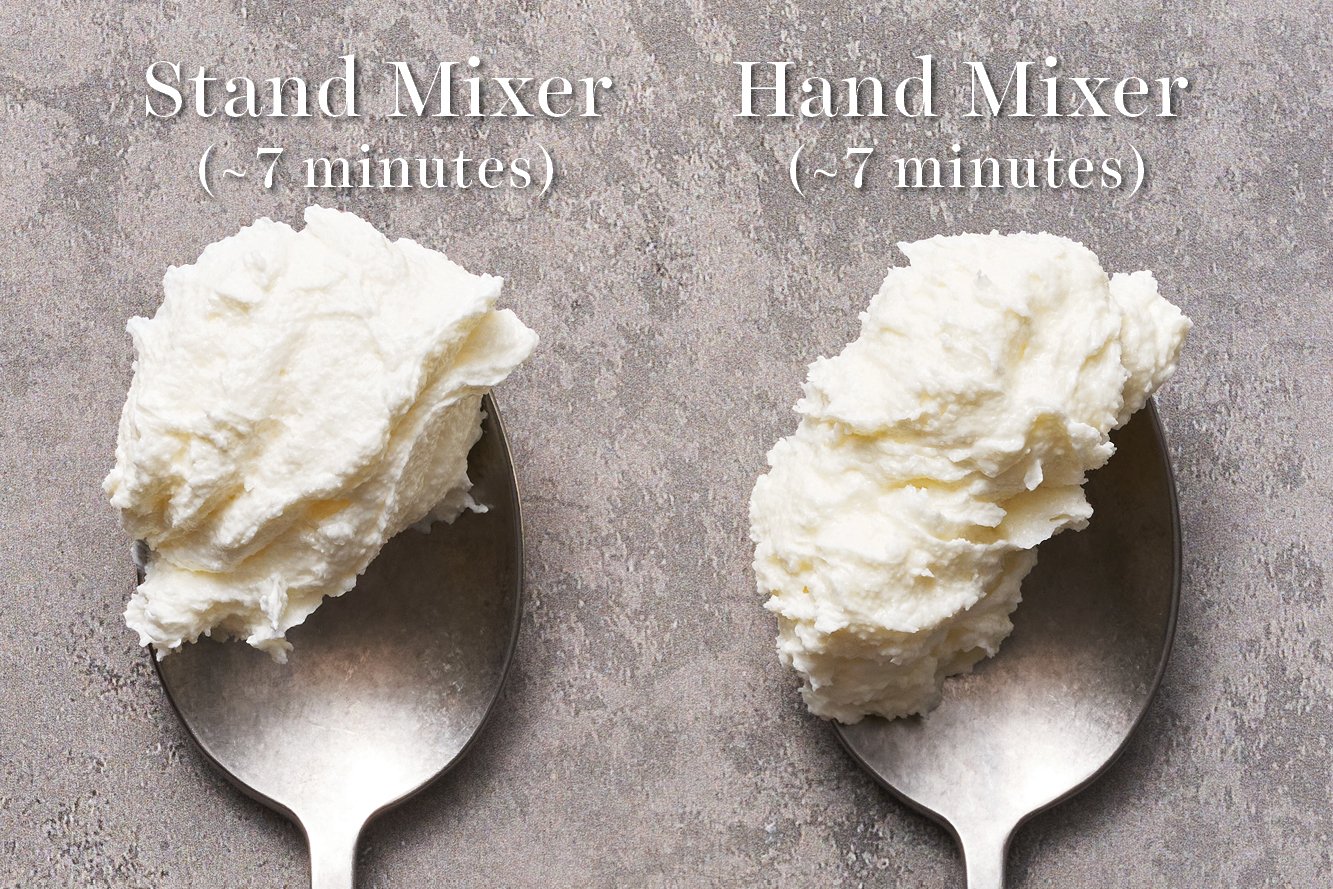
I tested creaming 1/2 cup unsalted butter and 1/2 cup granulated sugar in both a stand mixer and a hand-held mixer, to spot any visual differences at intervals of 1, 3, 5, and 7 minutes. The good news is that both mixing techniques seemed to work sufficiently for such a small amount of butter at all intervals. The hand-held mixer creamed the butter and sugar just as well as the stand mixer. However, I would not suggest creaming a large amount of butter and sugar in a hand mixer; the best results for a larger amount of butter would definitely be in a stand mixer.
Take a look at how the results of creaming butter with a stand mixer vs. hand mixer were nearly identical at each time interval:

Can I Cream Butter and Sugar by Hand Without an Electric Mixer?
Unfortunately, this isn’t a technique I would recommend. Most people aren’t strong enough to incorporate enough air consistently into their butter when beating by hand. The result is often an uneven mixture that’s generally under-creamed.
Step 2: Cream the Butter and Sugar
There are so many factors that influence the speed at which your butter and sugar will become properly creamed. Temperature, mixer power, paddle size and shape, the amount of butter you’re creaming, etc. For this reason, I will usually give a range of time for mixing, as well as a visual indication of what to look for. You can see that reflected in the photos in this post!
- Generally, two to three minutes at whatever your mixer’s version of medium-high speed is perfect in my kitchen for cookies. Cookies don’t need as much creaming because they have less structure than cakes and can hold onto less air.
- Three to five minutes at medium-high tends to work best for cakes and cupcakes. Pay more attention to how the butter and sugar look than blindly following an amount of time.
- Also, be careful not to turn your mixer speed up to the highest setting. The air bubbles need to be gradually developed into the mixture so medium-high speed is your best bet.
Visual Indicators of Creaming Stages:
- Under-creamed butter will look darker in color and grittier in texture than perfectly-creamed butter.
- Perfectly-creamed butter will lighten in color (like a pale yellow), the sugar granules will look to be ‘dissolved,’ and the entire mixture will have grown slightly in volume, giving it those fluffy peaks and valleys.
- Over-creamed butter will look like whipped butter. Unfortunately, if you realize you’ve over-creamed butter (which can happen all too easily if you’re distracted while your mixer is on… Instagram I’m looking at you!), that mixture cannot be corrected. It shouldn’t be used in your recipe. Instead, add some salt and save as a whipped butter spread, to spread on bread. Or, add some powdered sugar, honey, and cinnamon to it for a delicious honey butter (that full recipe can be found in this recipe post here).
Step 3: Scrape Down the Bowl
Handle the Heat bakers know the critical importance of scraping down your attachment, the sides of your mixing bowl, and the bottom of your mixing bowl at least once when creaming (and at least once more after adding the eggs). This ensures a consistently-beaten mixture.
What happens when you don’t scrape down your mixing bowl with a rubber spatula when beating butter and sugar?
- You end up with unincorporated clumps of butter that can often ‘explode’ when they hit the heat of the oven.
- If you’ve ever baked a batch of cupcakes where 10 of them look fine but one or two look like they burst open… that was probably from an unincorporated piece of butter.
- The same can happen to cookies.
Step 4: Proceed with the Recipe
Typically, the next steps will be to add the eggs, vanilla, and then the dry ingredients. Some more complex cake recipes will have you separate eggs or add the ingredients in alternatingly. Whatever the next steps are, all other ingredients will incorporate a lot better if your butter is properly creamed!

Tessa’s Tip: If you’re worried your butter has warmed up a little too much, especially for basic cookie dough recipes, use eggs that are at a cooler temperature. This goes against most advice that calls for room-temperature eggs, but the temperature of your butter is more important. You’ll just need to beat the cooler eggs in a little longer to properly emulsify.
More Science of Baking Articles to Check Out:
- Salted Vs Unsalted Butter
- Why I Hate Baking Substitutions
- How to Prevent Cakes and Loaves from Sinking
- Everything You Need to Know About Sugar in Baking
Recipes You’ll Love:
- Bakery Style Chocolate Chip Cookies
- Yellow Cupcakes
- Brown Butter Brownies
- Soft and Chewy Sugar Cookies
Sources:
- On Baking: A Textbook of Baking & Pastry Fundamentals
- How Baking Works (third edition)
- Cooks Illustrated: The Science of Good Cooking
- On Food and Cooking: The Science and Lore of the Kitchen
- I’m Just Here for More Food
Photos by Joanie Simon | The Bite Shot

Author: Tessa Arias
I share trusted baking recipes your friends will LOVE alongside insights into the science of sweets. I'm a professionally trained chef, cookbook author, and cookie queen. I love to write about all things sweet, carb-y, and homemade. I live in Phoenix, Arizona (hence the blog name!)
About Tessa...
I share trusted baking recipes your friends will LOVE alongside insights into the science of sweets. I'm a professionally trained chef, cookbook author, and cookie queen. I love to write about all things sweet, carb-y, and homemade. I live in Phoenix, Arizona (hence the blog name!)
Leave a Comment & Rating
Add a Review or Question
© Handle the Heat - handletheheat.com

As a trained chef and cookbook author, I share trusted baking recipes your friends & family will love alongside insights into the science of sweets. I help take the luck out of baking so you *always* have delicious results! Learn more here.

-
6 Crowd-Pleasing Thanksgiving Recipes


Order your Ultimate Cookie Handbook Hardcopy!

Join the Handle the Heat Community

Instead of digging through cookbooks and magazines and searching the internet for amazing recipes, subscribe to Handle the Heat to receive new recipe posts delivered straight to your email inbox. You’ll get all the latest recipes, videos, kitchen tips and tricks AND my *free* Cookie Customization Guide (because I am the Cookie Queen)!
Thank you for this article. I have had trouble with baking cookies the last few years and didn’t know why. I believe the temp of the butter has been the culprit. I made your lemon cookies yesterday and they turned out great.
I do have a question about flour. If the conversion of cups to grams for the flour differs from the conversion on my bag of flour, should I go by the cups measurement or the grams. My flour is 120 grams per cup.
Thanks.
Hi Kaye! So glad you found Tessa’s article helpful! I’m glad to hear that your lemon cookies turn out well! The measurement Tessa uses for weighing flour actually evolved over time. It is basically a combination of:
– The weight of a cup of flour using the ‘spoon & level method’ averaged out,
– What Tessa learned in culinary school,
– Alongside the averages of 1 cup from some of Tessa’s go-to resources like Cooks Illustrated (although she found Cooks Illustrated to be too heavy – I believe their 1 cup of flour is 141 grams),
– Factored with the weight of 1 cup of Gold Medal flour vs. King Arthur Baking by their nutrition labels. Tessa’s favorite brand of flour is Gold Medal Bleached Flour and this is what she uses to create and test recipes.
Of course, feel free to experiment and add a few additional grams of flour to determine whether or not you prefer those results, but I hope that gives you some context as to how Tessa landed on this particular gram measurement! Happy baking 🙂
Hey Tessa,
Thank you for covering this topic! It’s always been a tricky thing. I’ve been baking cakes for a little over 2 years. One thing I have found… (and so I’m curious to hear your thoughts on it) is that when I have a cake recipe that actually incorporates a combination of butter AND some vegetable oil, I tend to get a better texture more consistently and relatively quicker. (almost as if the addition of the oil acts as an insurance for the texture to get to the correct state as well as almost always producing an incredibly moist cake.) I’m curious to hear your thoughts on this.
Thanks!
-Matt
Hi Matt! Yes, adding oil can be a great way to ensure cakes and some other bakes (like brownies) are extra moist, as Tessa explains more in this article here. I hope this helps! Happy baking 🙂
Amazing!
Fantastic article! Thanks!
Thanks Suzanne!
If I want to cream browned butter (after I let it cool to ~65F and added back water tht evaporated), do you find that it creams much faster than regular room temp butter? I found that I added it to a recipe the other day and it seemed to turn into “whipped butter” very fast!! 🙁
Hi Jess! Creaming browned butter isn’t something we have experimented with much, but the little we have, it seems to whip up extremely quickly! I’d recommend cutting the time wayyyy down, and just going on how it looks (as Tessa outlines in this article), so you can experiment without wasting butter! Let us know what you find out as you experiment – I’m sure it will be delicious!!
You say flat puddle cookies like it’s a bad thing. That’s exactly how I like my chocolate chip cookies.
Hi Kathy! Everyone’s preferences are different, especially when it comes to cookies! In this article, Tessa is teaching people how to prevent flat cookies if their preference is thicker cookies! 🙂
Love this series so much. Thanks for taking the time to explain all this stuff, It has already made a WORLD of difference in my recipes.
So happy to hear that!
I’m so eager to try this! One quick question, read through this a few times but maybe its the lack of coffee, at what point do I add the sugar? You mentioned it being overcreamed at it could be use for bread, and to add sugar or salt. So I’m guessing that sugar wouldn’t be added at that point. So sorry if I missed that and thank you for this lovely tip, again can’t wait to try it!!!
Hi Amanda! Step 2 includes directions on creaming the butter and sugar 🙂 When it’s over creamed (the butter and sugar), you can add some salt to it for whipped butter, or you can add powdered sugar, honey and cinnamon to it to create honey butter, which the honey butter recipe is linked in the article. I hope that helps!
I lots of times use shortening and butter flavored shortening in my recipes. Everything seems to taste good though. Is it a big no no in your kitchen recipes?
Hi Luanne! Tessa actually wrote an article about Shortening vs Butter (click HERE to read) a while back that you might be interested in reading 🙂
Thank you for detailed instructions for creaming butter and sugar. I’ve always blended several minutes longer, but at medium speed. What a difference medium-high makes! My butter is now close to white and the texture is-dare I say- fluffy? My cookies back up in nice mounds, not flat. This visual tutorial came at a good time, too, as I’m baking several dozens of eight of your cookie recipes for Christmas gifts. Merry Christmas!
Yay! So happy to hear that! Glad the visuals helped too 🙂 Merry Christmas!
Thank you so much for this information!!! I’ve been baking for years and recently have had some cookies go flat and dense on me…They were supposed to be light and cake like…I’ve been over creaming my butter!!! And the temperature of the butter was too warm!! I’ve saved this information to reference to …Thank you again so much!!!
Bonnie DeKay
So glad this article helped! Can’t wait for your cookies to turn out perfectly next time 🙂